 Introduction
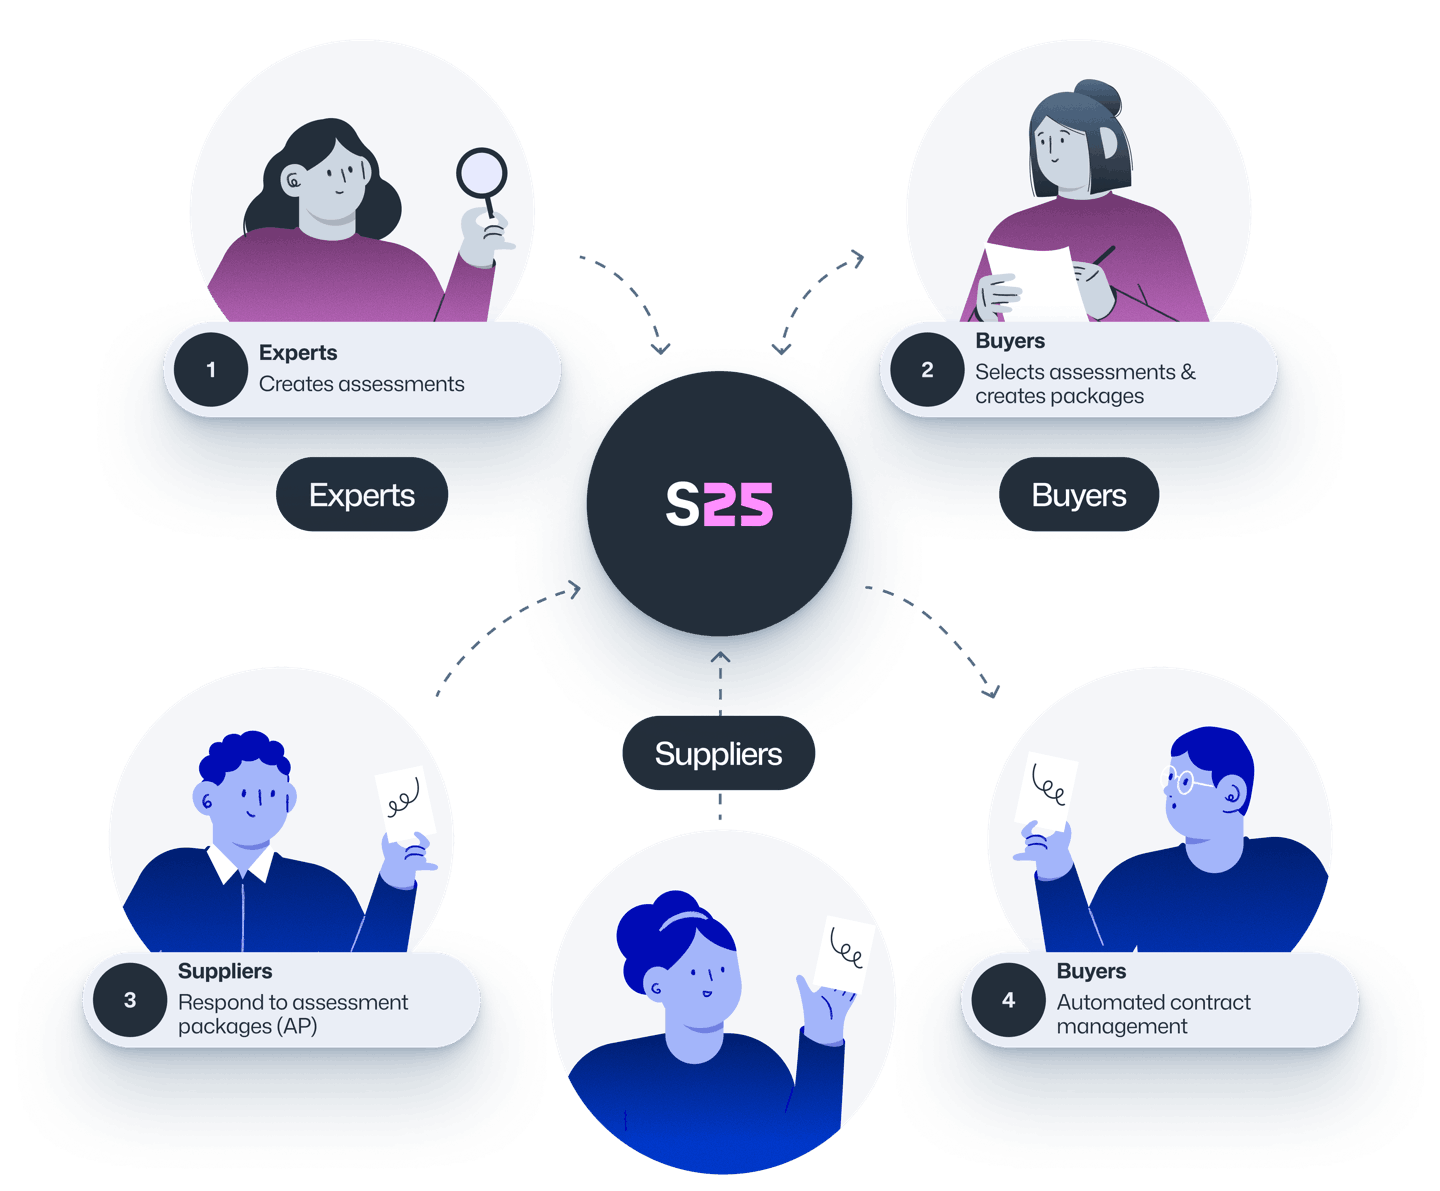
Welcome to Supply25
Supply25 is a platform built to help public sector organisations strengthen supplier assurance, streamline due diligence, and bring consistency to procurement.
It replaces scattered spreadsheets, email chains, and standalone assessments with a single, structured system for managing supplier checks, including areas like Cyber Security, Accessibility, and more. Everything is organised, trackable, and easy to manage, whether you’re running one tender or many.
This guide will help you get started, explain key features, and show you how to use Supply25 throughout the procurement process, from creating an Assessment Package to reviewing submissions and involving your team.
Let’s get started.
What is Supply25?
A brief history of Supply25
Supply25 was created in response to CivTech Challenge 9.5, a challenge set by the Scottish Government through the CivTech programme, which aims to bring innovation into the public sector.
The challenge asked:
“How can we use technology to create the most efficient supply chain for public sector procurements?”
Supply25 was selected as the winning solution. It brings together the expertise of domain specialists, including Cyber Security and Accessibility professionals, to give public sector buyers a more consistent, structured way to assess suppliers and ensure they meet high standards.
Why it matters
Procurement teams face increasing pressure to manage risk, meet regulatory expectations, and improve assurance. Supply25 was built to respond to these pressures by making supplier assessments clearer, easier to manage, and more repeatable.
At its core, Supply25 is about building resilience and robustness into public sector supply chains, starting in Scotland and expanding across the UK.
Support Information
We’re here to help!
If you have a question, encounter a problem, or need assistance using Supply25, our support team is ready to help.
Here’s how to get in touch:
Email Support
For any issues or detailed questions, email us at support@supply25.com.
FAQ Page
Visit our for answers to common questions.
Feedback & Bug Reporting
If you encounter a bug or unexpected behaviour, let us know via the feedback form. Please include a clear description and any relevant screenshots to help us resolve it quickly.
Your feedback helps us improve the platform. Thank you for taking the time to share it.
What happens if the Supply25 system goes down?
In the unlikely event of a service disruption, you’ll receive a notification by email as soon as possible. We actively monitor system performance and will work to restore normal service promptly.
While the platform is offline, you can continue your procurement process by switching to an offline approach. We recommend:
- Informing bidding suppliers via the Public Contracts Scotland message board or email that assessments will temporarily be completed offline.
- Follow your organisation’s offline plan for continuing assessments, such as using internal spreadsheets or templates to collect supplier responses where appropriate.
- Once the platform is restored, you can continue your procurement process on Supply25. If needed, key assessment decisions or outcomes can be manually recorded on the platform to maintain continuity.
Our team will provide guidance throughout and notify you when the system is back online.
Getting Started
Creating an account
If this is your first time using Supply25, you’ll need to create an account. You can do this directly on the application or through an invitation. This manual will guide you through both options.
Start creating your account
You can create an account in two ways:
Via an invitation: Open the invitation email and click Create an account. This will take you to the Supply25 application to start the account setup.

Directly on the application: Go to app.supply25.com. You’ll be redirected to the Supply25 authentication portal to sign up and create your account.
Set up your account
Enter your name and email address. If you received an invitation, make sure to use the same email from the invitation, this ensures your account is linked correctly.
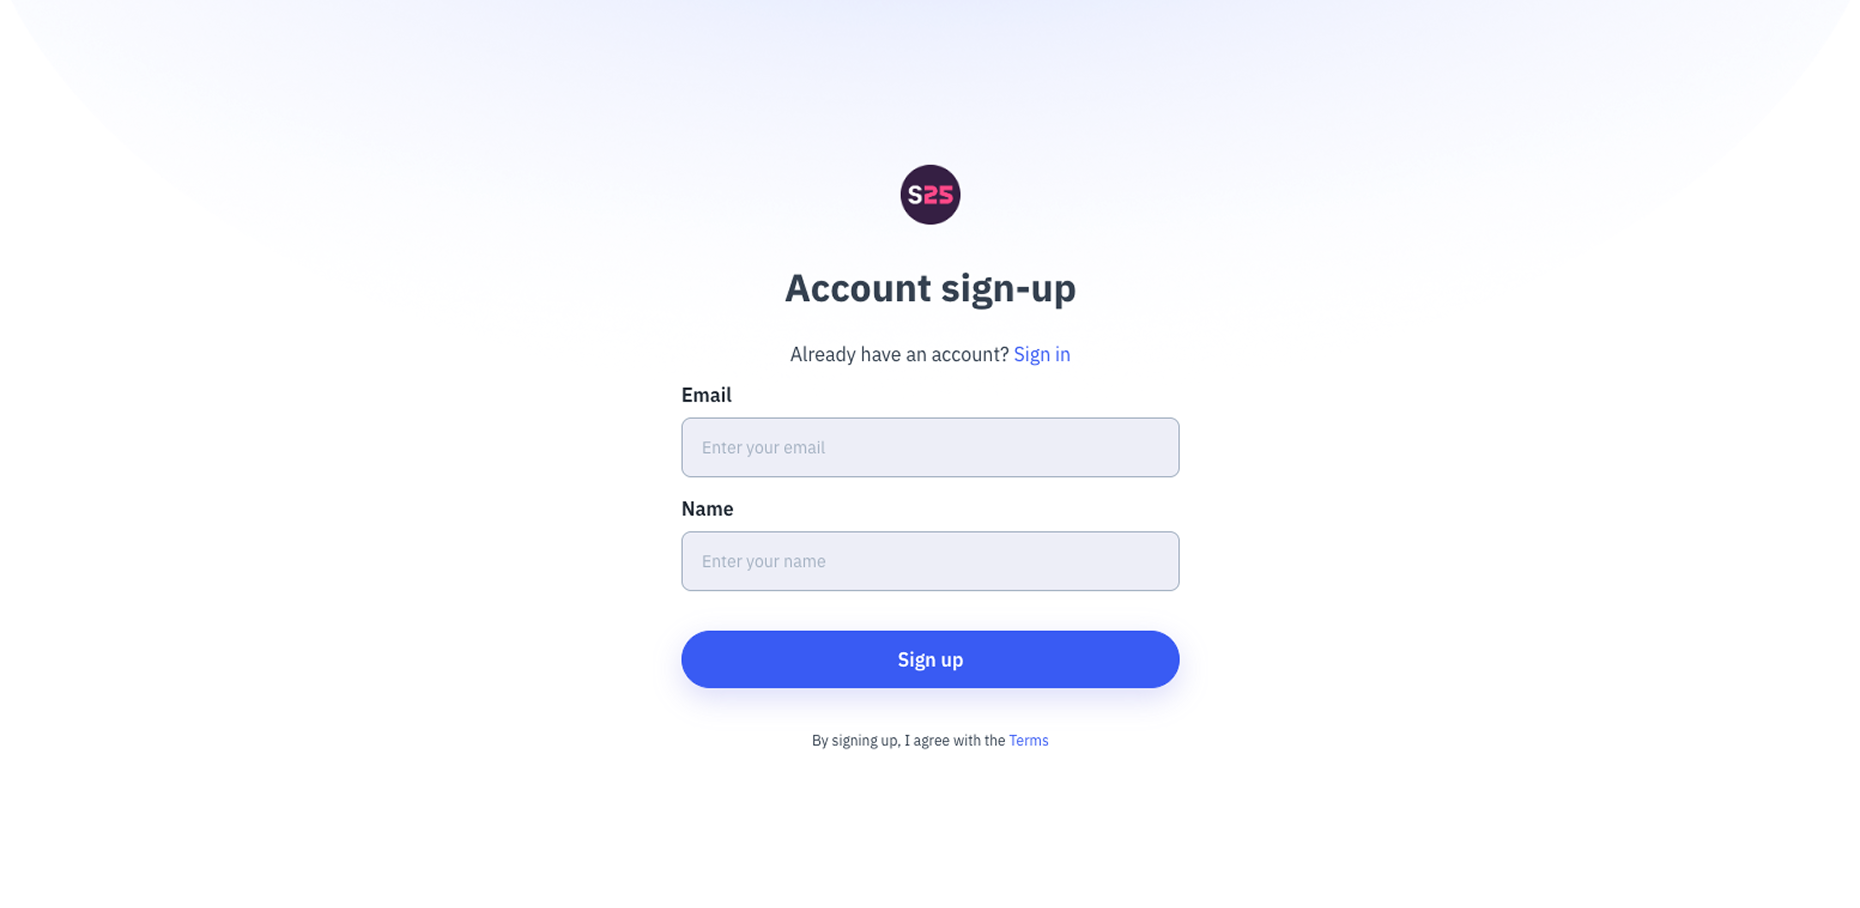
When you’re ready, click Sign up. You’ll then see a confirmation page, and Supply25 will send a verification email to confirm your address. This can take a few minutes, so check both your inbox and spam folder.

Verify your email address
In the verification email, click Activate Your Account. This will take you back to the Supply25 application, where you can create a password and activate your account.

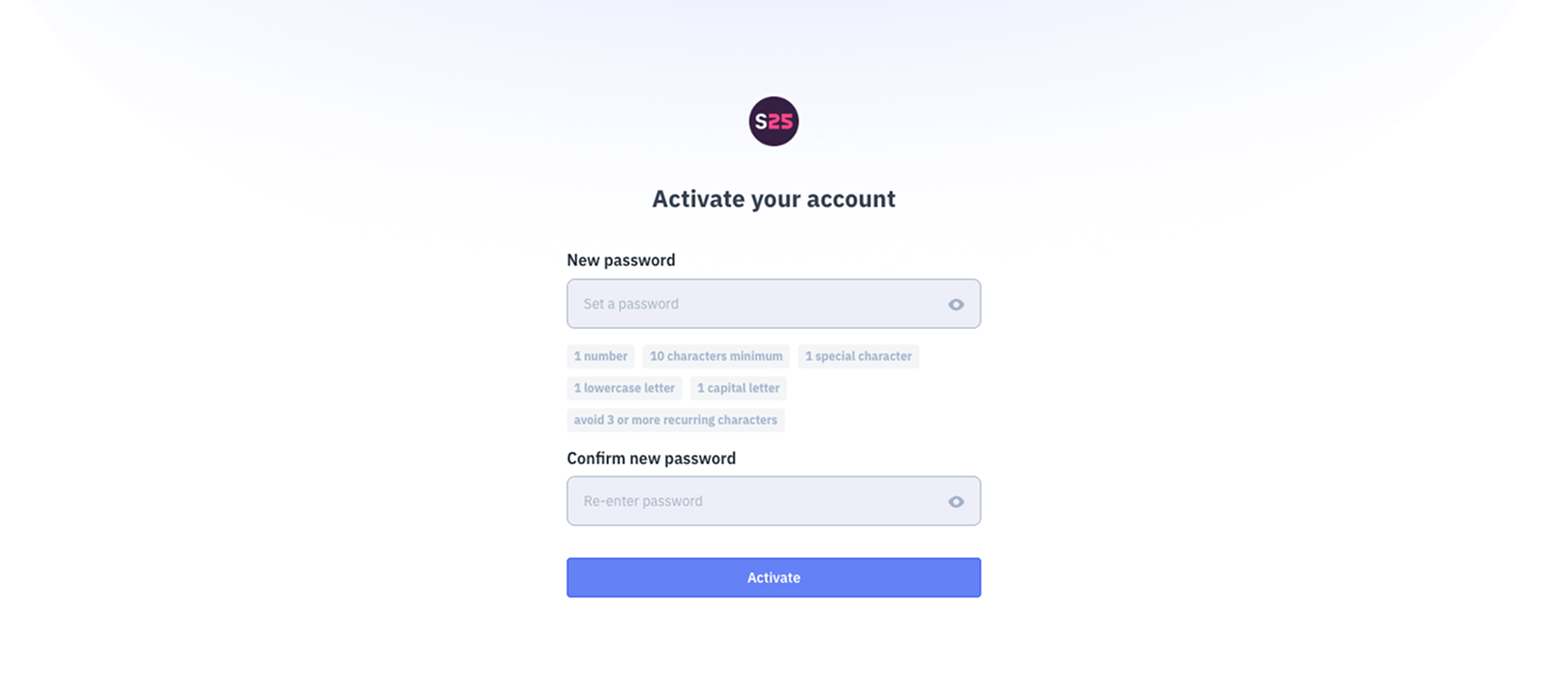
Activate your account
Create a strong password for your account. The password requirements are shown on the screen to guide you. Once entered, retype your password to confirm, then click Activate Your Account.
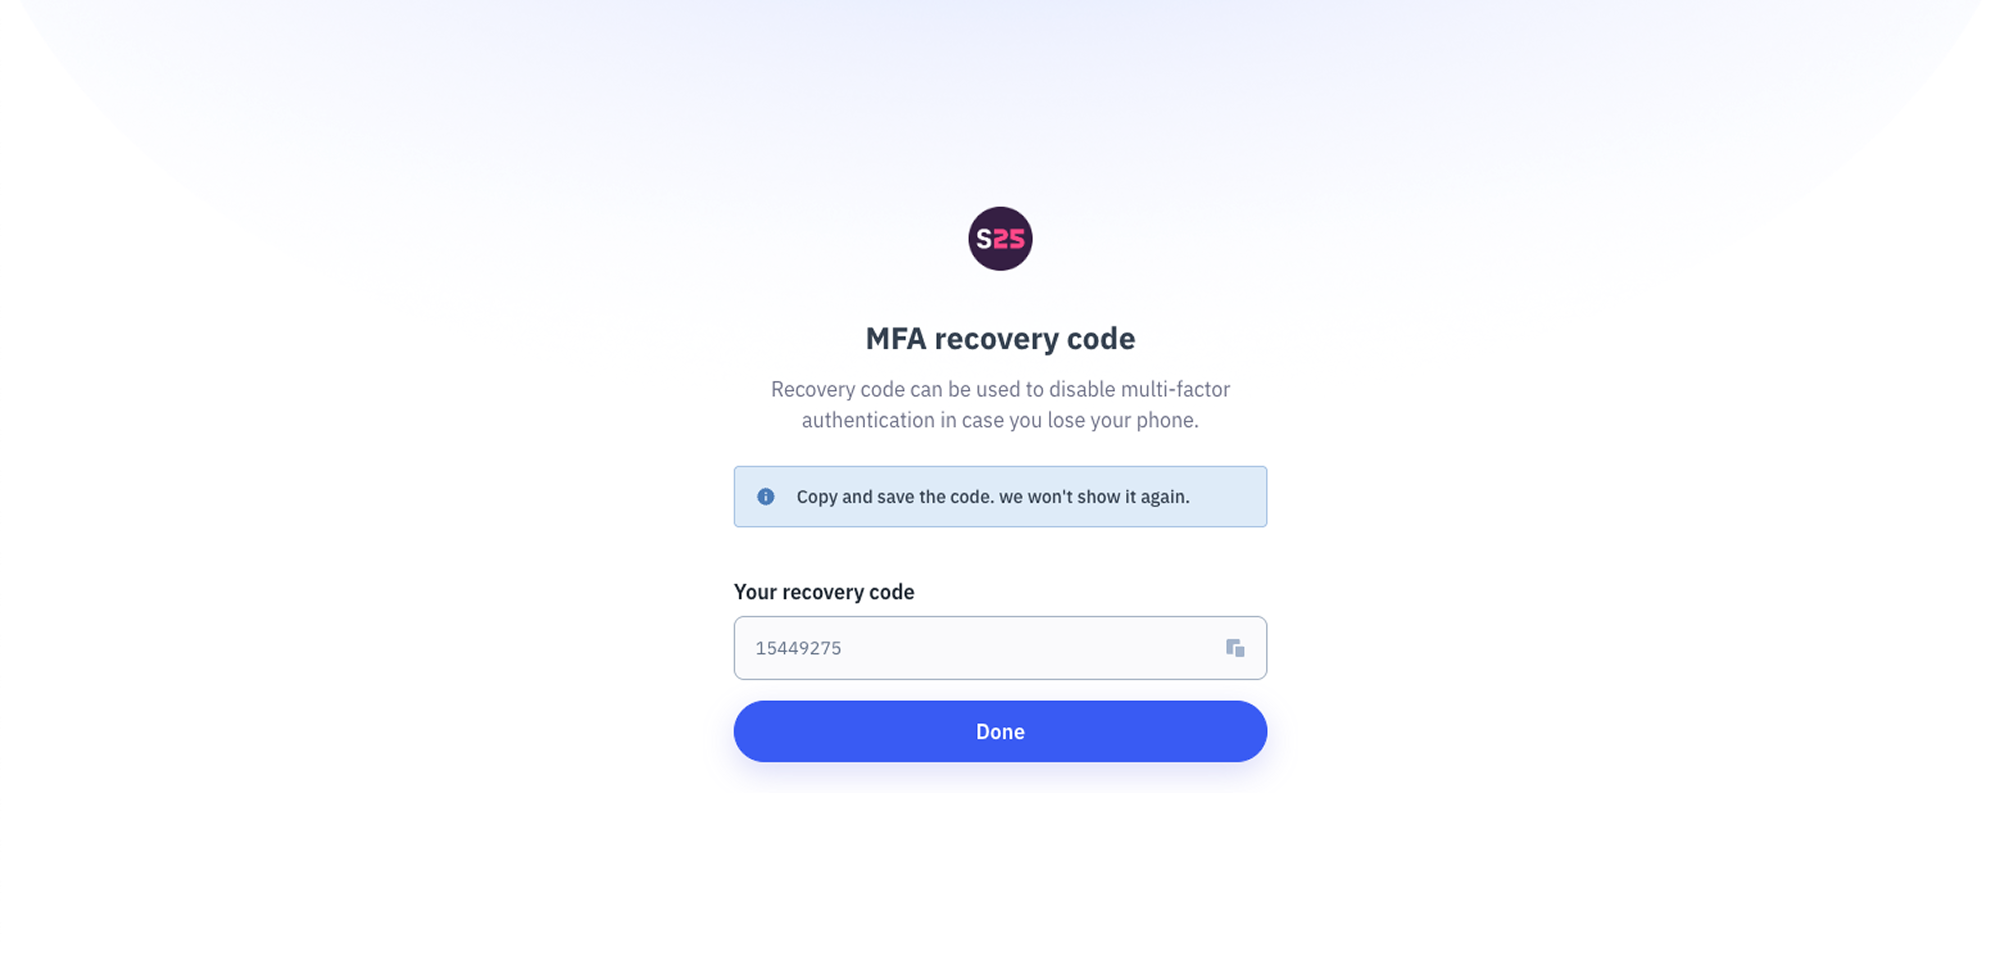
Set up Multi-Factor Authentication (MFA)
Supply25 requires all users to set up MFA for an extra layer of security. You can use any authenticator app on your phone, such as Microsoft Authenticator or Google Authenticator, both available in the app store.
Using your authenticator, scan the QR code shown on the screen and enter the 6-digit code to verify. If you’re on a trusted device, you can check “Don’t ask again on this device for 1 day” to skip MFA prompts temporarily.
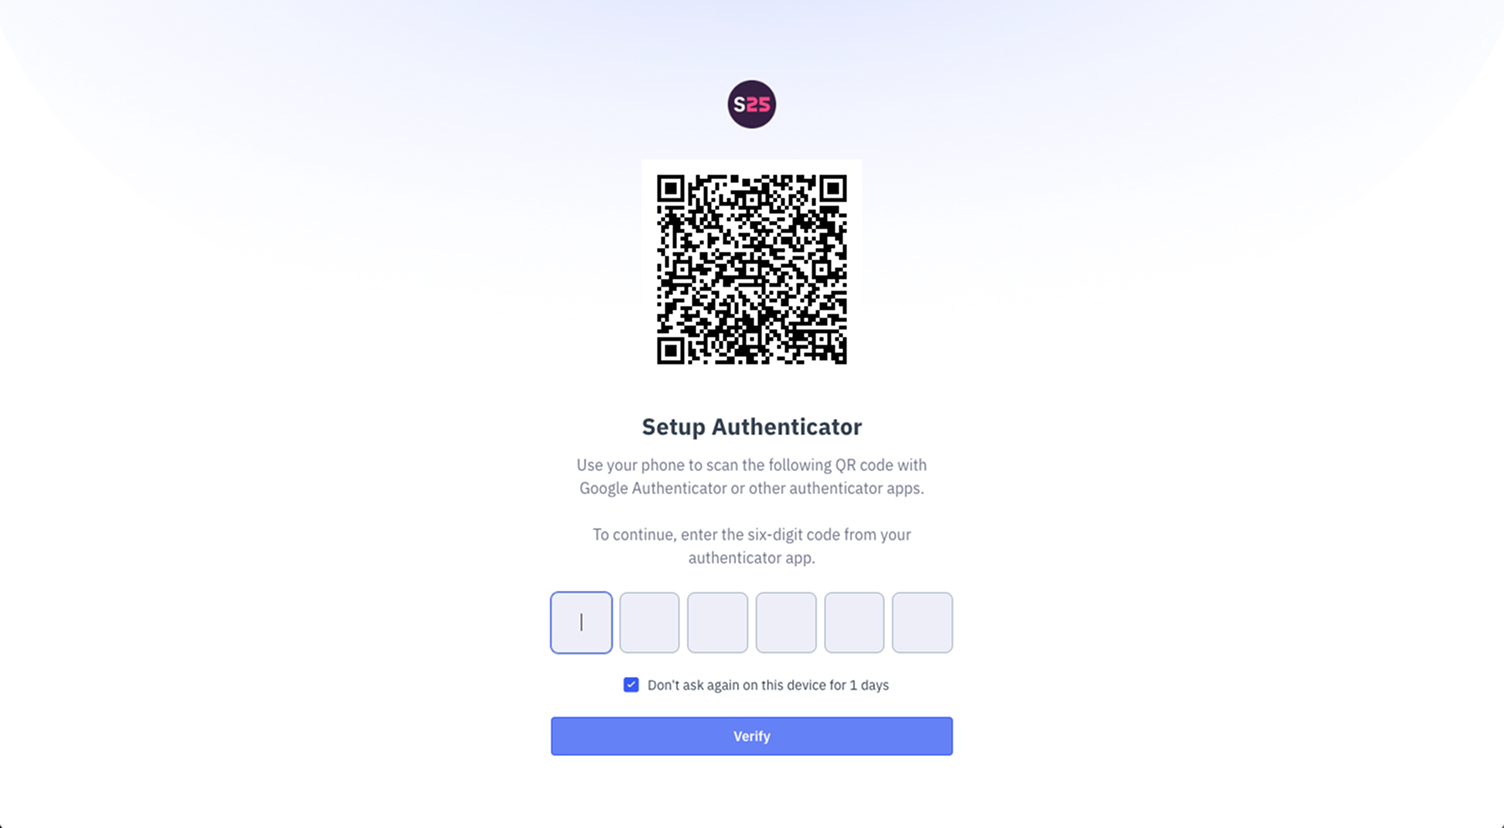
After entering the 6-digit code, you’ll receive a recovery code. Store this code somewhere safe and secure. If you ever lose access to your authenticator app, you can use the recovery code to regain access to your account.
You’ll need to use MFA for all future logins.
You’re all set to go!
Your account is now created and activated. You’ll be automatically directed to the Supply25 application.
- If you signed up via an invitation: You’ll have access to your invited organisation and workspace, where you can start creating assessment packages. See Create an assessment package to learn more.
- If you created an account directly: You’ll first need to create an organisation and workspace before getting started.
If you encounter any issues during the account creation process, contact our support team at support@supply25.com.
Login and access to Supply25
Once your account is set up, follow these steps to access the platform:
Go to the Sign In Page
Open your browser and navigate to app.supply25.com. Then enter your email and password on the Sign in page. Click Sign in.

Enter your MFA code
You’ll be prompted to enter a code from your Multi-Factor Authentication (MFA) app.
- Open your MFA app and get the 6-digit code.
- Enter the code and click Verify.
- You will then be taken to the Supply25 application.

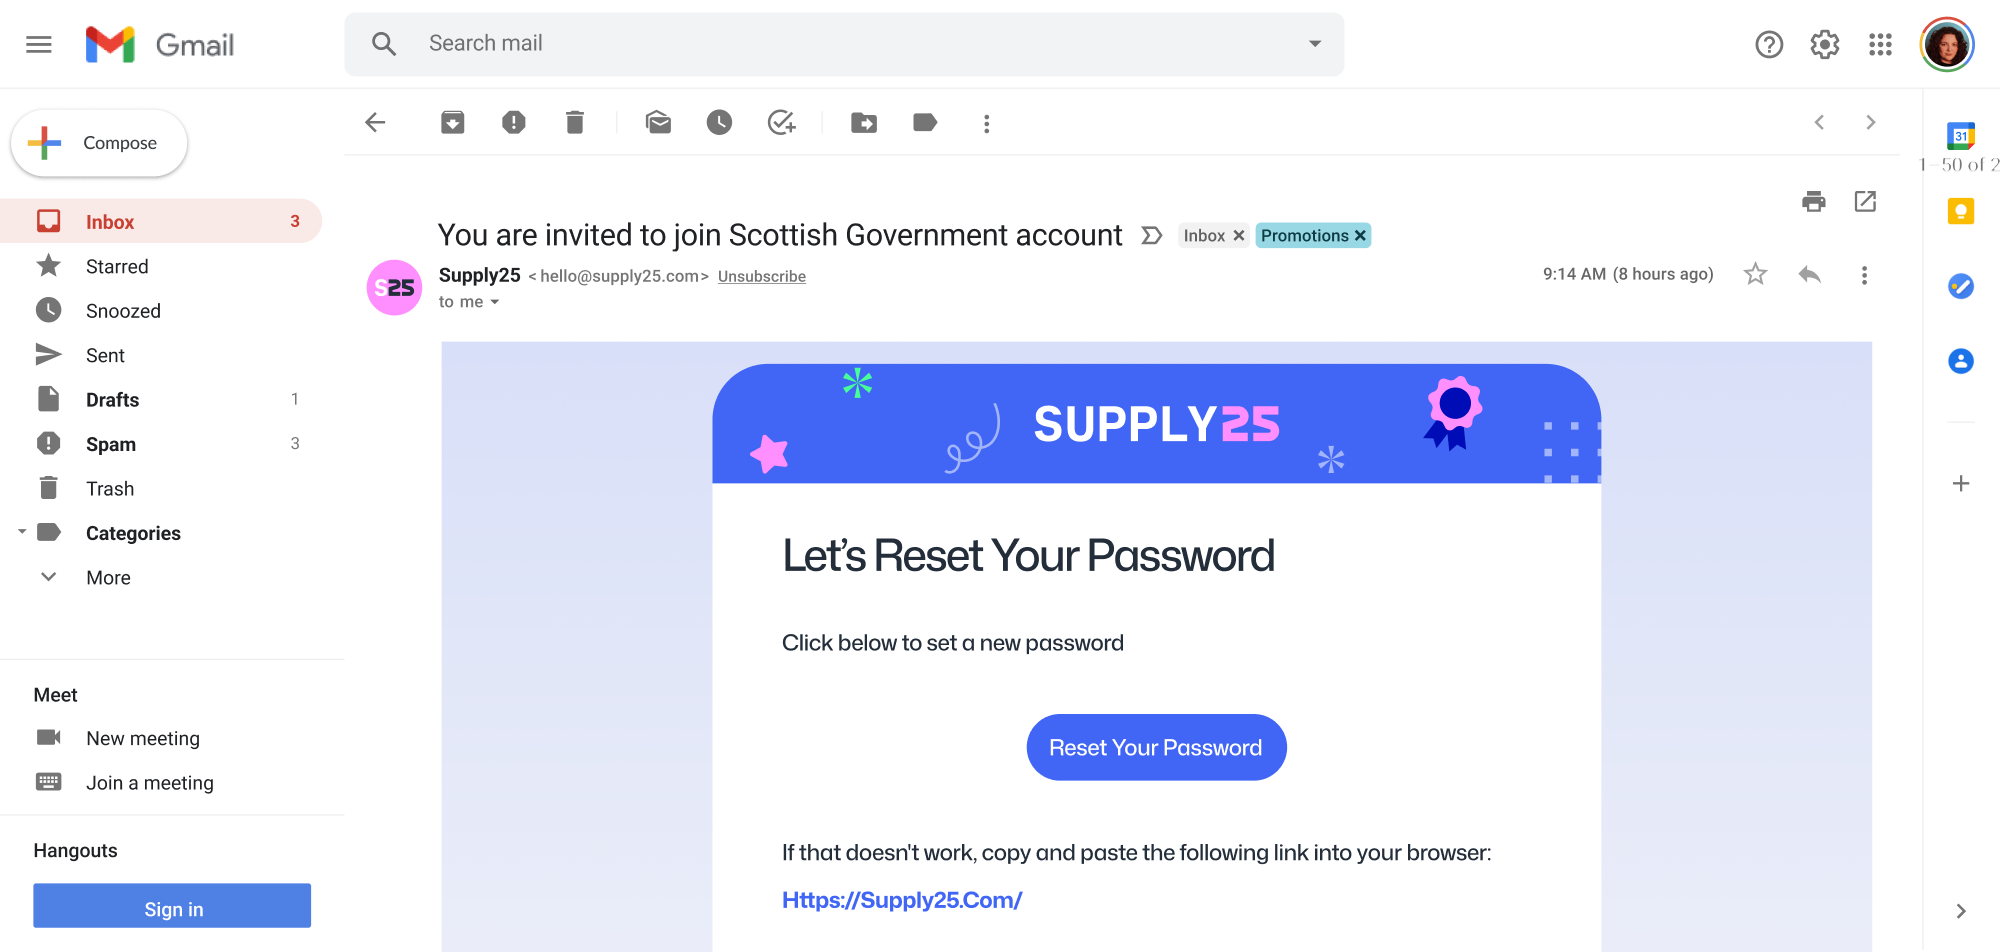
Resetting your password
If you’ve forgotten your password, you can reset it from the Sign In page.
Go to the Sign In Page
- Open your browser and navigate to app.supply25.com.
- Click Forgot password above the password field.

Request a password reset
- Enter your email address and click Remind me.
- You’ll receive an email with a link to reset your password. This can take a few minutes, so check both your inbox and spam folder.

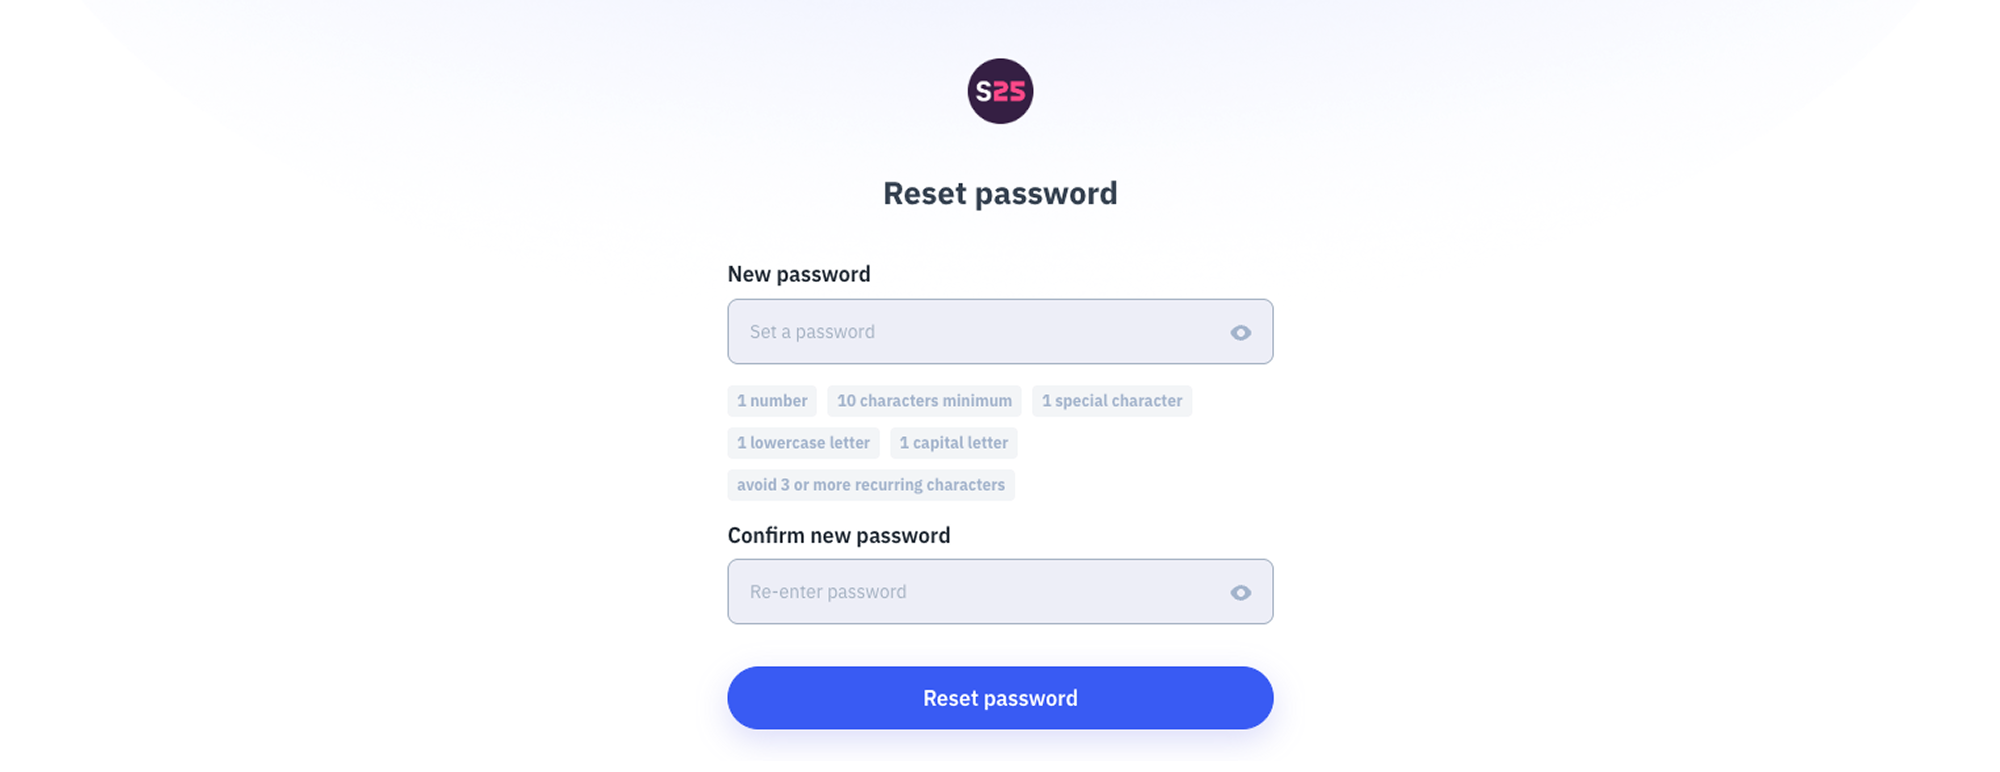
Reset your password
In the email, click Reset Your Password. You’ll be redirected back to the Supply25 app to create a new password.
Enter a new password
Enter a new strong password that meets the requirements shown on the screen. Once ready, click Reset Password. You’ll be redirected to the login page, where you can sign in with your new password.
Organisation & Workspace
After creating your account, the next step is to join your organisation and a workspace.
Organisations and workspaces help you manage and organise your data within the platform. Workspaces allow you to group related information, such as supplier assessments, and control who can access them. This means users will only see the data that’s relevant to them, helping your team stay organised and maintain data privacy.
What is an organisation?
An organisation is the top-level structure that represents your entity or public body on the platform. It is where all your data is managed. This includes your workspaces, users, and any assessments you create or send.
What is a workspace?
A workspace is a subgroup within your organisation that helps you organise and separate data. Any data created in a workspace is only visible to users who are part of that workspace, as well as organisation admins.
Workspaces are typically used to represent departments or divisions within your organisation, but they can also be used for specific projects or teams.
Joining your first organisation
After signing up, you may be given the option to join an organisation on the Supply25 platform.
This option will appear if the email address you used to sign up matches the verified email domain of an existing organisation.
For example, if you sign up with hello@example.com, and an organisation has verified the domain @example.com, that organisation will appear in your list of available options to join.
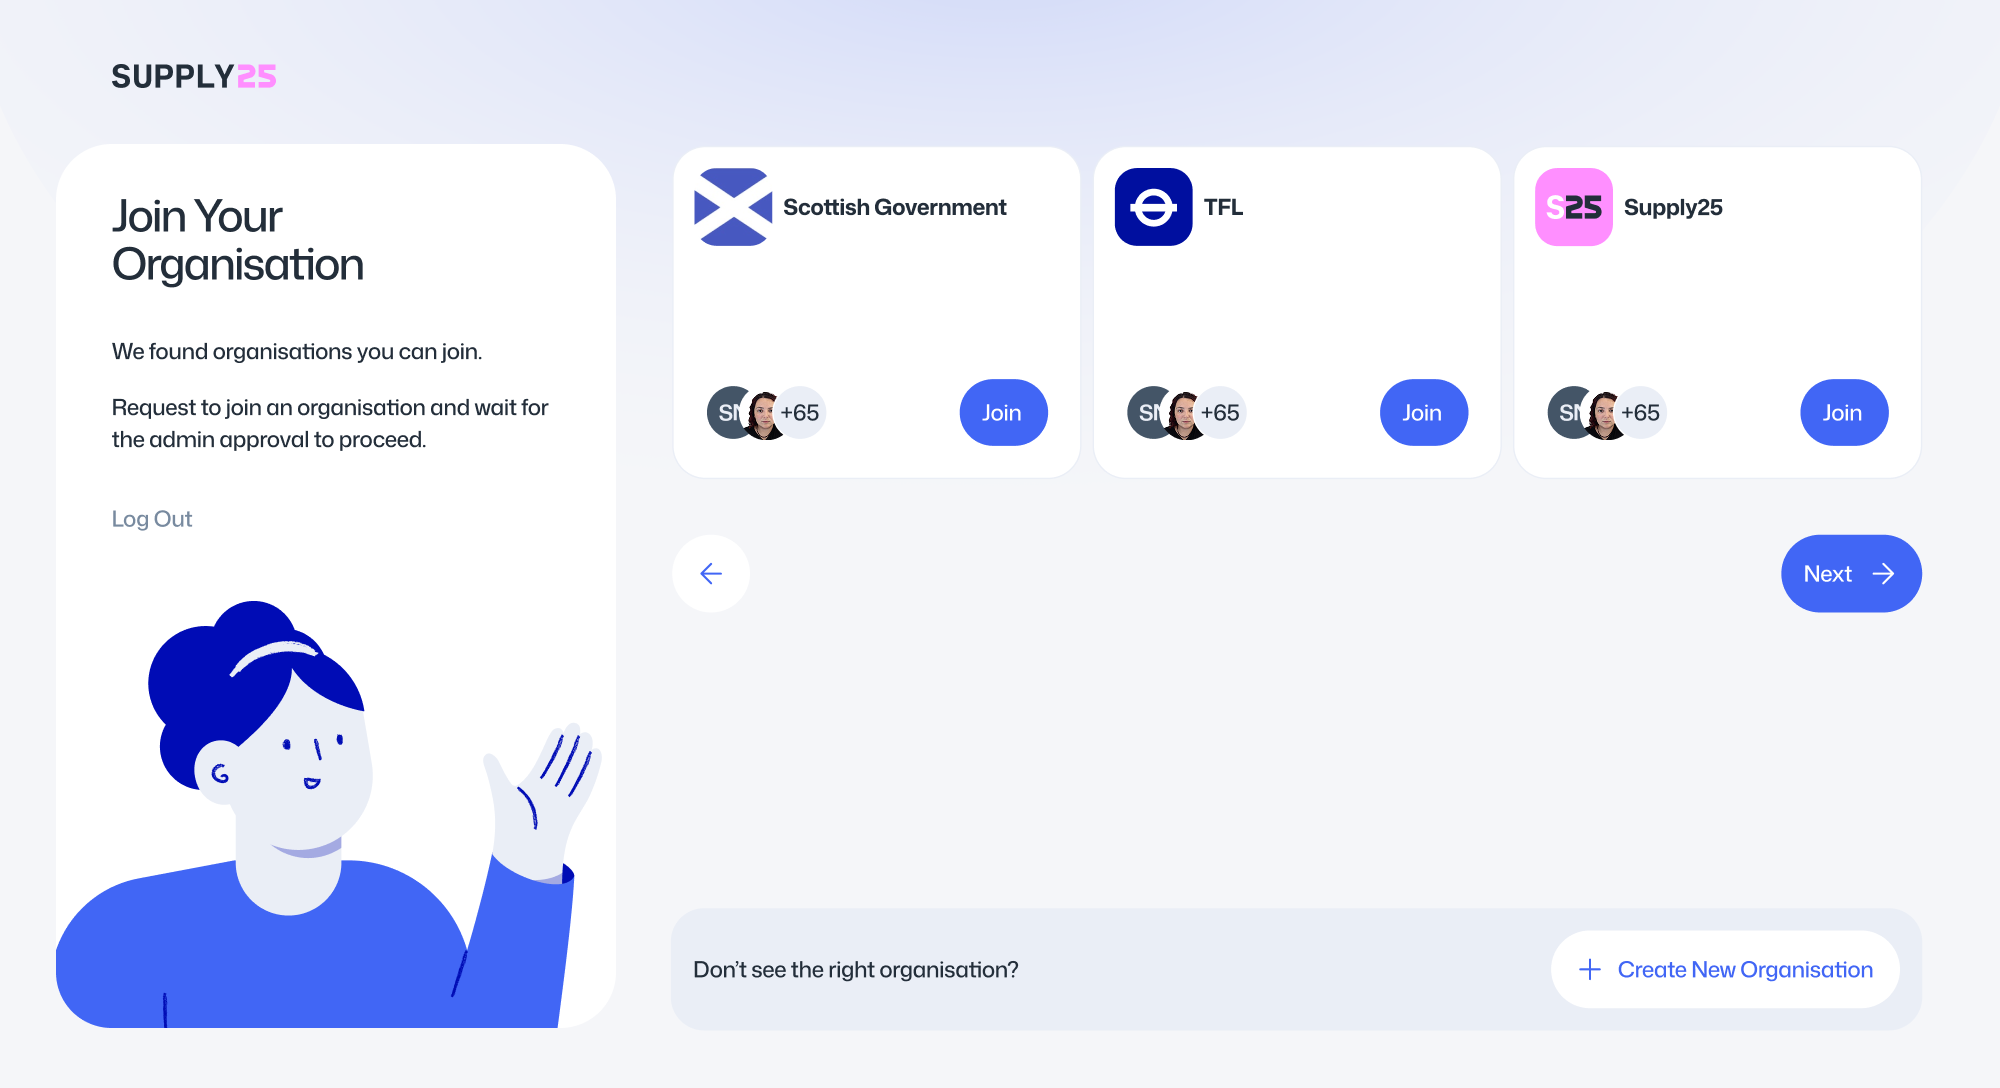
After clicking the Join button for the organisation you want to join, you can click Next to choose which workspaces you'd like to be part of within that organisation.
If none of the listed organisations are the right one for you, you can continue by creating a new organisation instead.
Selecting a workspace
After joining your organisation, the next step is to select a workspace to join within that organisation.
To do this, start by selecting the organisation from the modal. Once selected, you will see a list of available workspaces.
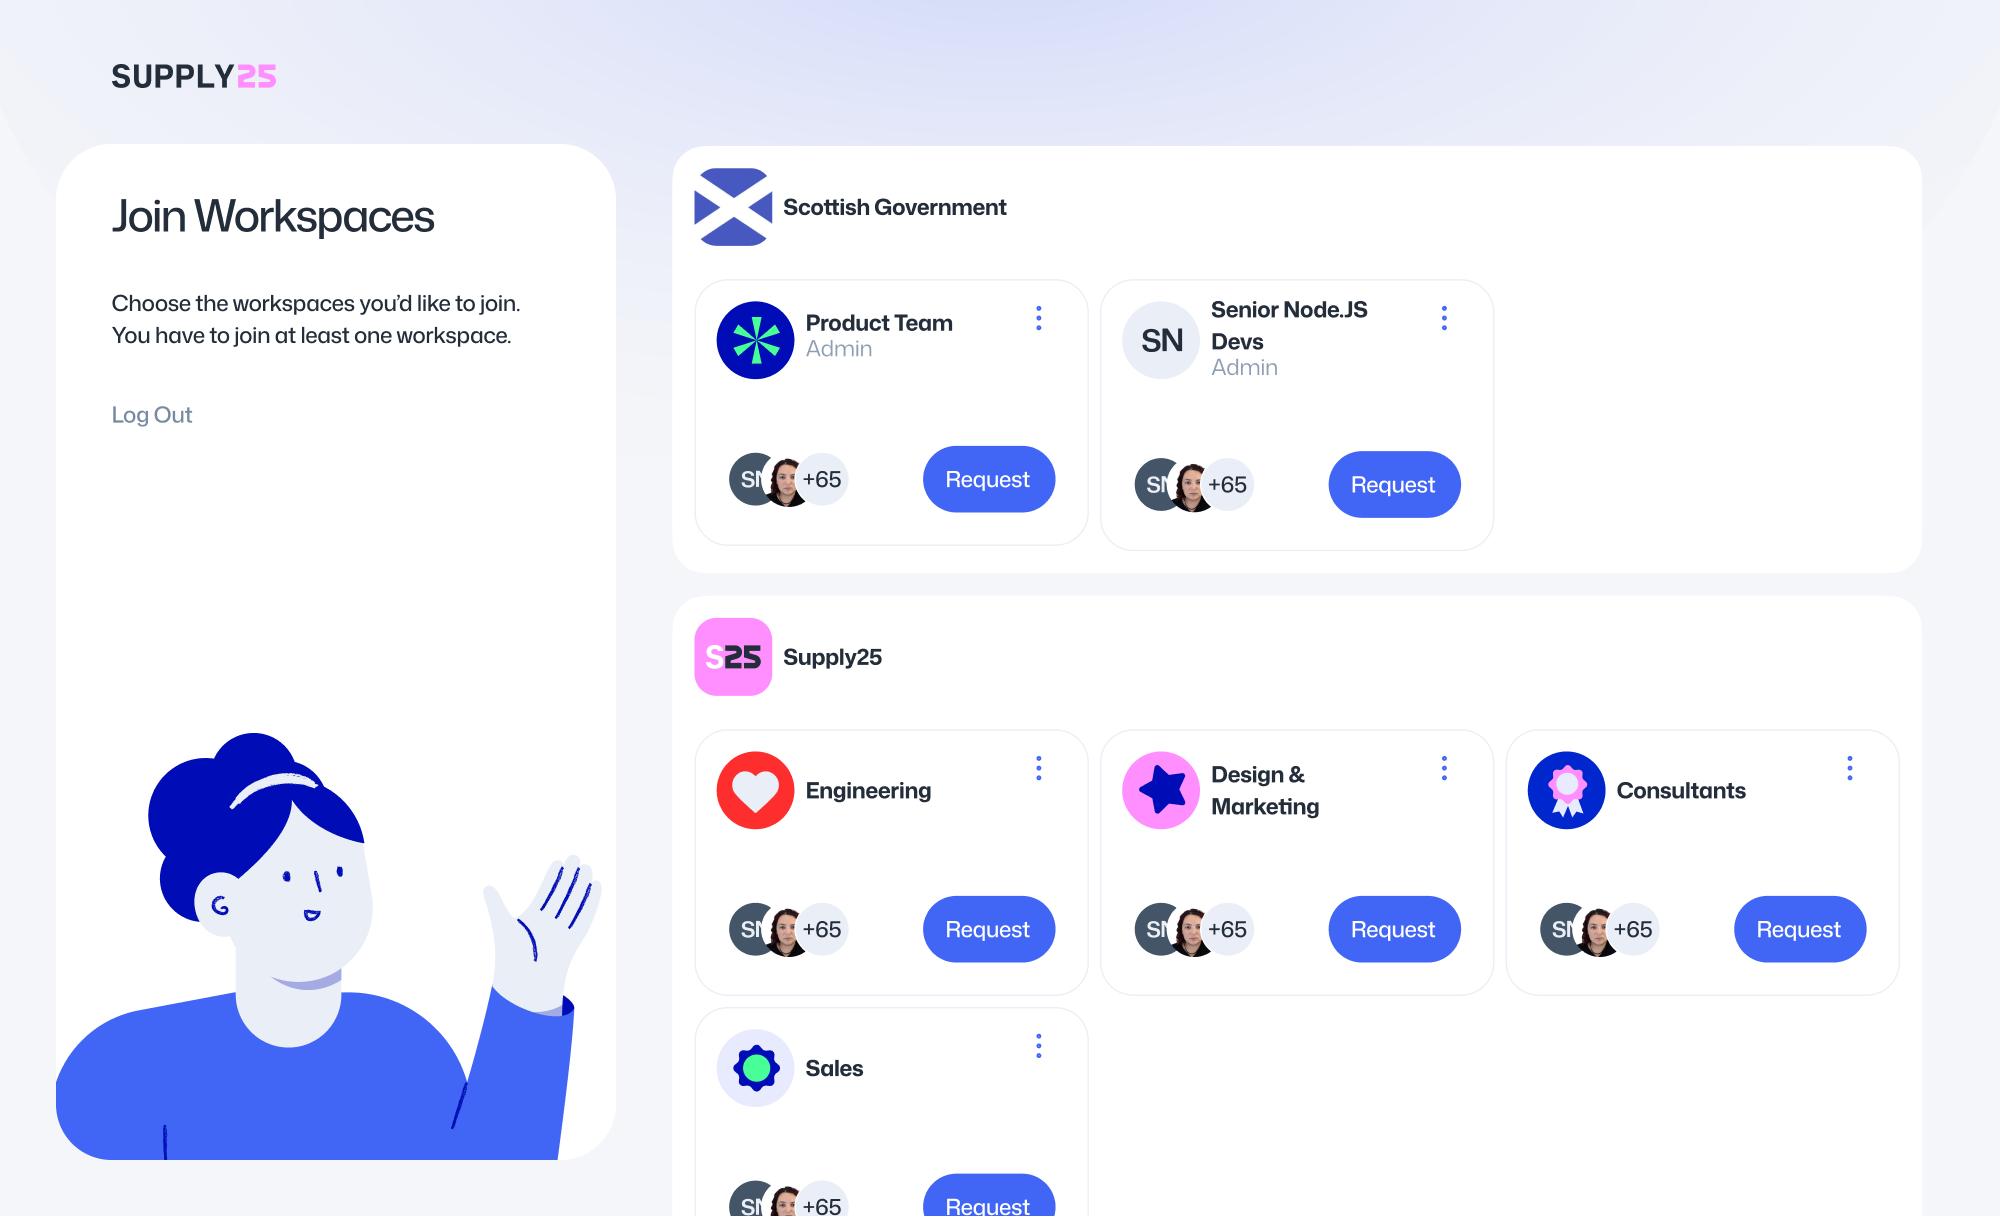
Click the Request button next to the workspace you want to join. You will then need to wait for an admin from that organisation to approve your request before you can continue.
Organisations
Joining more organisations
Once you’ve created an account and joined your first organisation, you can join additional organisations in two ways:
- By invitation: an admin has invited you to join their organisation and workspaces.
- By verified email domain: your email address uses a domain that the organisation has approved, allowing you to discover and join it.
Any organisations you’re eligible to join will appear on your Organisation Settings page, listed under Organisations you can join, below the organisations you already belong to.
To join one of these organisations:
Select the organisation from the Organisations you can join section.
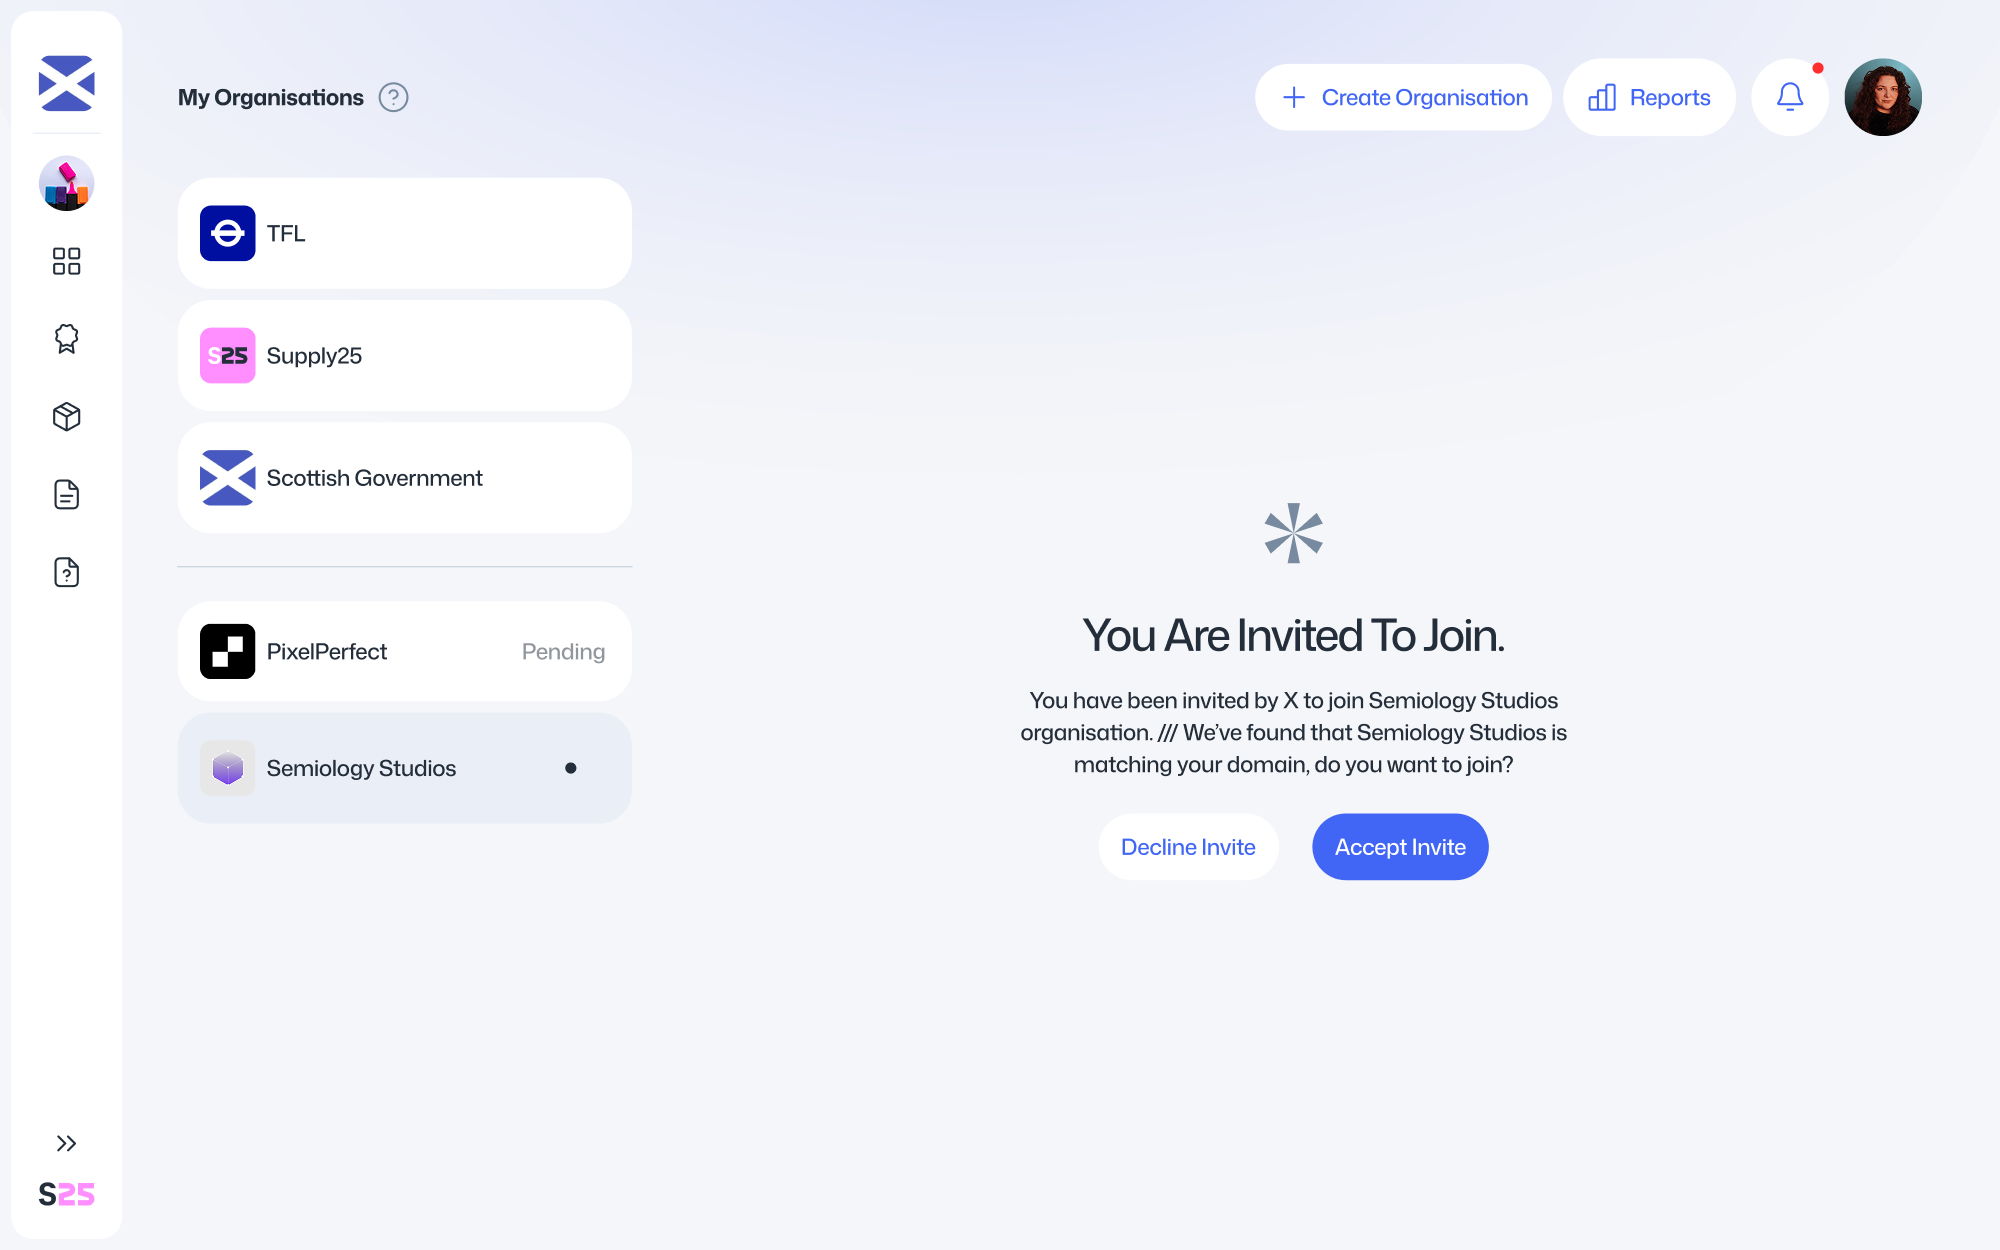
Depending on how you’re eligible:
- Invited users will see options to Accept or Decline the invitation.
- Users with an approved email domain will see options to Join or Dismiss.
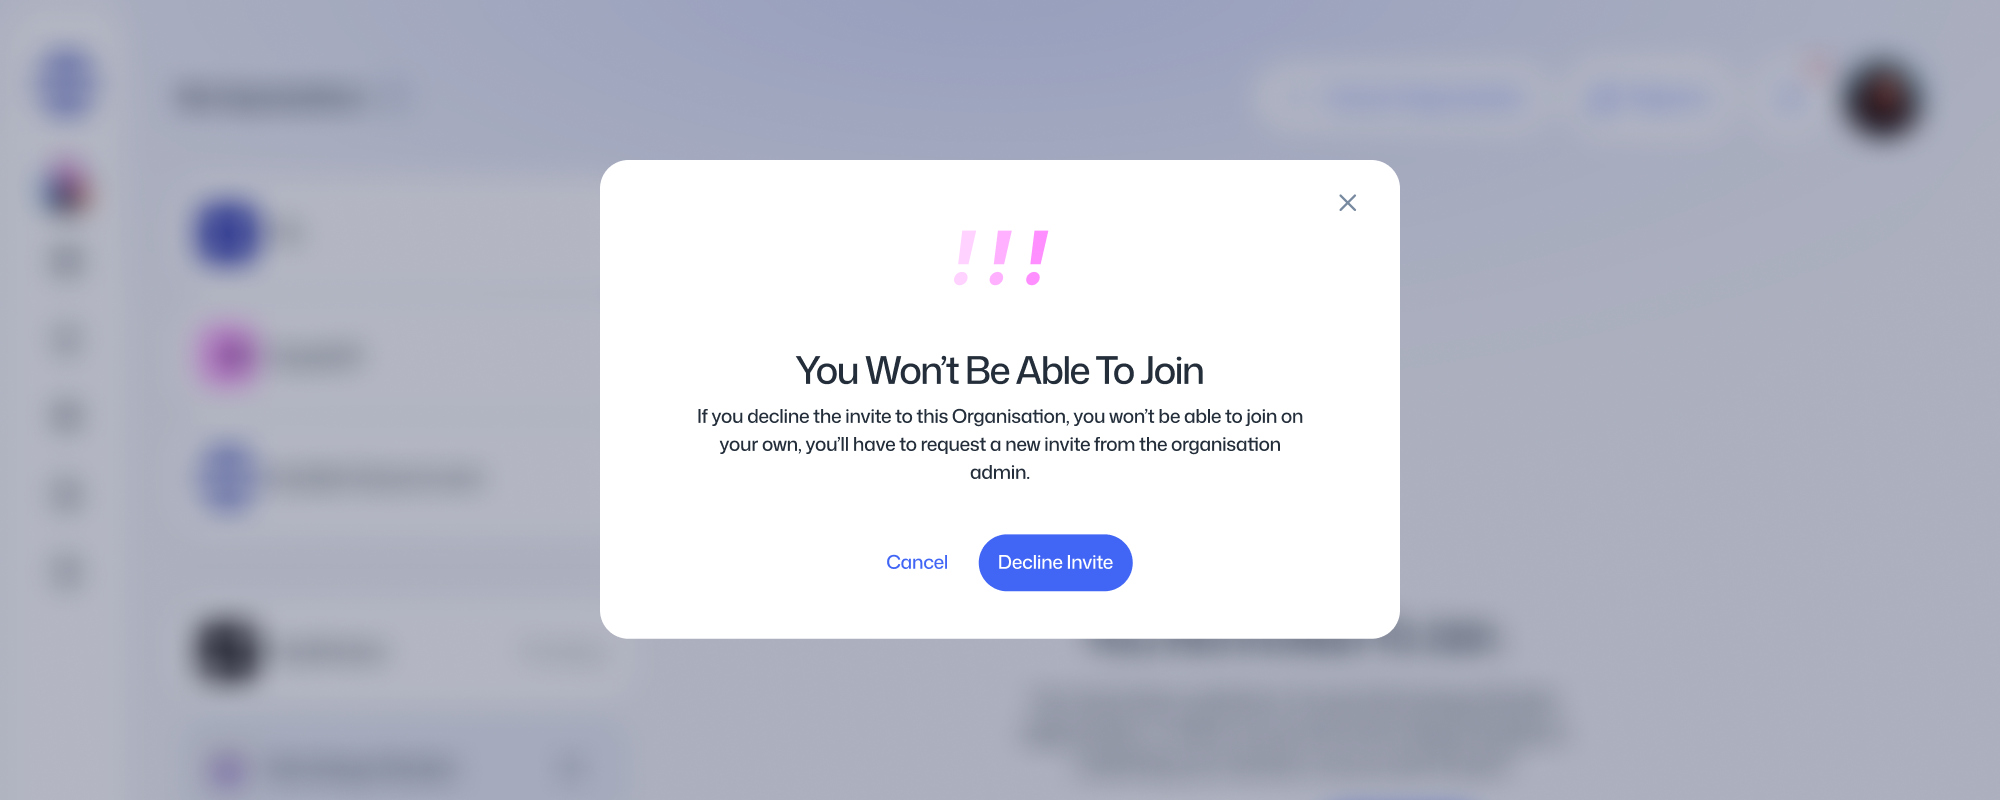
If you Dismiss or Decline, the organisation will be removed from your list and can only be joined later through a new invitation.
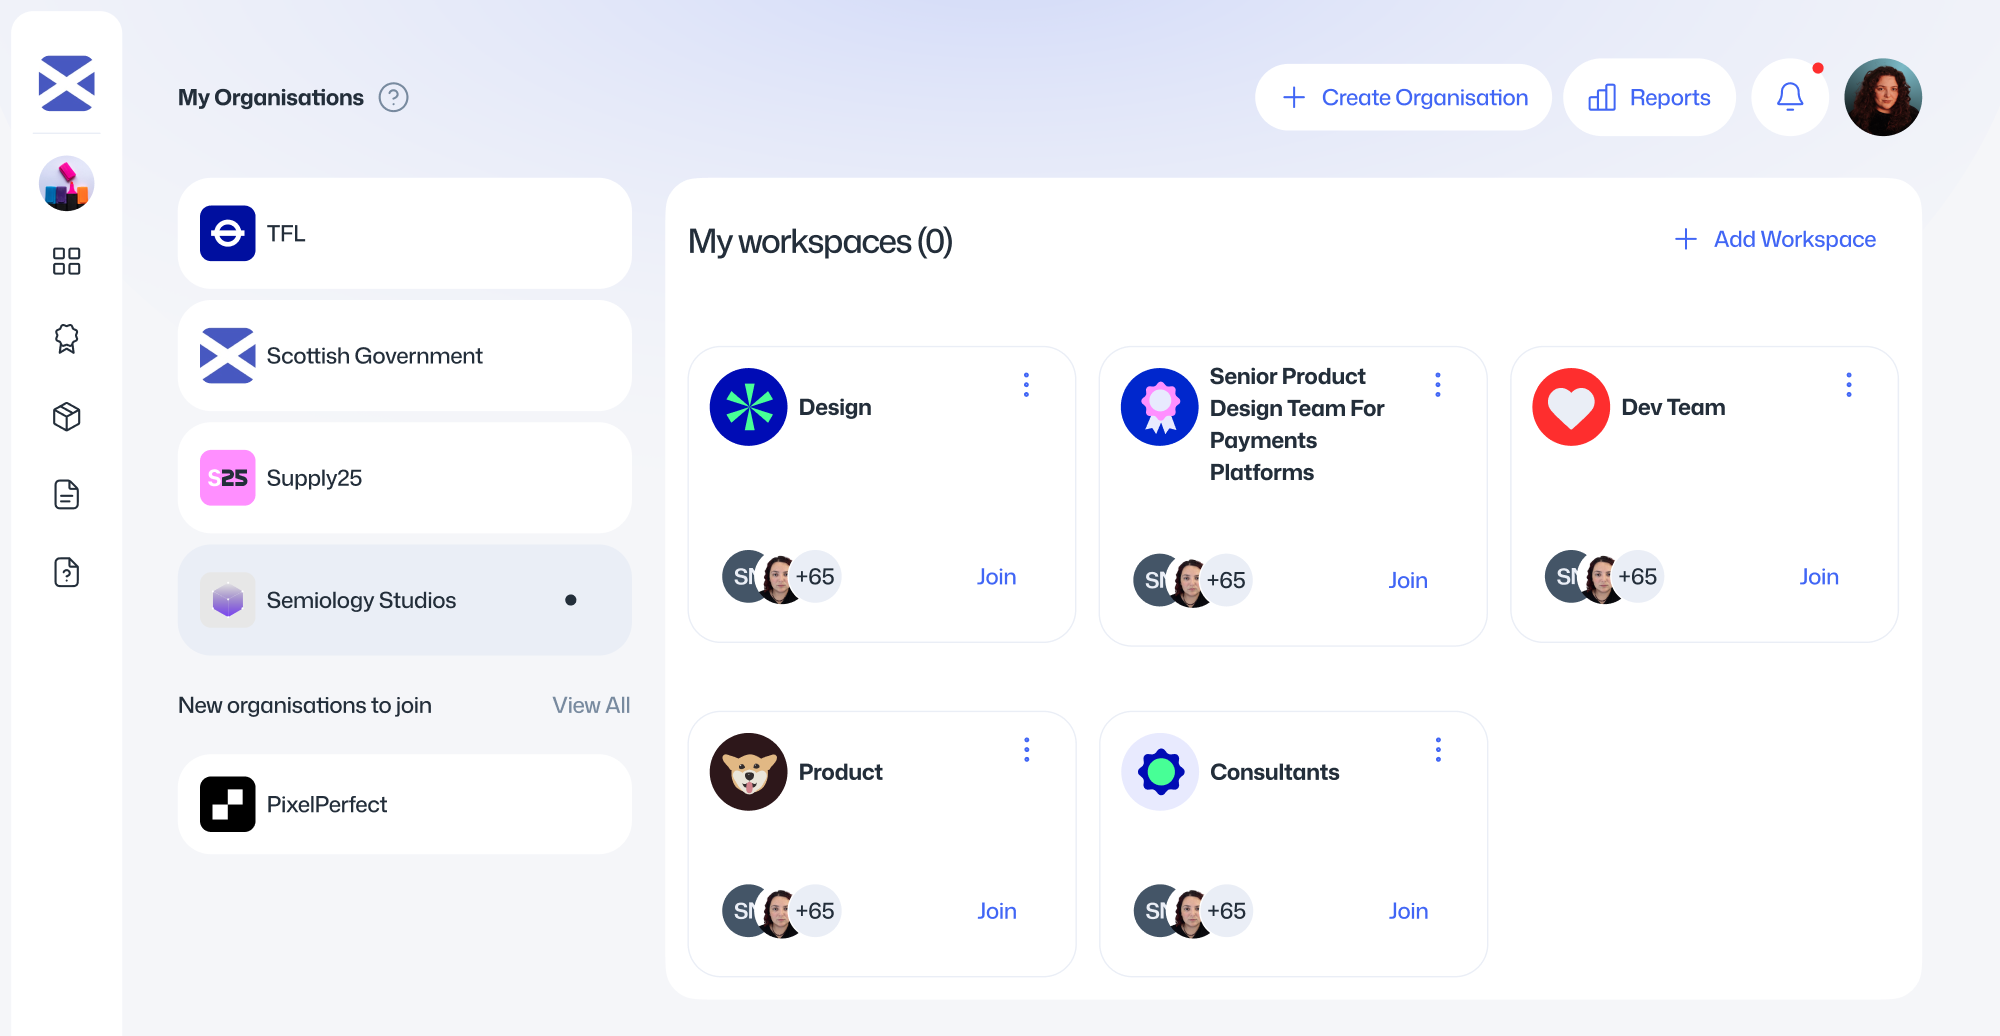
Once you’ve joined the organisation, it will appear in your main organisation list. From there, you can select which workspace you’d like to join.
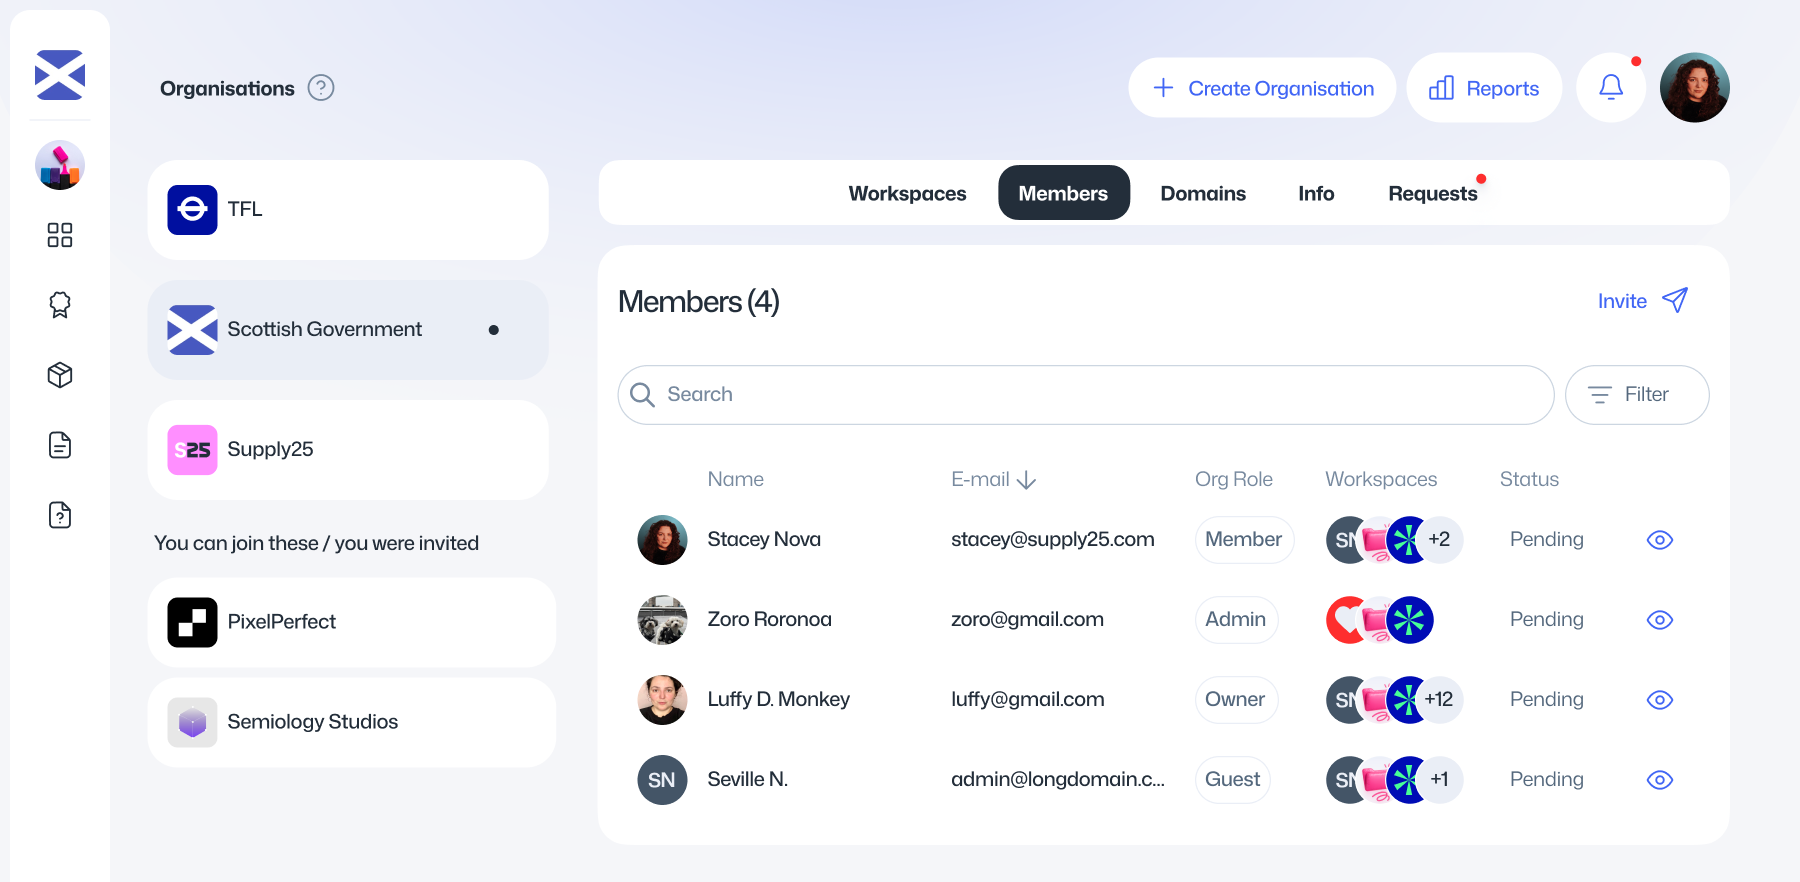
Managing your organisation
As an admin, you can edit your organisation and workspaces, and manage users within them. To access these settings, click the organisation or workspace icon in the left navigation bar.
From here, you can access the following pages:
Workspaces
Manage all workspaces within your organisation and switch your active workspace.
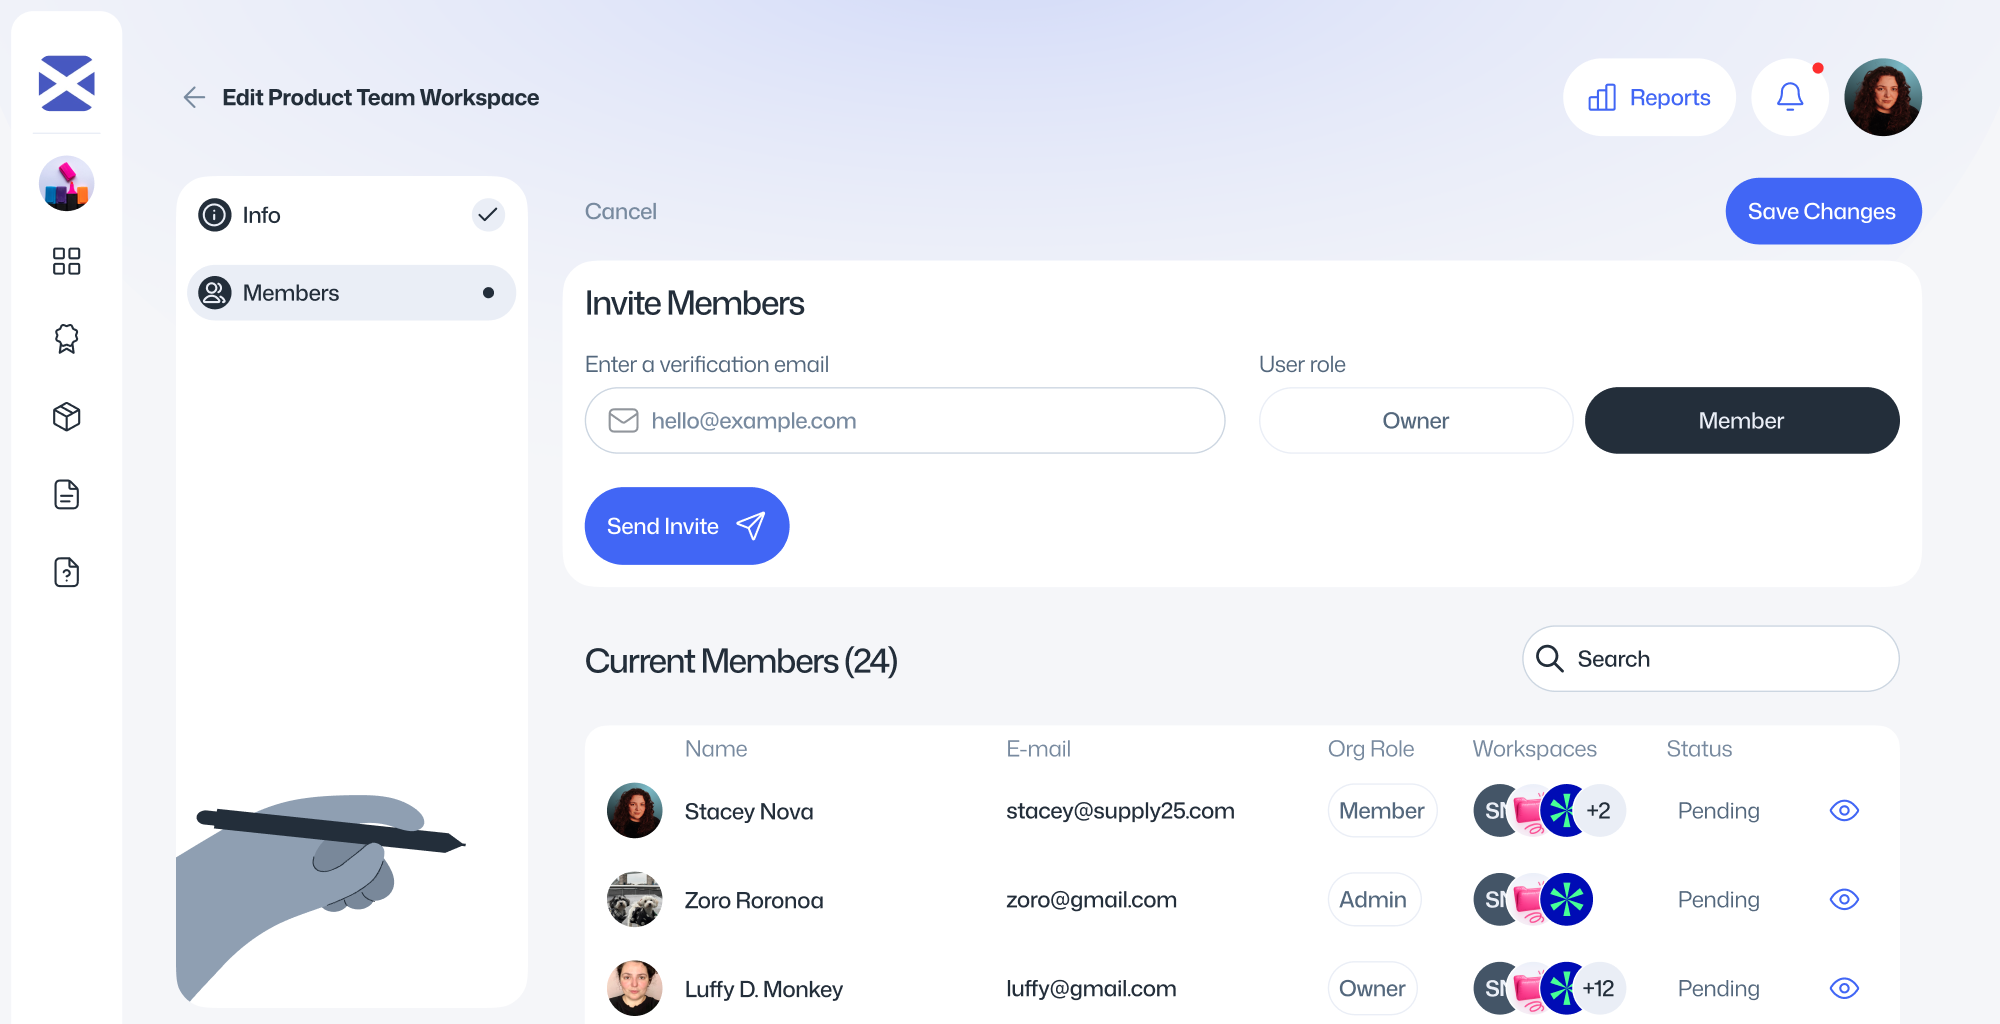
Members
View all users in your organisation, including their email addresses, permissions, and assigned workspaces. You can also invite new members to your workspaces.
Domains
Connect your organisation to one or more email domains. Members with matching email domains can automatically join your organisation.
Info
View your organisation’s basic details.
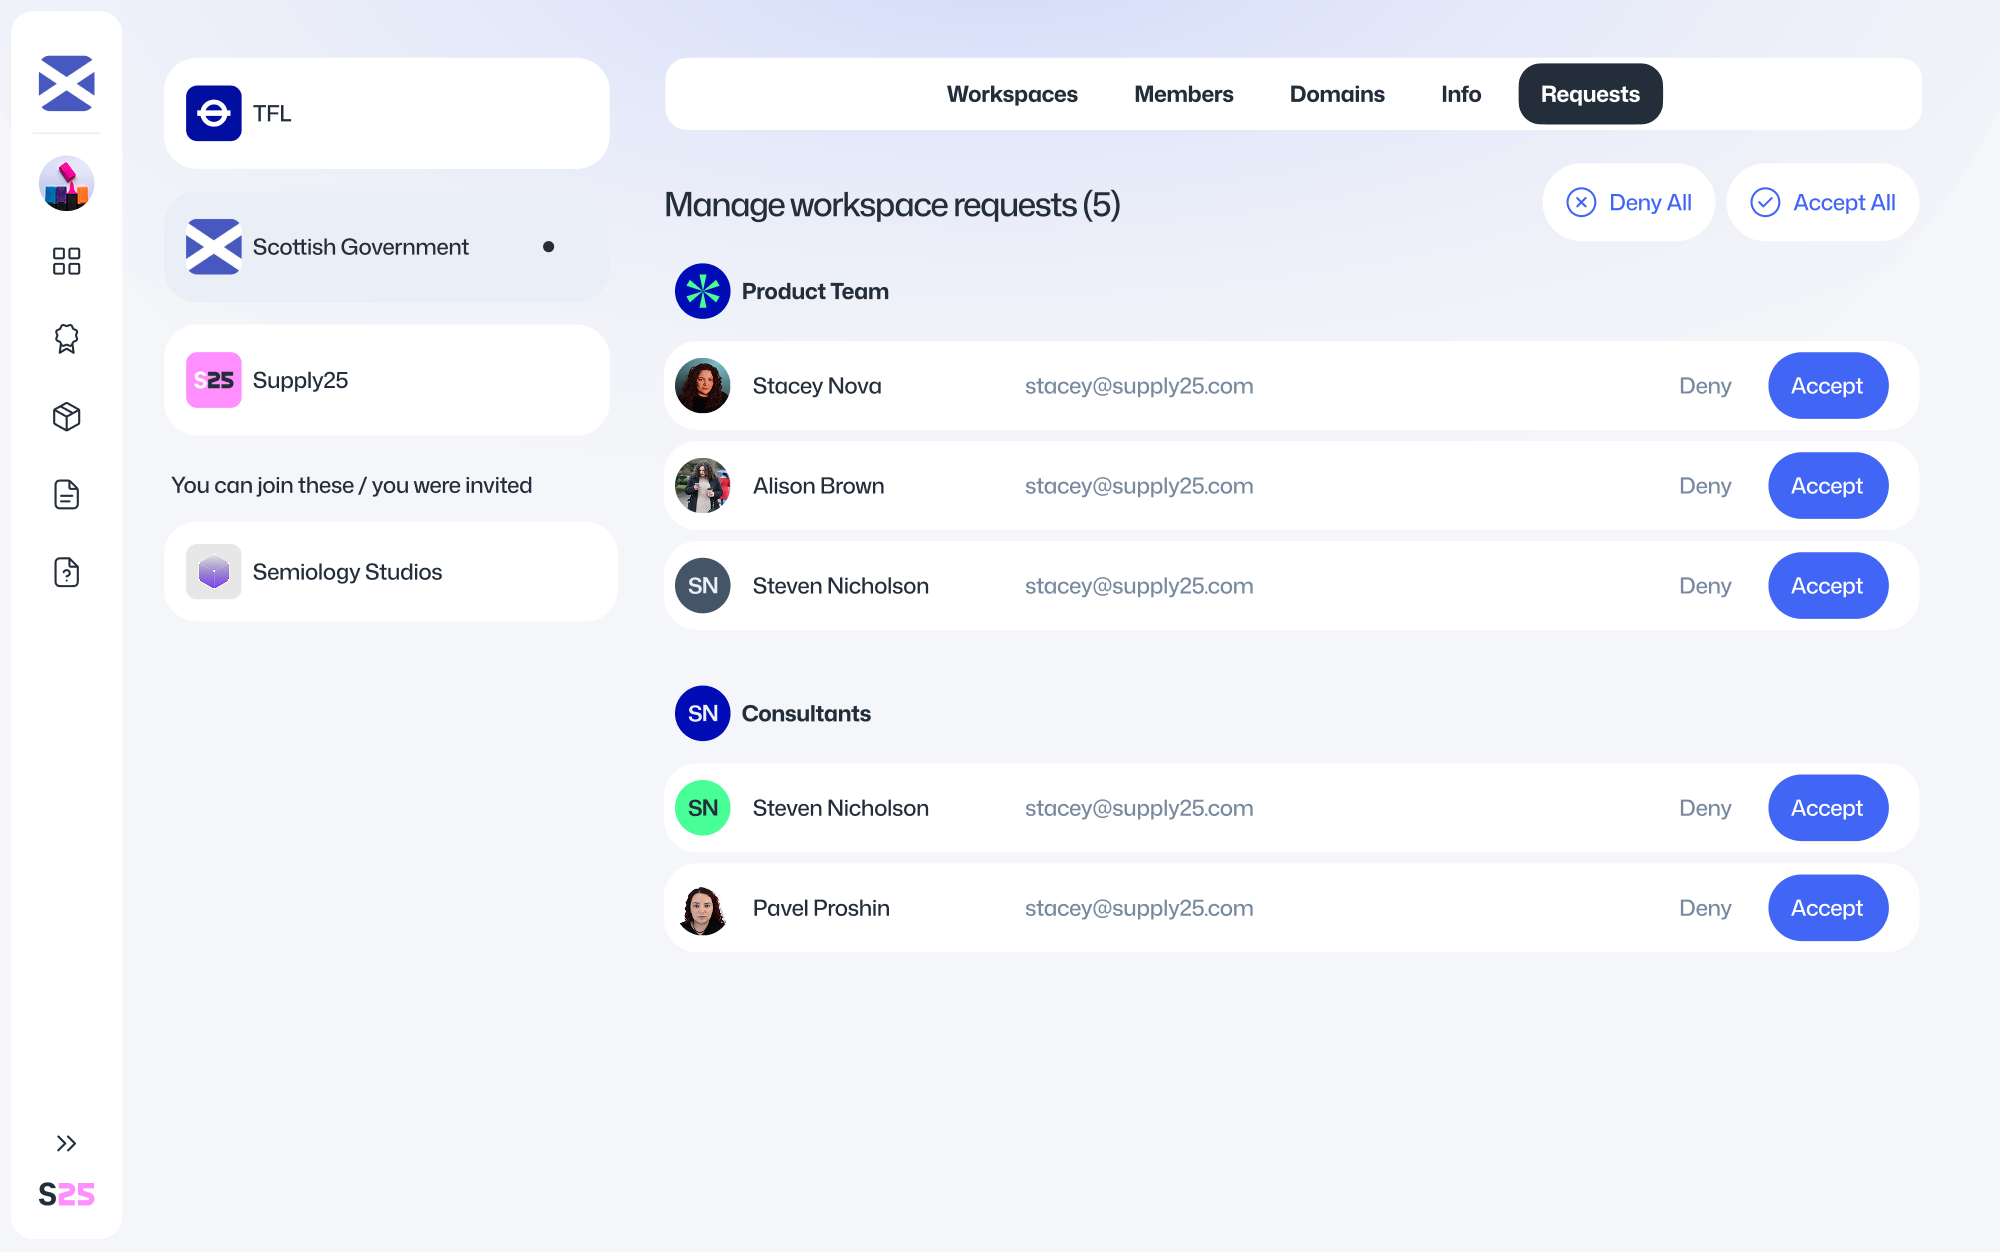
Requests
Review all pending workspace join requests from users in your organisation.
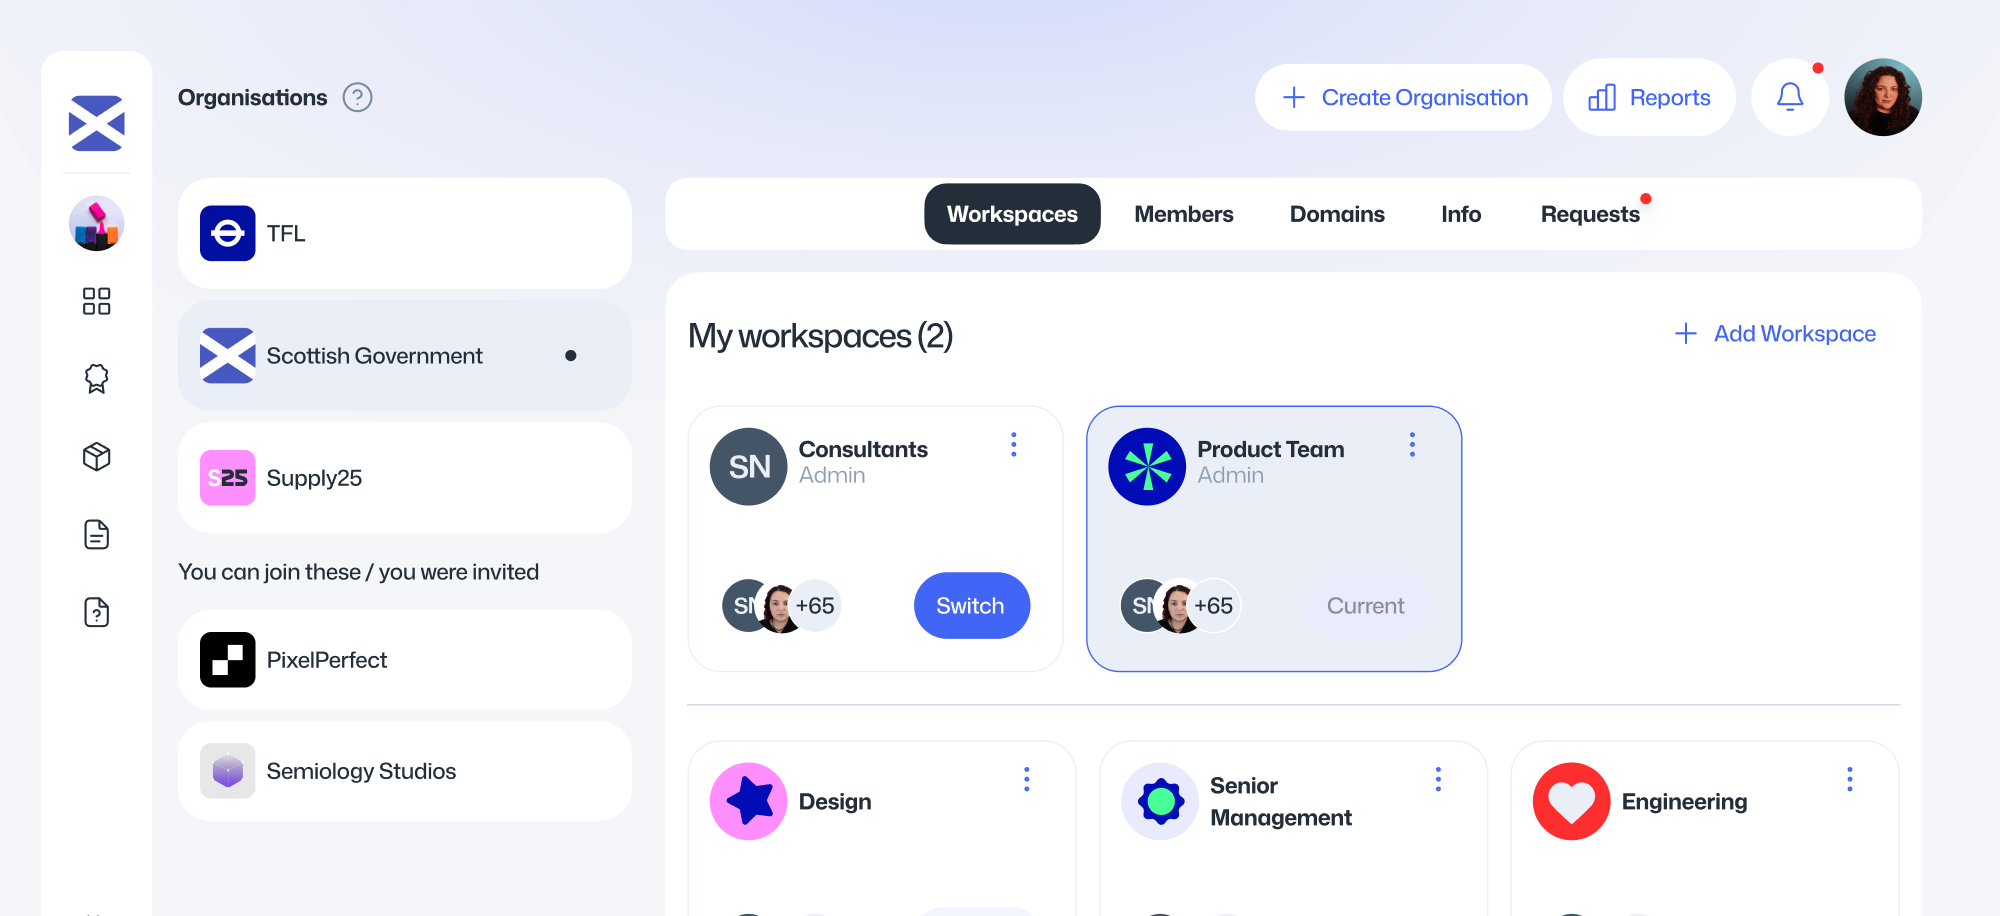
Workspaces
Managing your workspaces
You can view all workspaces in your organisation on this page.
The workspaces at the top are the ones you currently have access to. Those below the divider are part of your organisation that you don’t have access to.
Switching workspaces
In Supply25, your data is scoped to a workspace. To create or view assessment packages in a different workspace, you’ll need to switch the active workspace. You can always see the current workspace in the left navigation bar at the top.
To switch workspaces:
- Click the workspace icon in the left navigation bar.
- Select your organisation.
- Click Enter on the workspace you want to switch to.

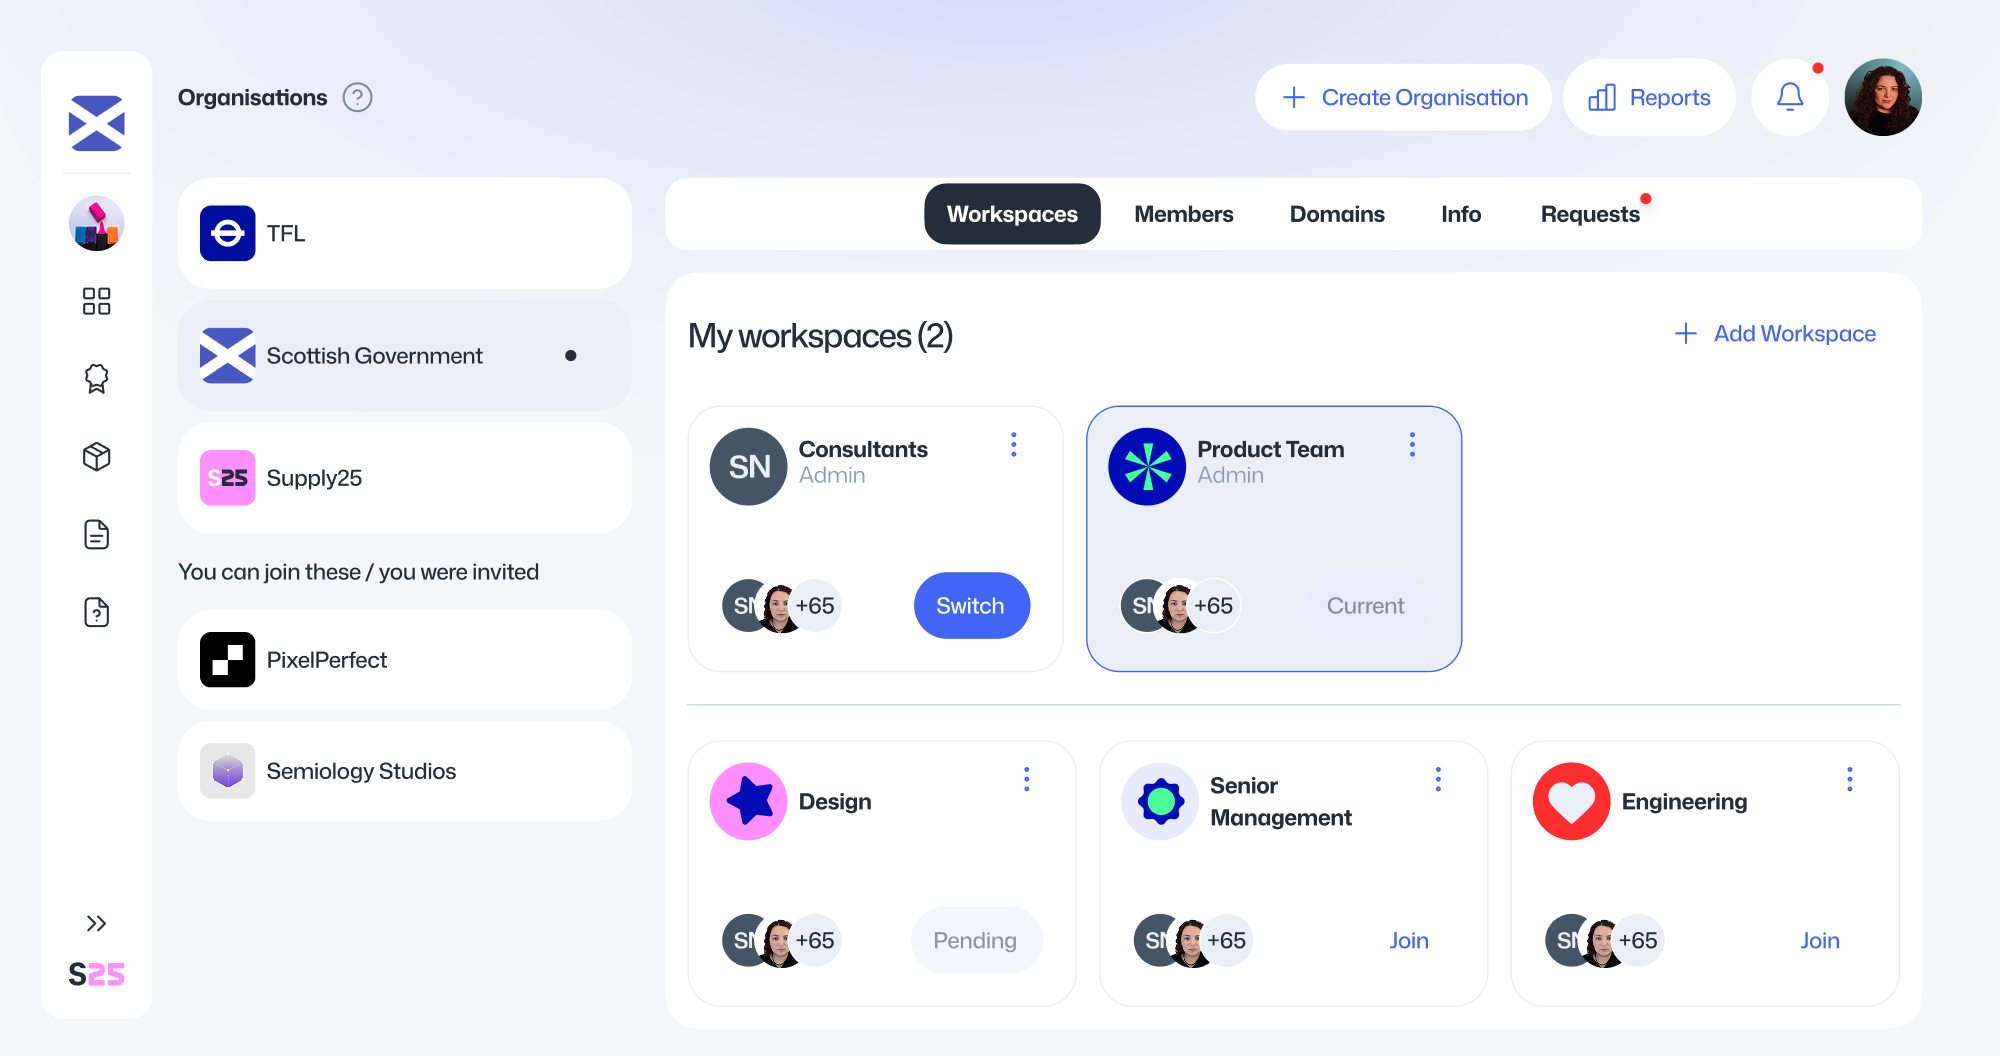
Joining a workspace
To join a workspace, click Join on the workspace card.
- If you’re an admin, you’ll be added to the workspace automatically.
- If you’re a member, a join request will be sent to the admins for approval.

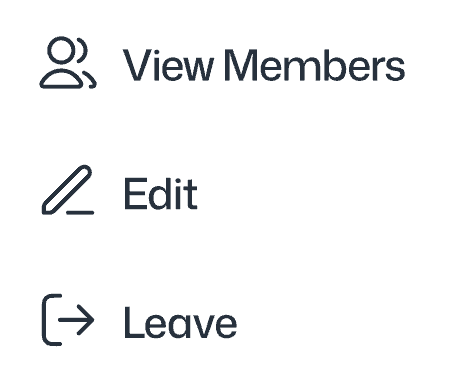
Leaving a workspace
To leave a workspace, click the three dots on the workspace card and select Leave. The workspace will then appear below the divider.

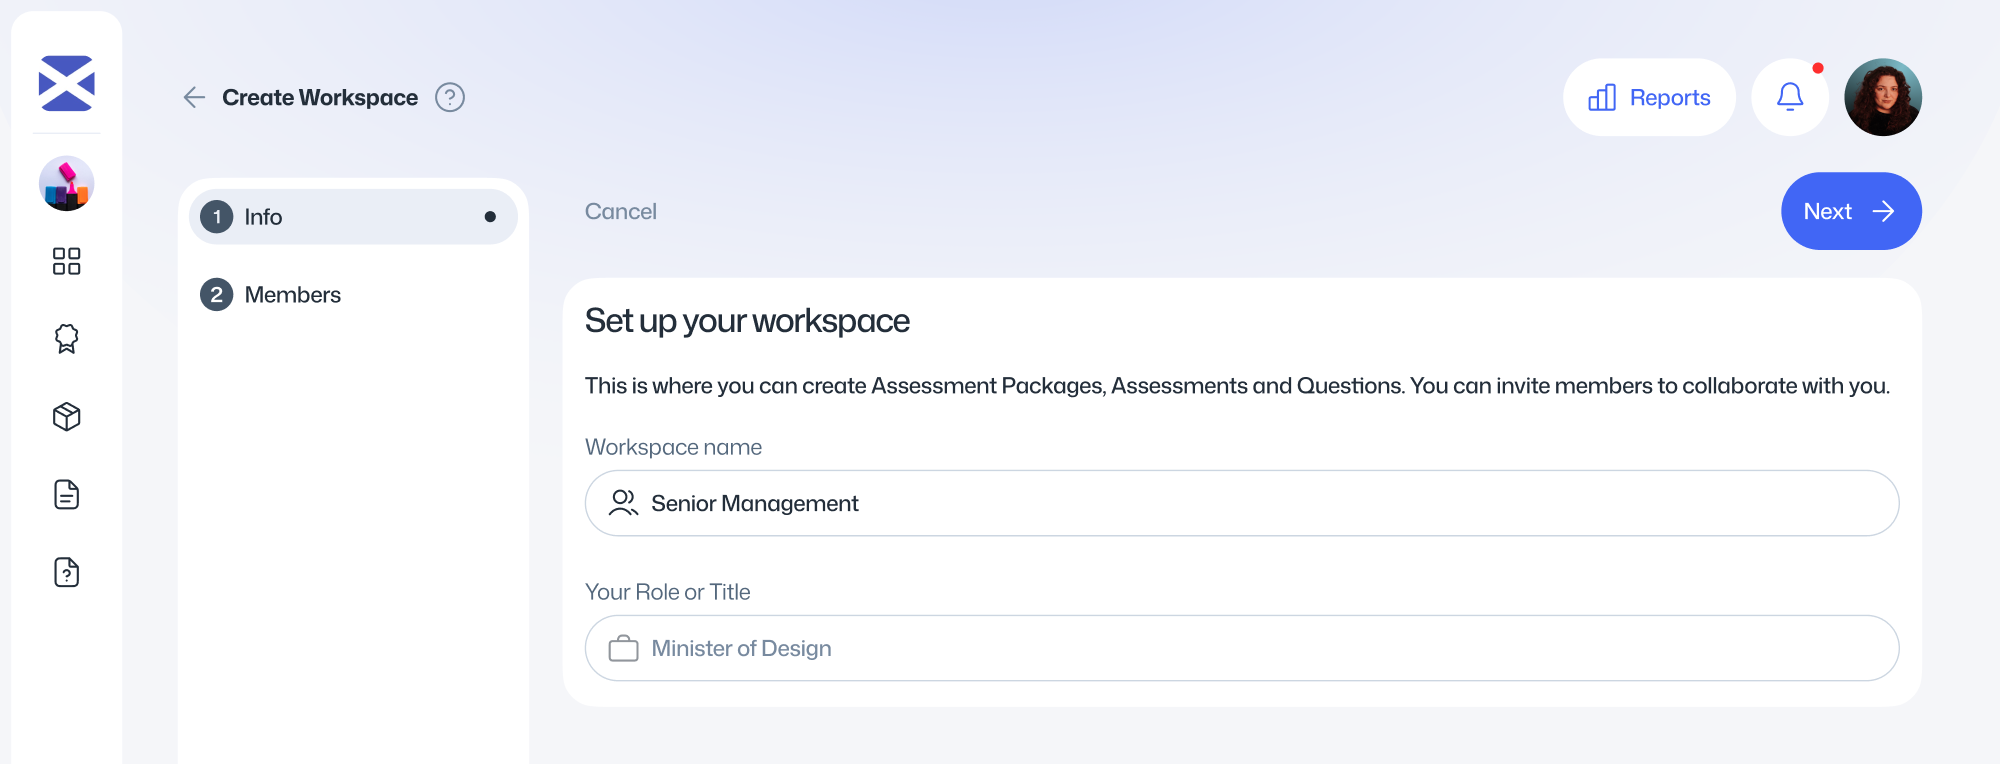
Creating a new workspace
Workspaces can only be created by organisation admins. To create a new workspace, follow these steps:
Click your organisation name from the list, then select Add Workspace.

Enter a name for the workspace and click Add. You can continue adding more workspaces if needed.
When you’re finished, click the back arrow icon to return to the organisation settings page.
Editing a workspace
To edit a workspace, click the three dots on the workspace card and select Edit.
From here, you can change the workspace name and view the users assigned to this workspace.
Managing organisation members
You can view all members of your organisation, no matter which workspace they belong to. For each member, you can see their name, email, role, status, and assigned workspaces.
Depending on your permissions, you can also invite new users to your organisation or add existing users in your organisation to additional workspaces.
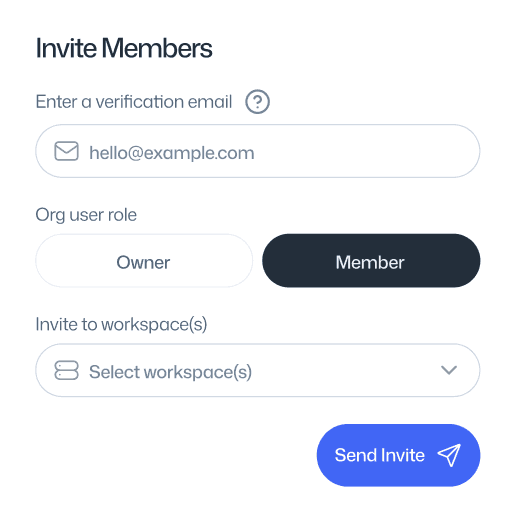
Inviting new users
- On the Members page, click Invite.
- Enter the email address of the person you want to invite.
- Select the workspaces you’d like them to join, then click Invite.
An invitation email will be sent to the user. Once they complete their account setup, they’ll be automatically added to the selected workspace.
While their invitation is pending, you’ll see their status marked as Pending in the members table.
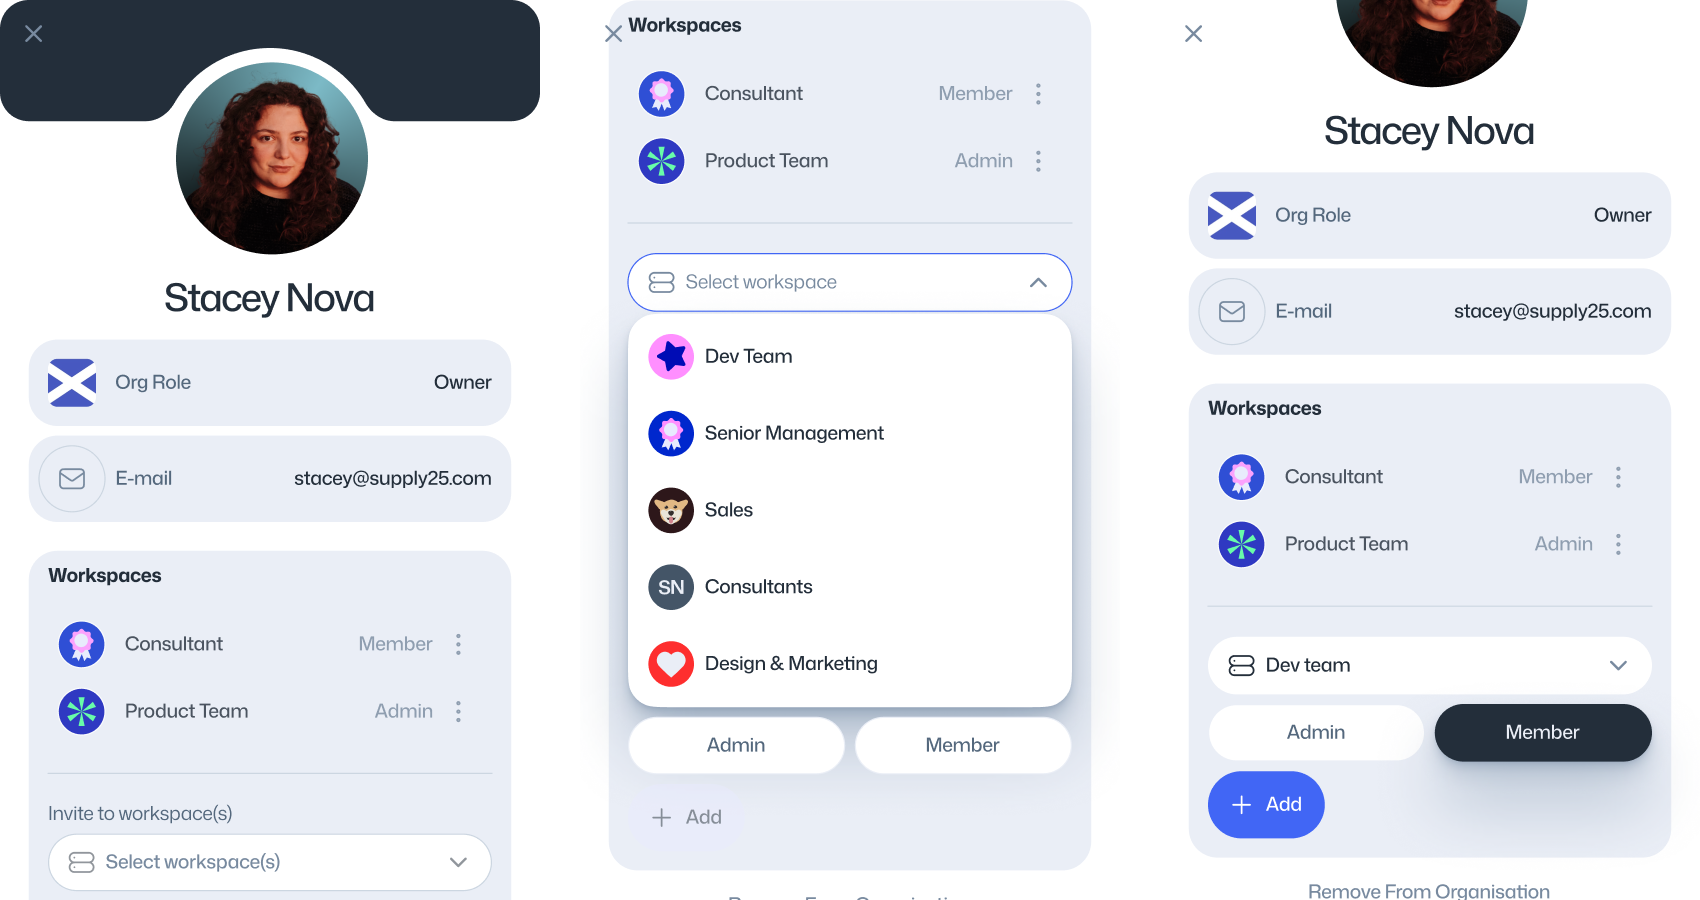
Adding or removing existing users
Locate the user in the members table, you can use the search or filter options to quickly find them.
Click the eye icon to view more details about the user

From here, you can add or remove the user from specific workspaces, depending on your permissions. You can also remove the user from the entire organisation if needed.
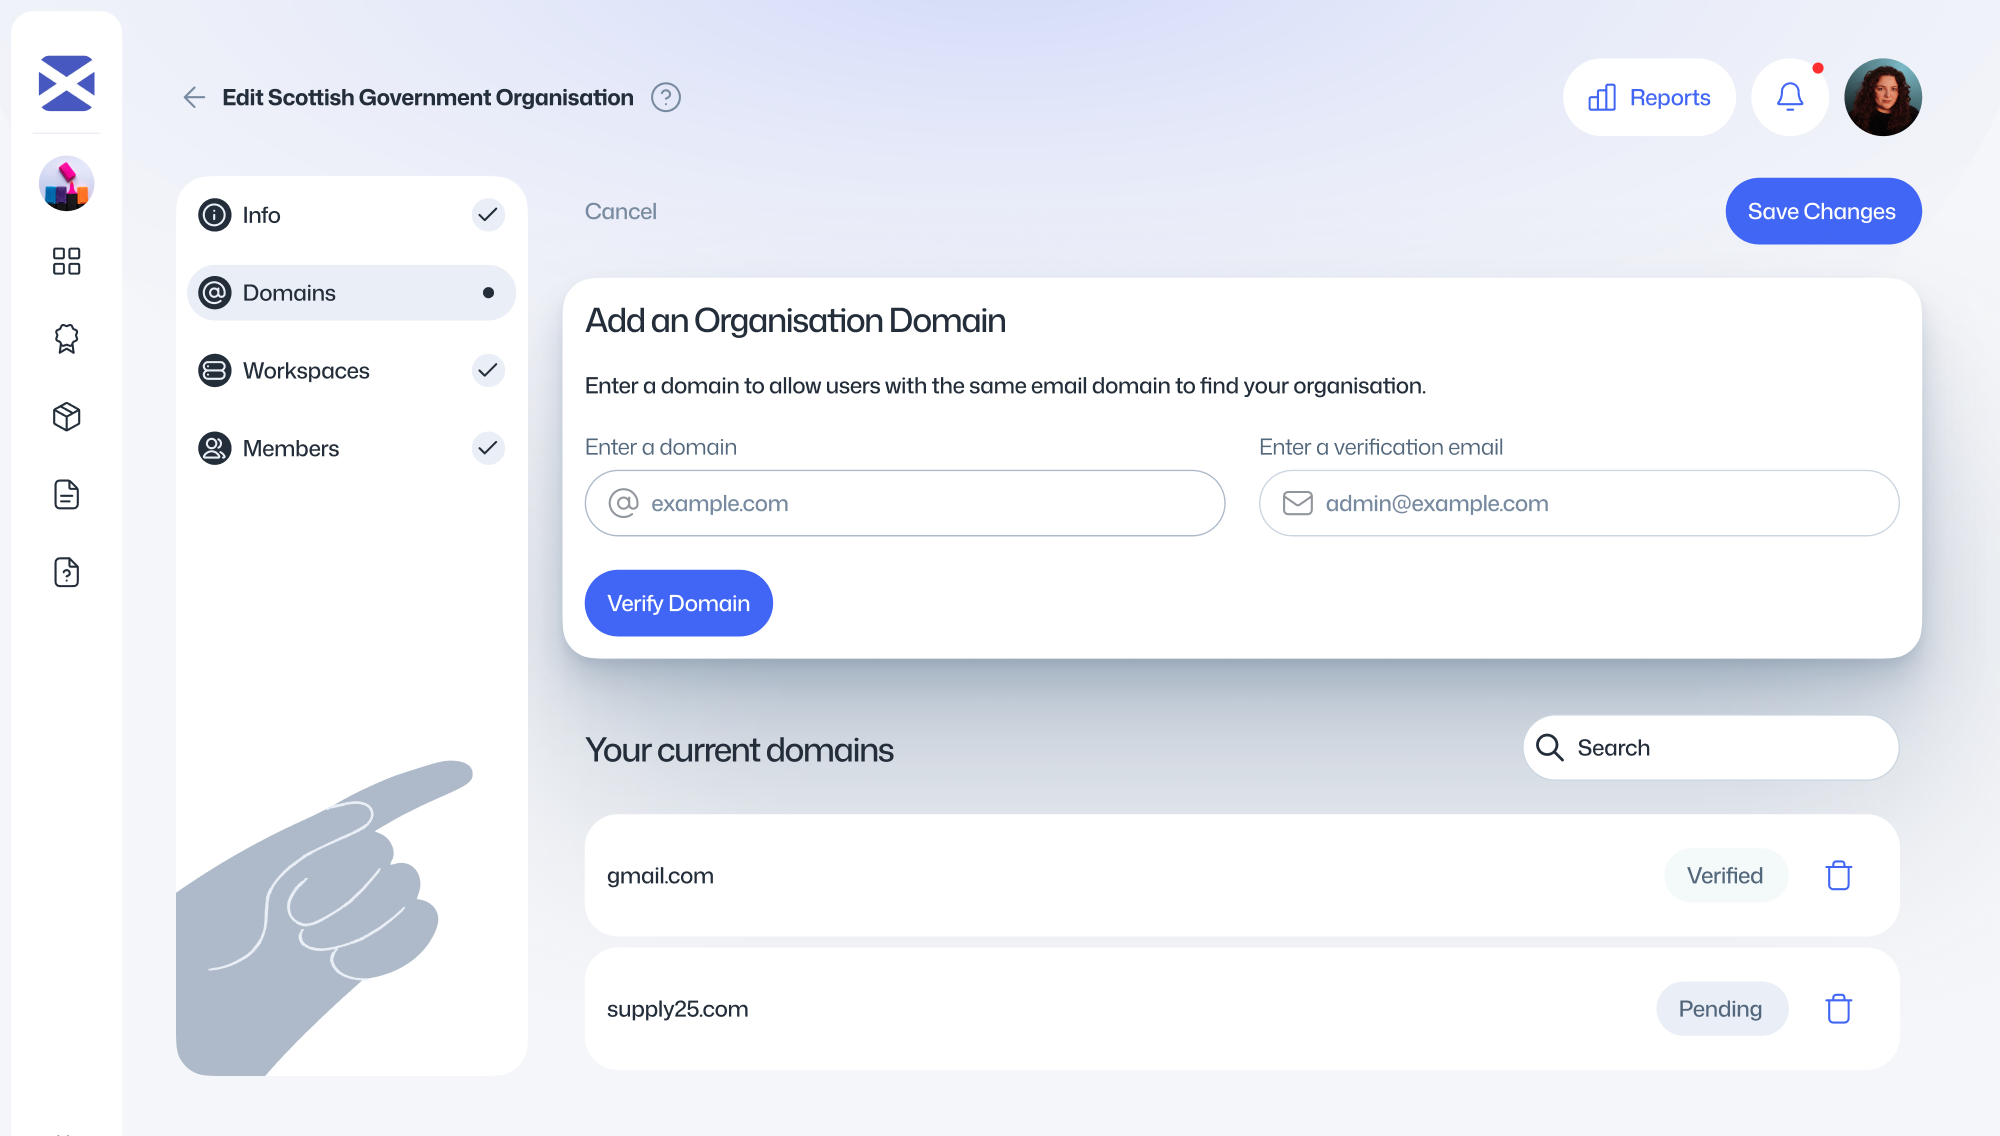
Adding and verifying email domains
You can add email domains to your organisation so that new users with matching email addresses can join automatically, as long as the auto-join setting is enabled.
To add and verify a domain, follow these steps:
Go to the Domains tab in the organisation settings page.
Click the Add button
Enter the domain you want to add. For example, if your organisation uses emails like user@company.com, you should enter company.com in the domain field.
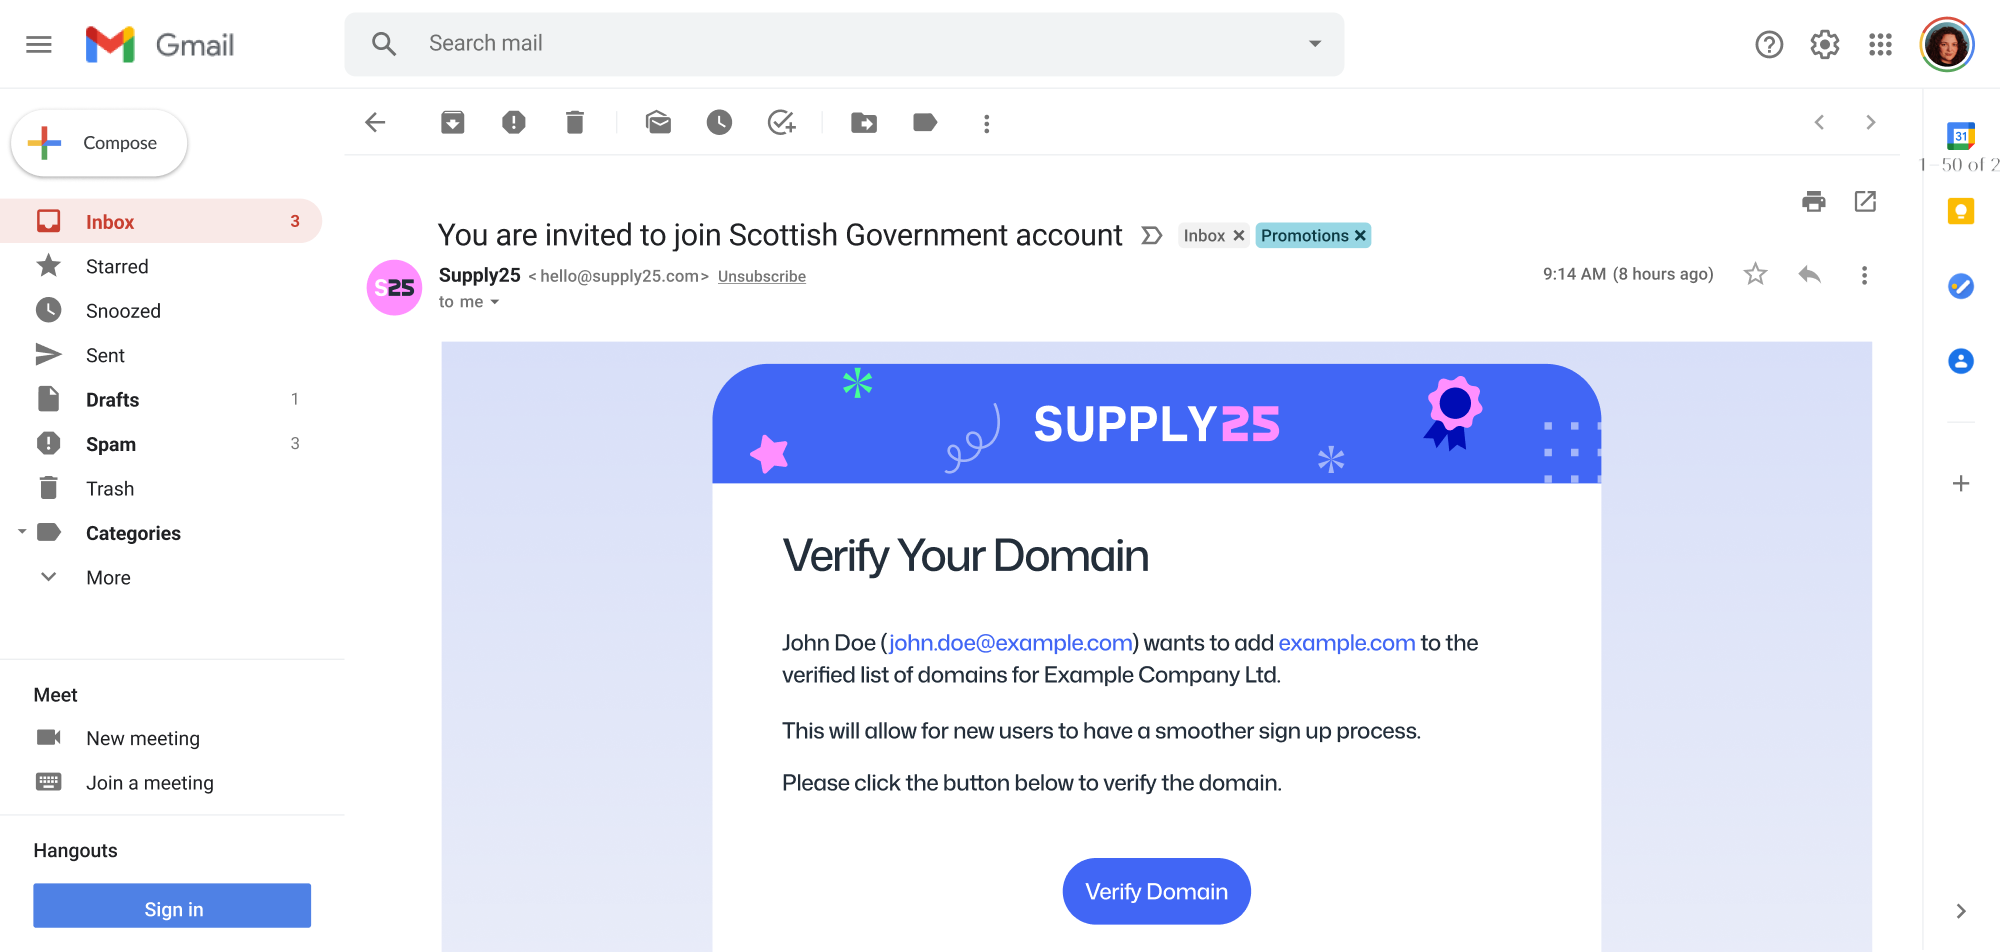
Provide an email address that uses this domain to prove you have access.
Click Verify Domain. The domain will appear in the Domains section with a pending status.
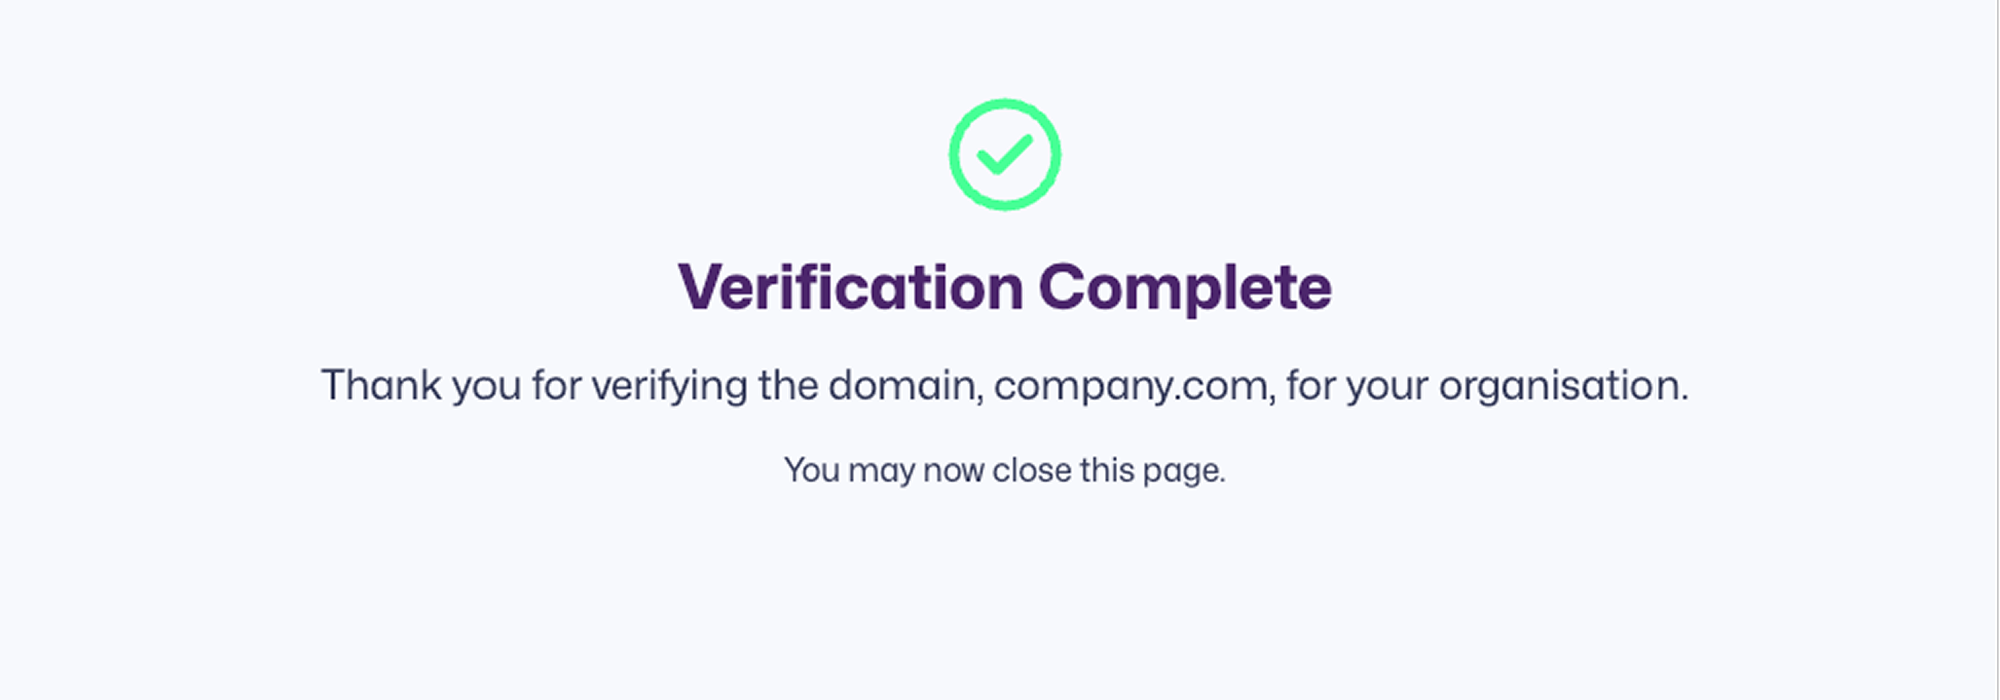
A verification email will be sent to the address you provided. Open it and click the Verify Domain link.
A new window will open to confirm the verification. Once complete, you’ll see a success message.
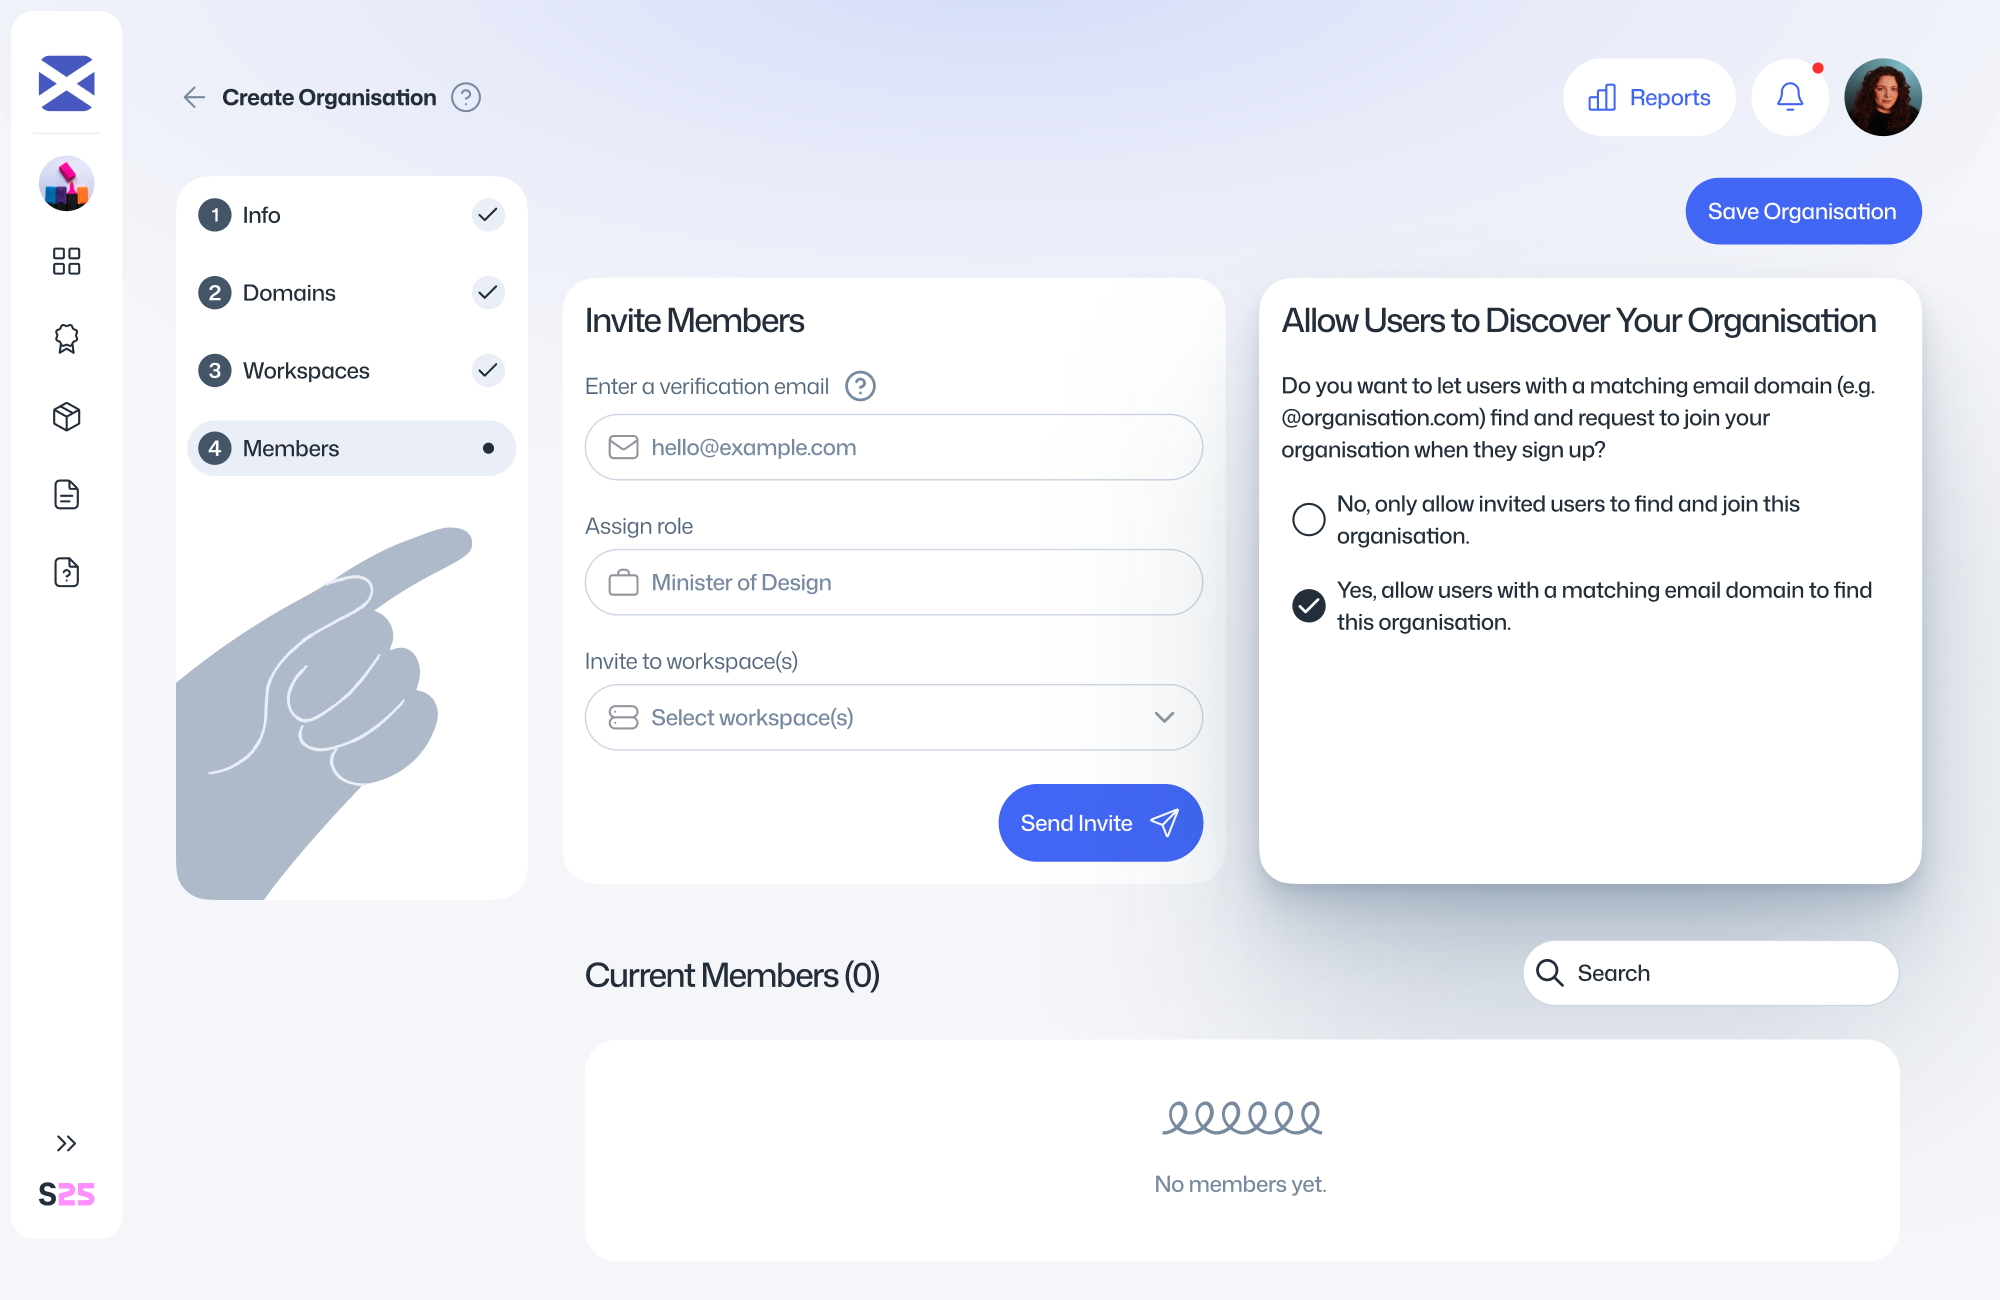
Enabling auto join
Once your organisation’s email domain has been verified, you can enable Auto Join to allow users with matching email domains to discover and join your organisation.
To enable this feature:
Go to the Members tab
Under the section Allow users to discover your organisation, select the option Yes, Allow users with a matching email domain to find this organisation.
Managing workspace join requests
By default, non-admin users require approval to join a workspace. Only admins can view and manage these requests.
All join requests can be found in the Requests tab of your organisation settings. Requests are grouped by workspace, and admins can choose to either accept or reject each one.
User types and permissions
In an organisation and workspaces, there are different user types to help you better permission the different users. Below is an explanation for what each user type can do.
Organisation Users
| Admin | Member | |
|---|---|---|
| Edit organisation information | ✅ | ❌ |
| Add & remove domains | ✅ | ❌ |
| Promote & demote Admins | ✅ | ❌ |
| Invite users | ✅ | ✅ |
| Remove users | ✅ | ❌ |
| Automatically join workspaces | ✅ | ❌ |
Workspace Users
| Admin | Member | |
|---|---|---|
| Edit workspace information | ✅ | ❌ |
| Create assessment packages | ✅ | ✅ |
| Accept & reject join requests | ✅ | ❌ |
| Invite & add users | ✅ | ✅ |
| Remove users | ✅ | ❌ |
Assessment Package
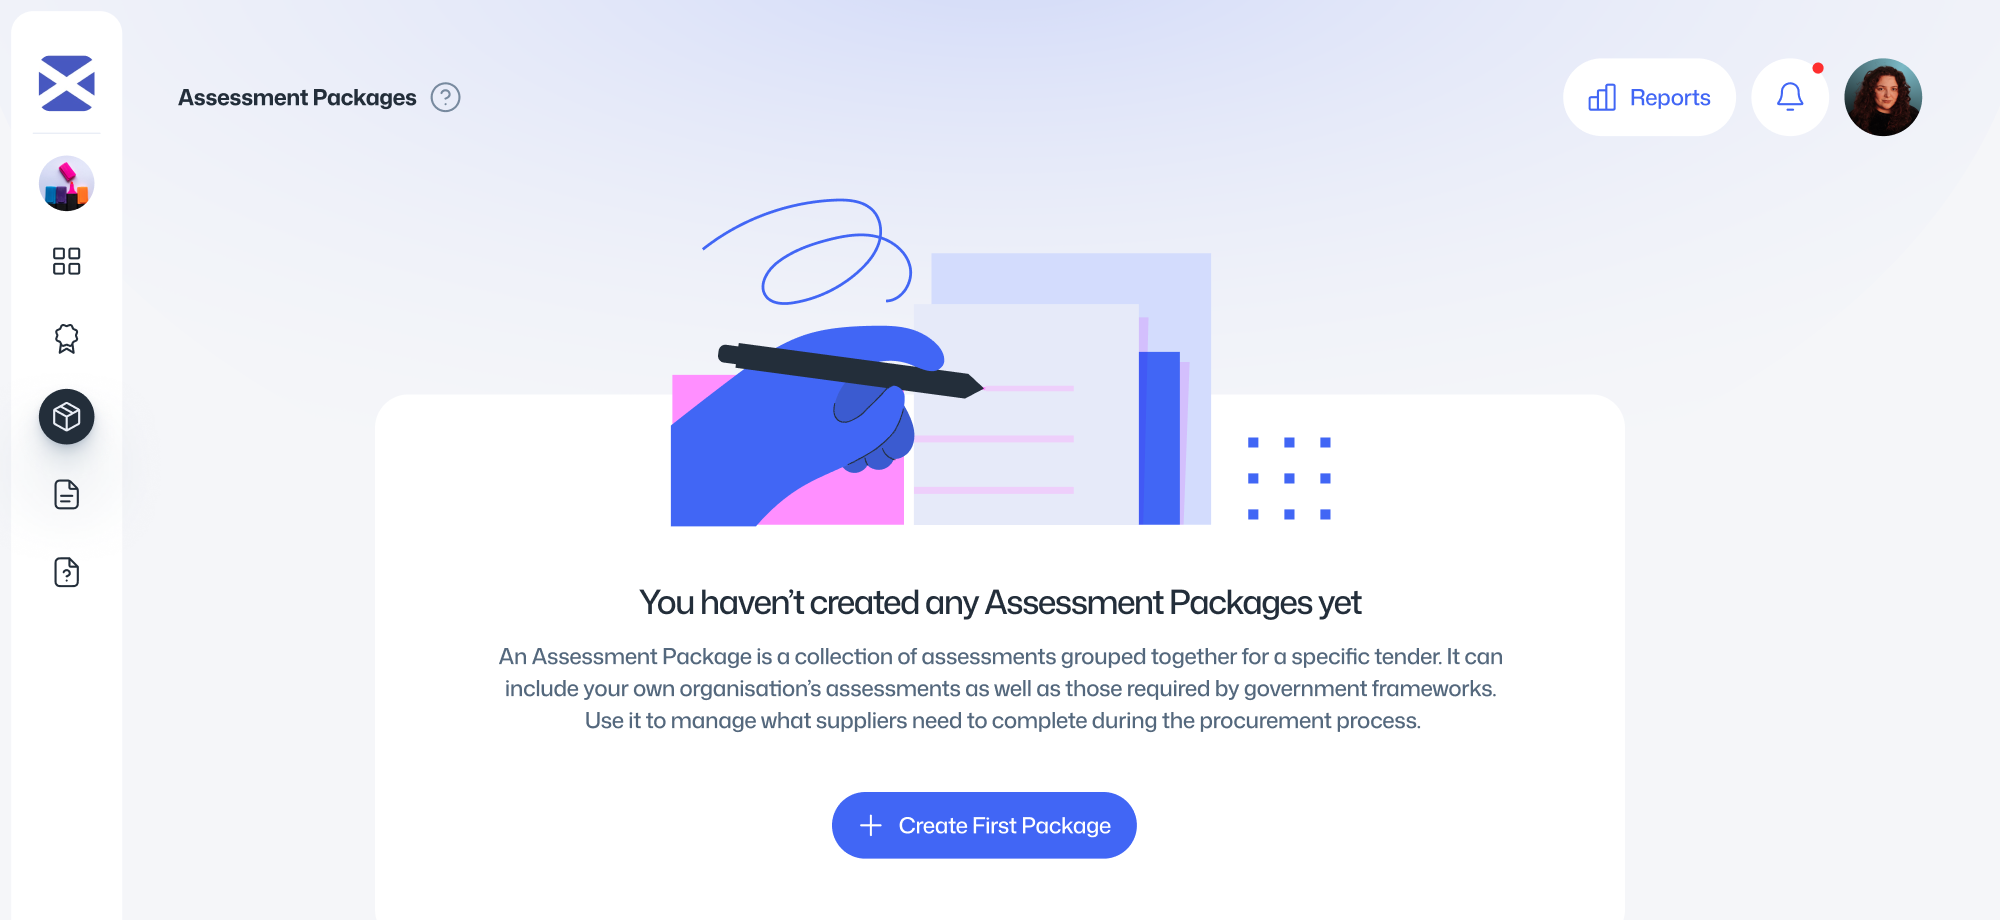
Create an Assessment Package
Let’s Get Started
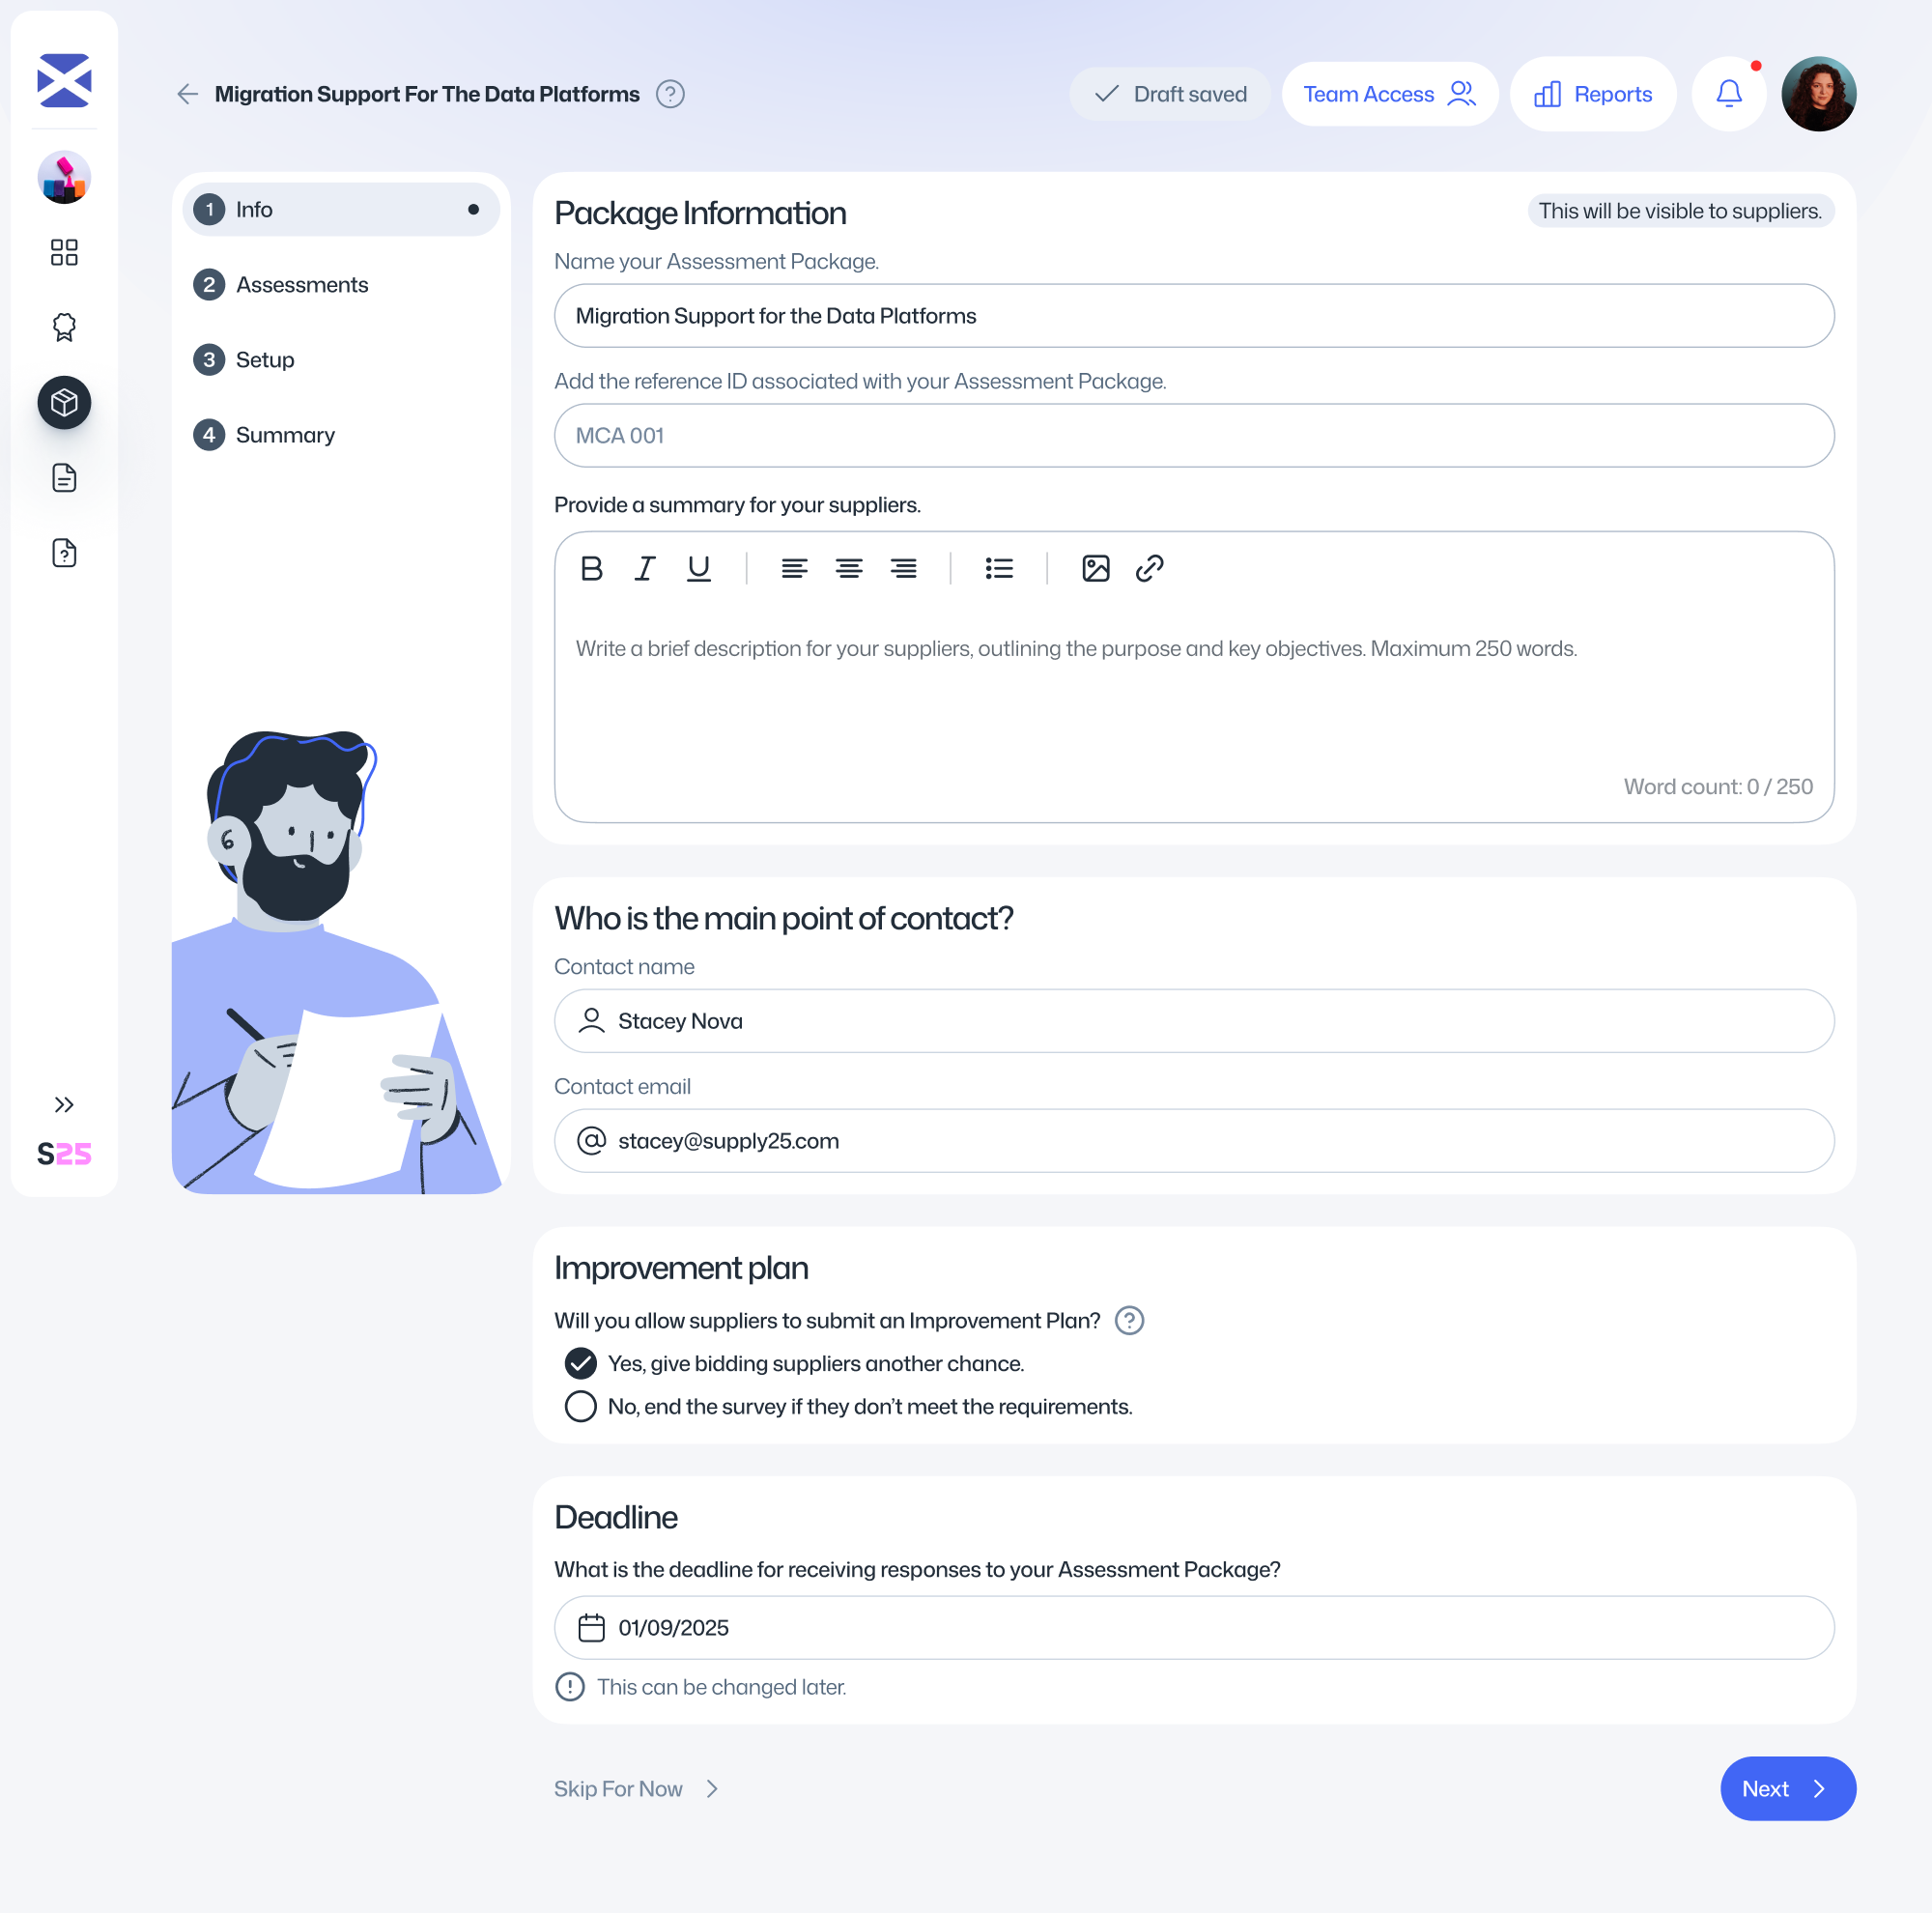
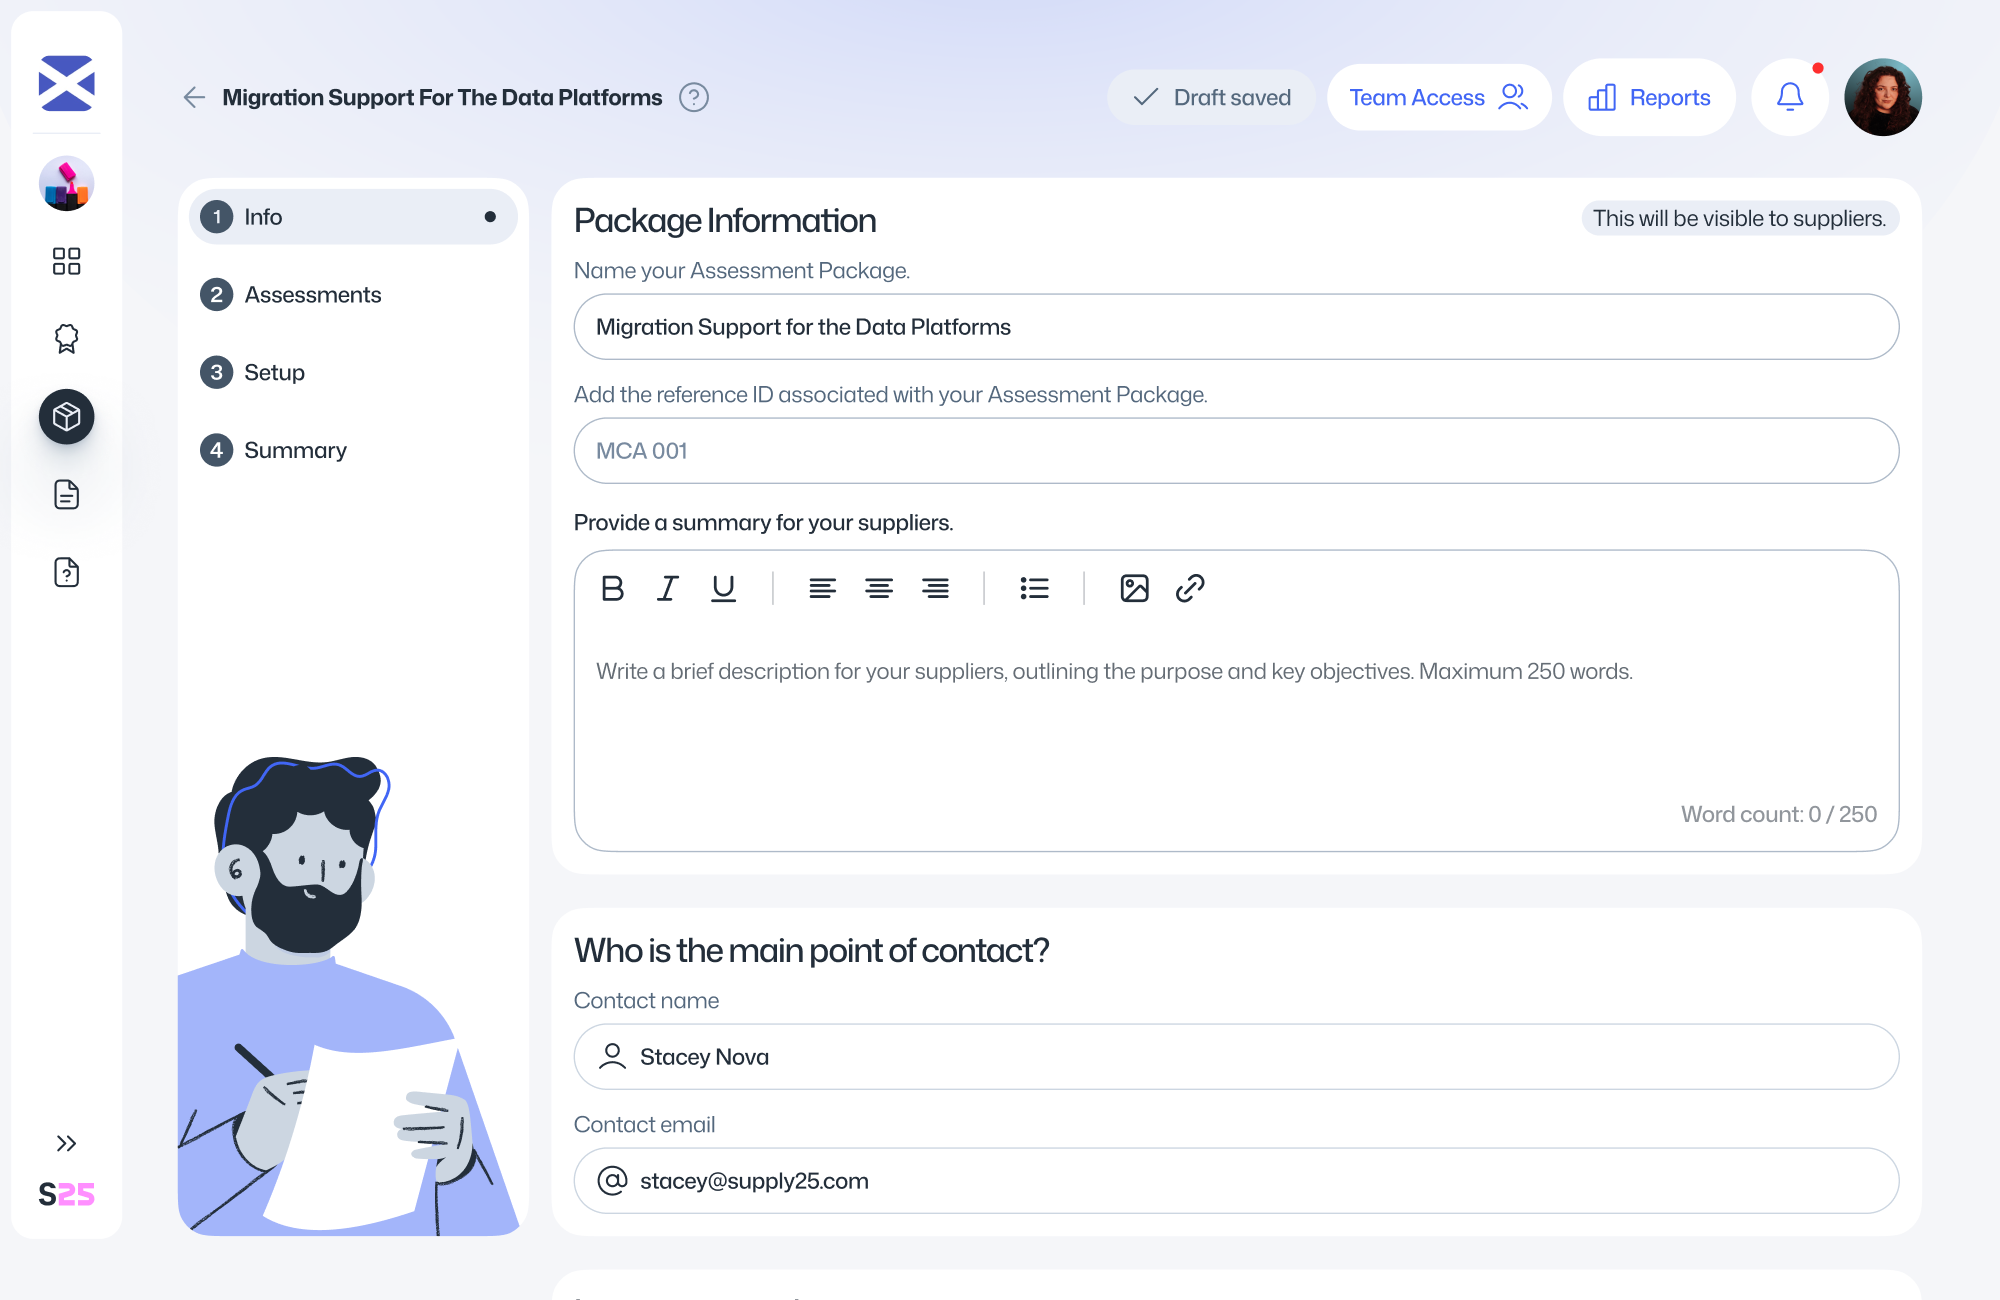
Click the Create First Package button from your "My Assessment Packages" dashboard. Read the introduction text and then press the Next button.
Name
Give your Assessment Package a relevant, clear and simple title. This will be visible to suppliers and must not include any sensitive information.

Reference ID
Enter a unique identifier for this contract. This could be an internal reference your organisation uses. The Reference ID will be visible to suppliers and must not contain any sensitive information.
Description.
Provide a short description of the tender. This will be shown to bidding suppliers and should briefly explain the purpose of the procurement. Do not include any sensitive information.
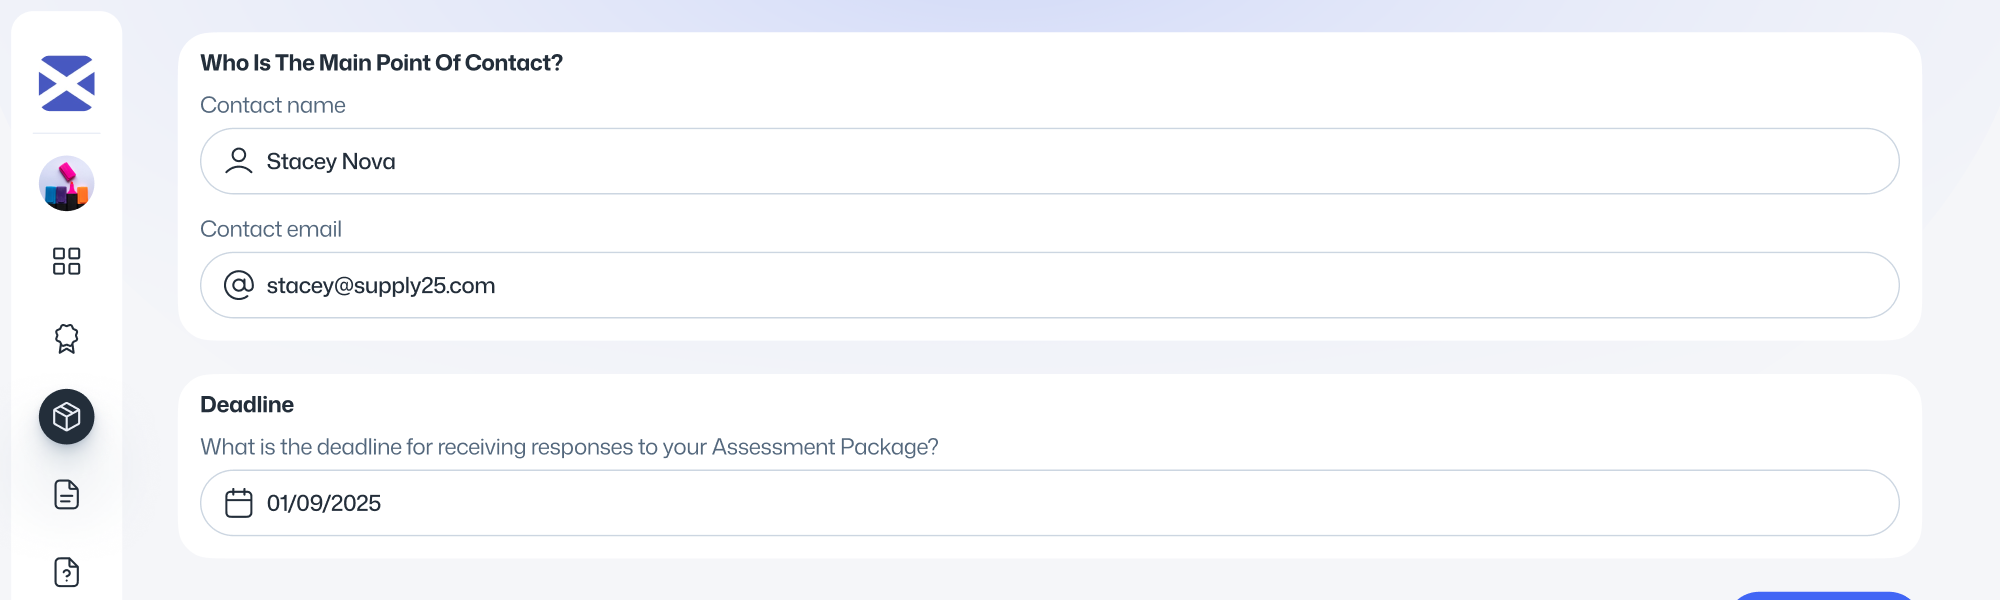
Point of Contact
Enter the name and email address of the person leading this Assessment Package within your organisation. This information is for internal use only and helps your team know who to contact for updates or coordination. Suppliers will not see these details.
Improvement Plan
Decide whether to allow suppliers to submit an Improvement Plan. This option gives suppliers who do not initially meet the minimum requirements another chance to explain how they will meet those requirements within an agreed timeframe.
Note: Improvement Plans are not legally enforceable on their own, but you can choose to include them in the final contract if you want to make them binding.
Deadline
Set the deadline date and time for suppliers to submit their assessment responses (and any Improvement Plans). You can update the deadline at any time until it passes.
Select Assessments
Select the assessments you want to include in your Assessment Package. These are the assessments that suppliers will need to complete as part of their tender submission.
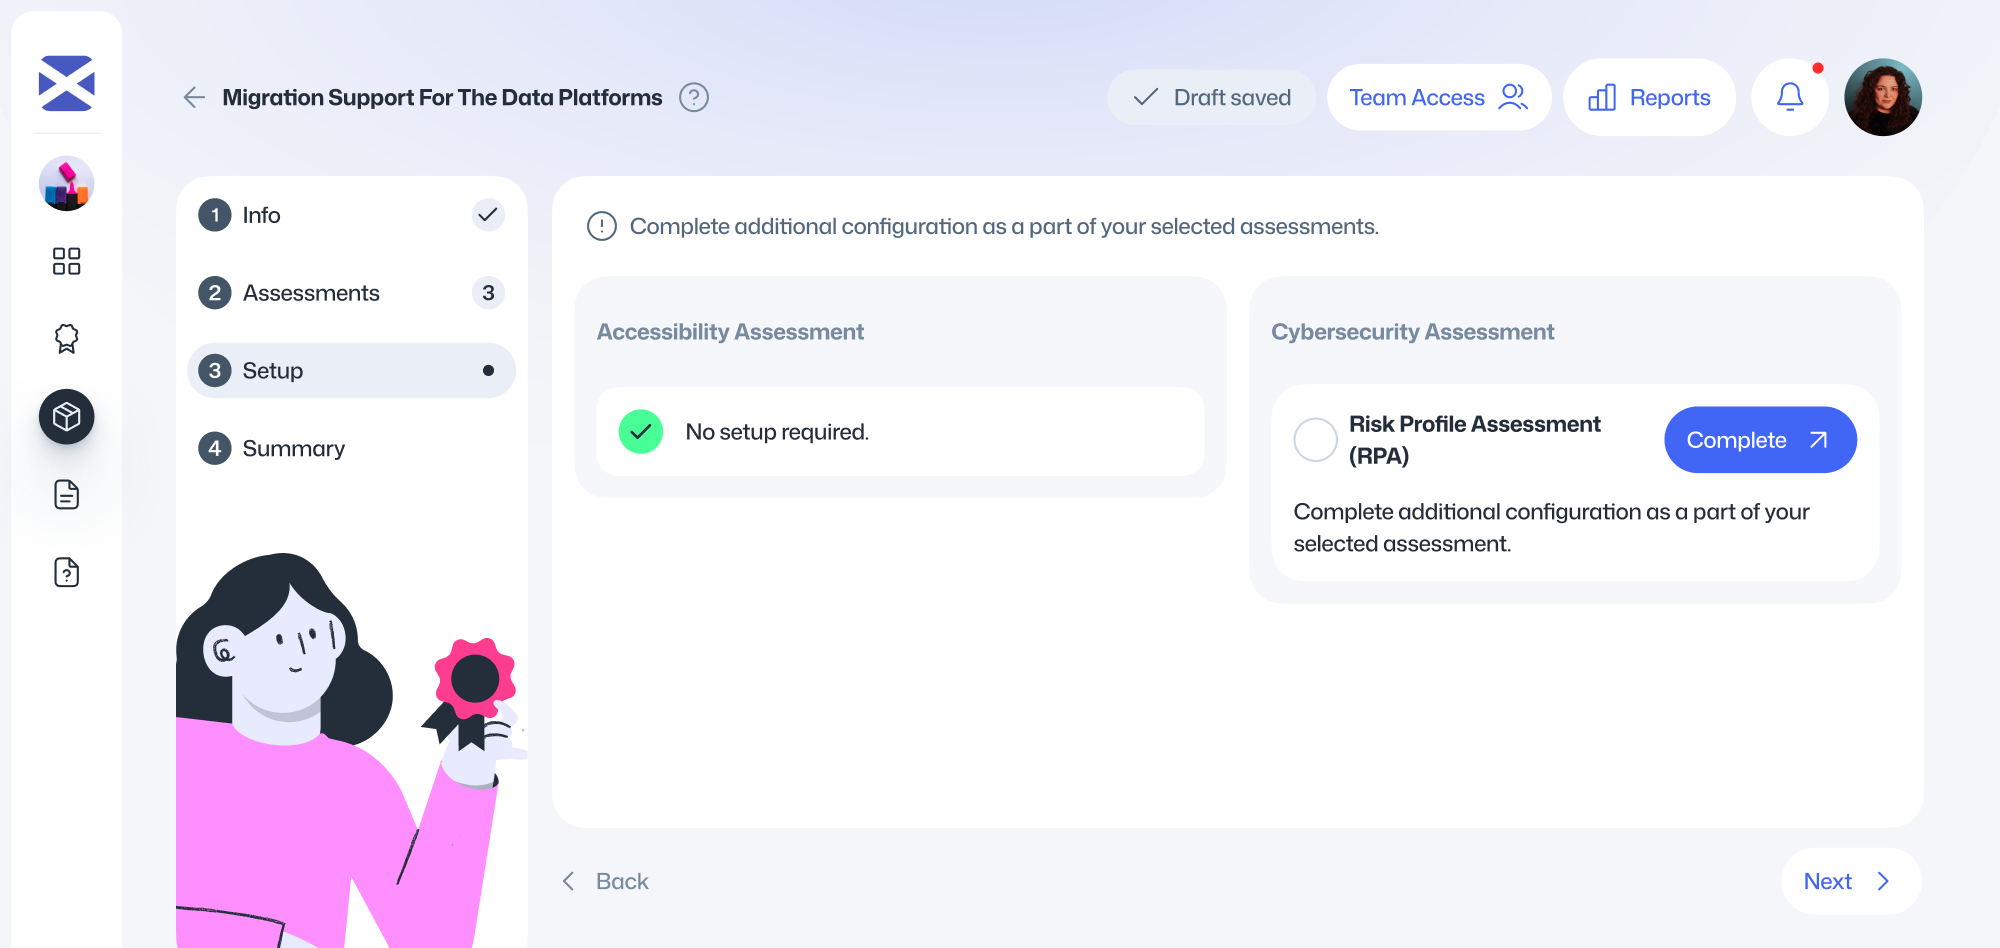
Setup Assessments
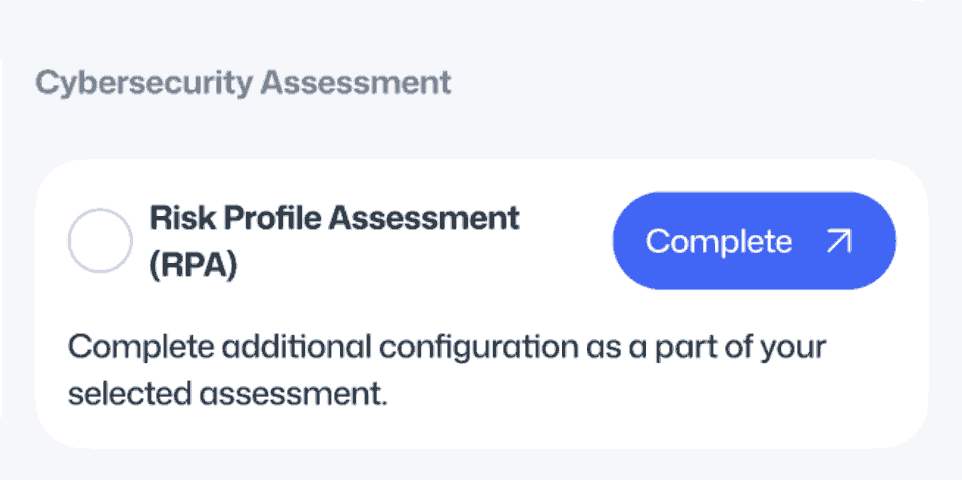
Some assessments require additional setup. For example, the Cyber Security Assessment from the Scottish Government requires you to complete a Risk Profile Assessment (RPA) before it can be included in the package. Refer to the How does the Cyber Security Assessment work? section for more guidance.

Cybersecurity
How does the Cyber Security Assessment work?
The Cyber Security Assessment, developed by the Scottish Government, helps buyers assess whether suppliers meet appropriate security standards for the contract.
It has two parts:
- The Risk Profile Assessment (RPA) – completed by the buying organisation.
- The Supplier Assurance Questionnaire (SAQ) – completed by each bidding supplier.
You must complete the RPA before activating the Assessment Package. The RPA determines the level of cyber risk for the contract – Low, Moderate, or High – and automatically generates the matching SAQ for suppliers to complete. Each level has a different number and complexity of questions to ensure the assessment is proportionate to the risk.
How do I complete the Risk Profile Assessment?
If you’ve chosen to include a Cyber Security Assessment in your Assessment Package, you must first complete a Risk Profile Assessment (RPA). This configures the supplier assessment and determines the appropriate level of cyber risk for the contract.

On Step 3 – Setup, click Cyber Security Assessment to open the Risk Profile Assessment. It will open in a new tab.
The Risk Profile Assessment will open in a new tab.
Scroll down and click Start assessment to begin.
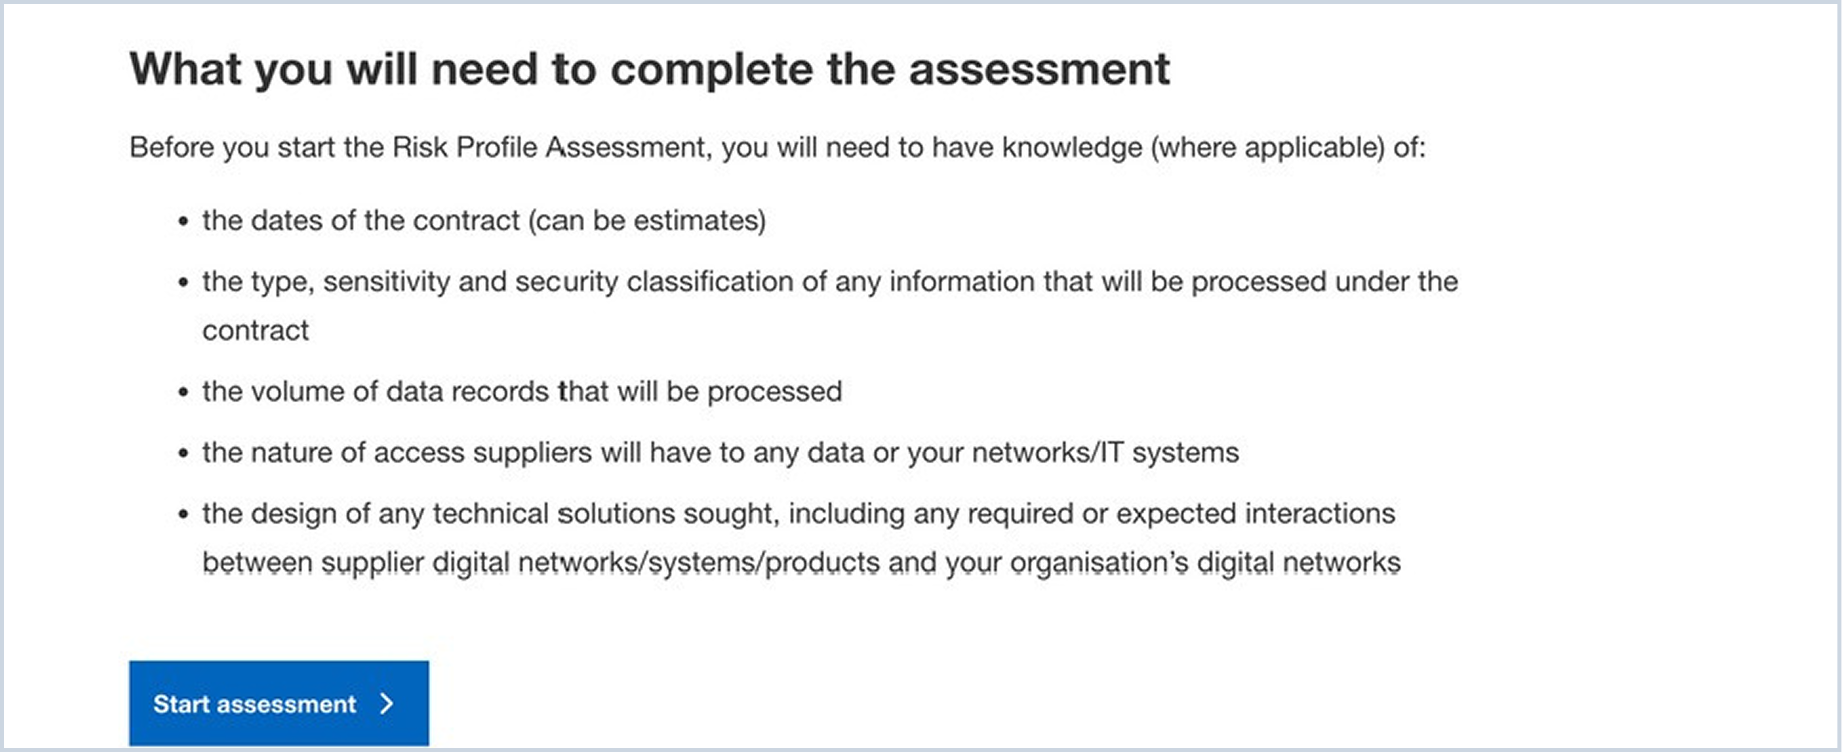
Answer each question one by one. Your answers are saved automatically, and you can return to the assessment later if needed.
- All questions are mandatory.
- You can preview upcoming questions.
- For additional help, expand the What does this mean? section under each question.
- A progress bar on the right will track your completion.
Once finished, review your answers on the Review your assessment answers page. If you need to make changes, click Edit next to the relevant question.
When you’re ready, scroll to the bottom and click Submit.
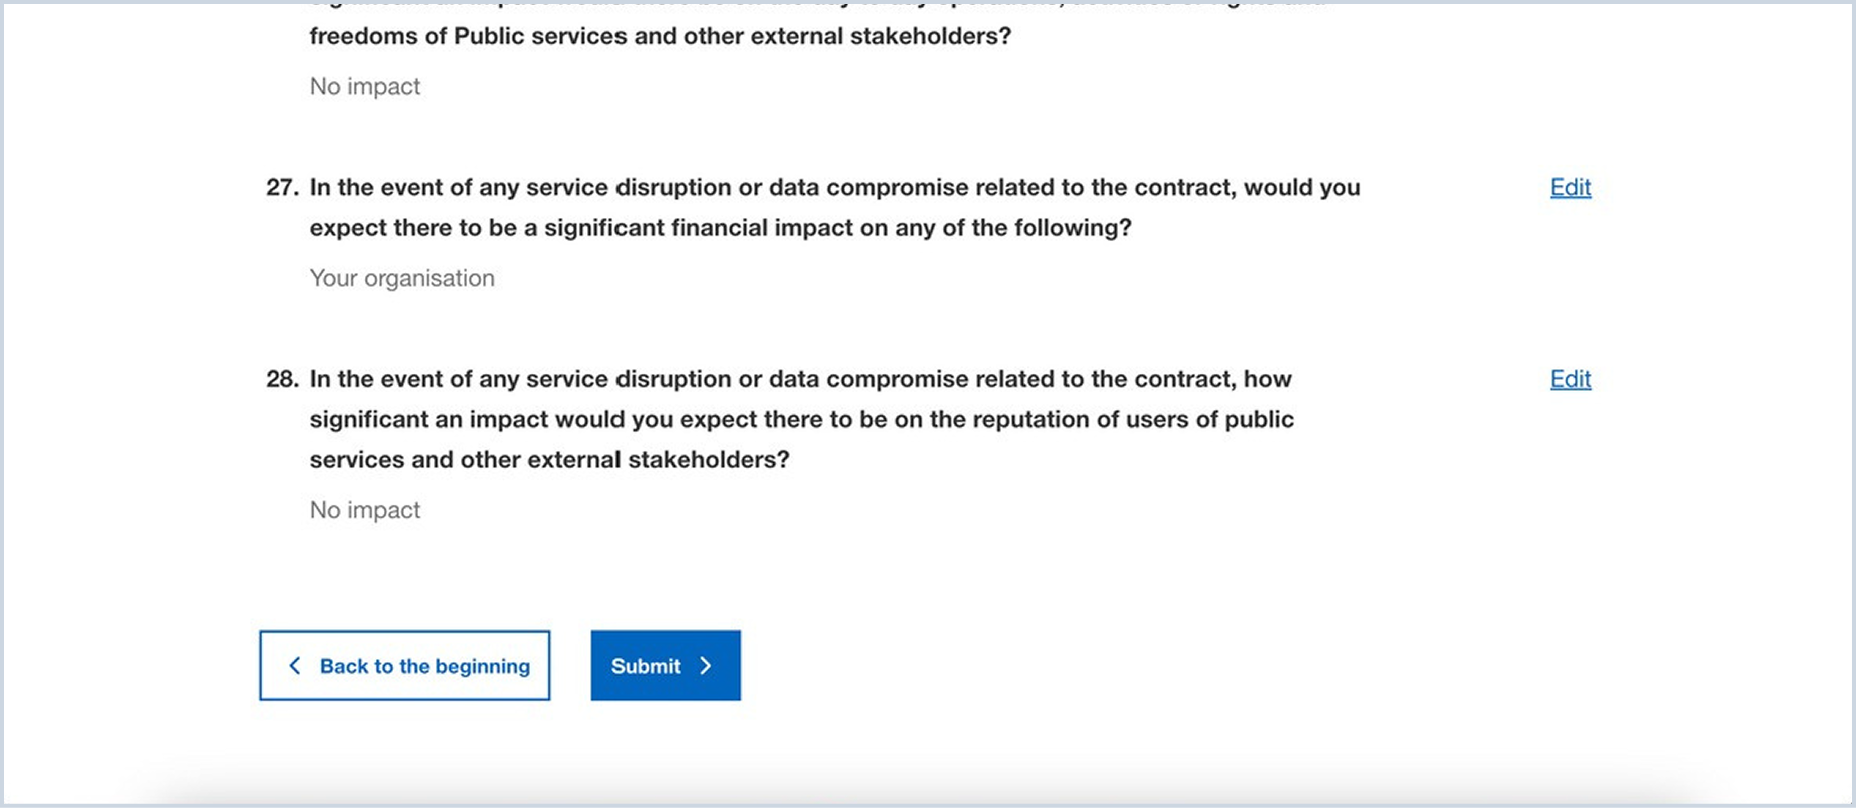
Based on your answers, the risk level of the contract is generated: Low, Moderate, or High. This determines which version of the Supplier Assurance Questionnaire (SAQ) will be sent to suppliers.
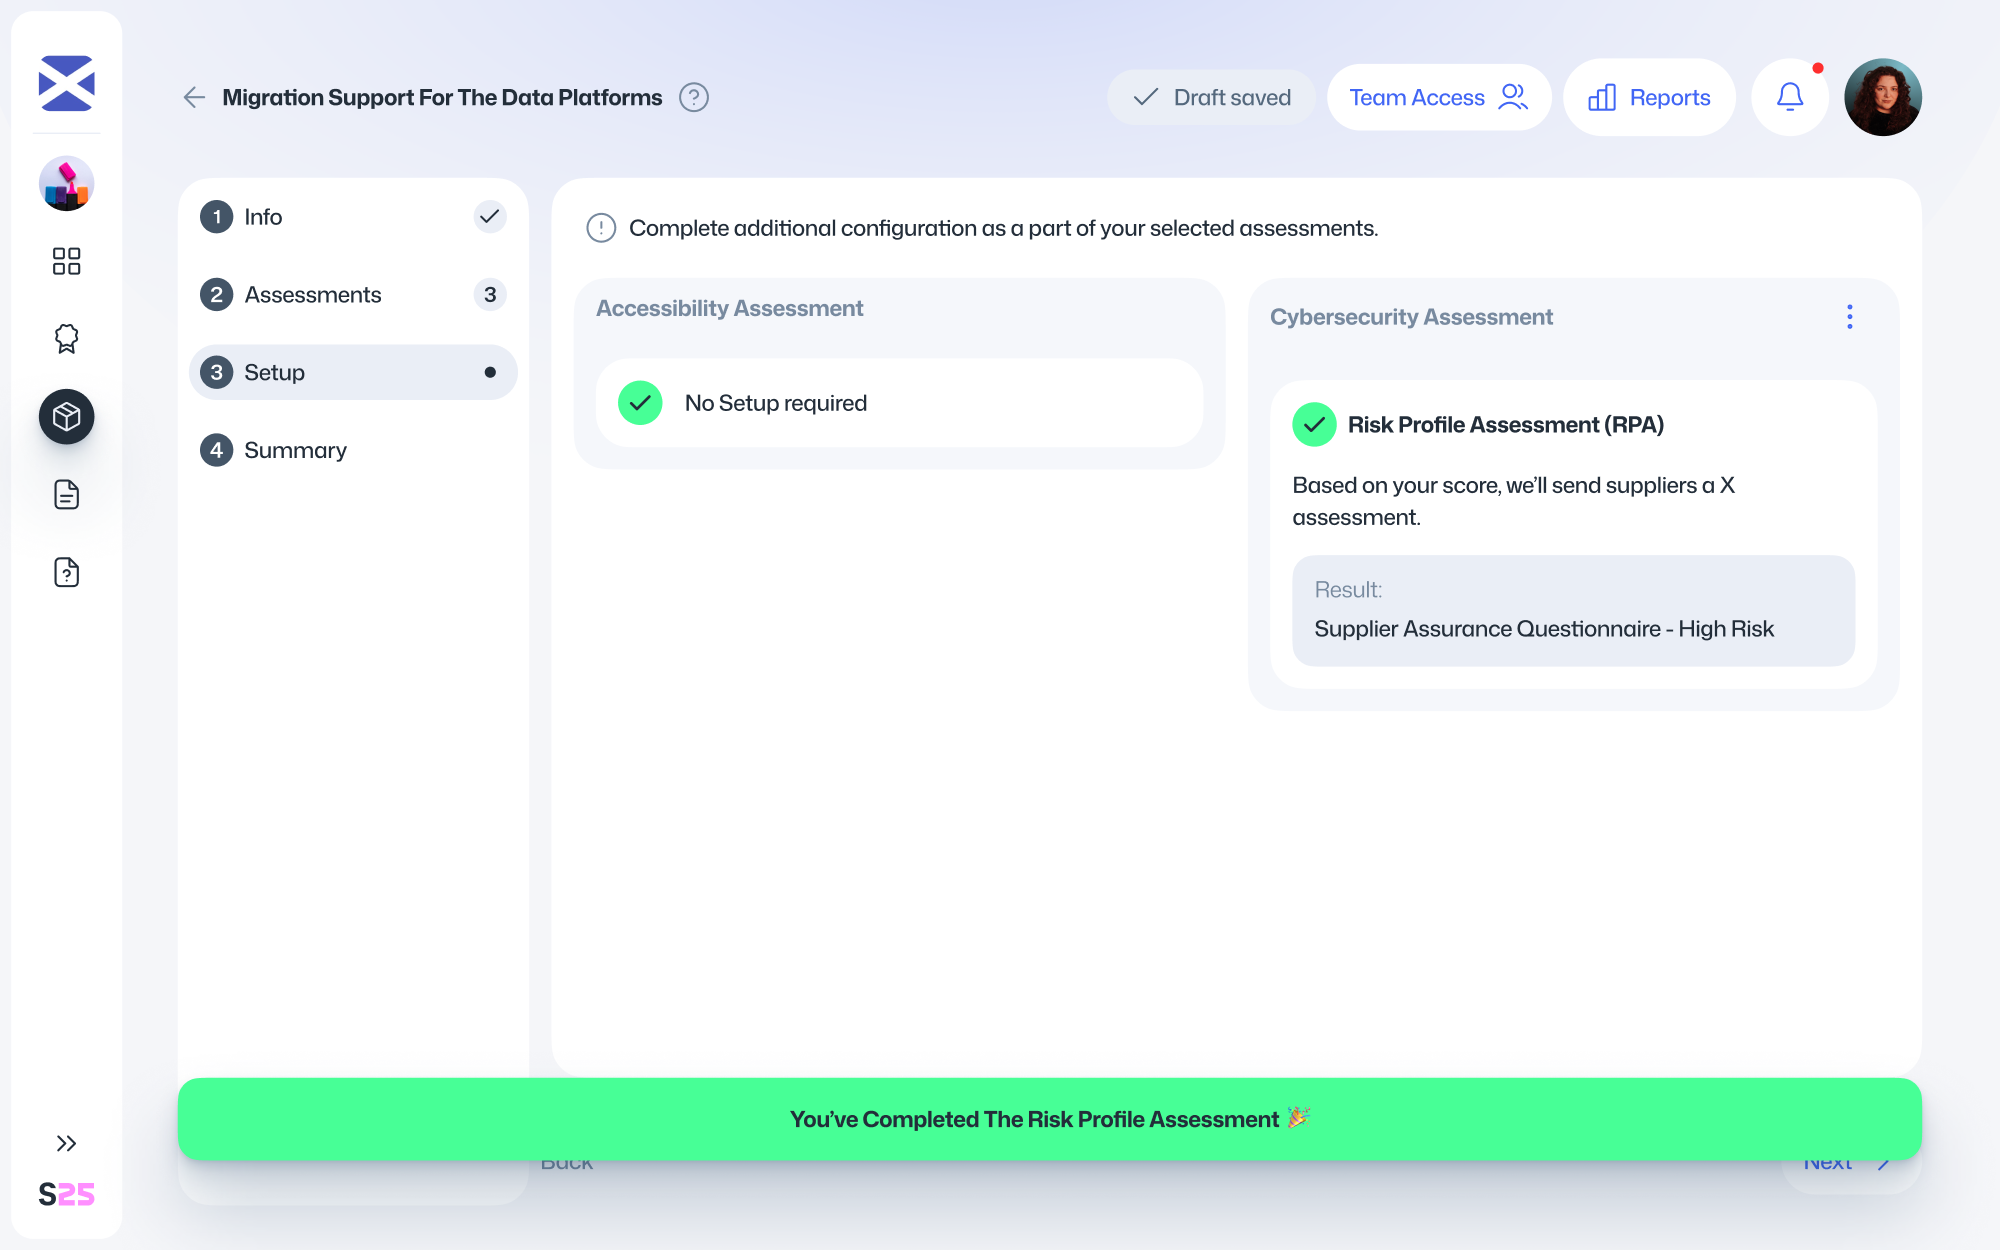
The Cyber Security Assessment is now ready.
- You can preview the generated SAQ in a new tab.
- If the contract requirements change, you can retake the Risk Profile Assessment to regenerate the SAQ.
- You can now close the Risk Profile Assessment tab and return to the previous tab to continue setting up your Assessment Package.
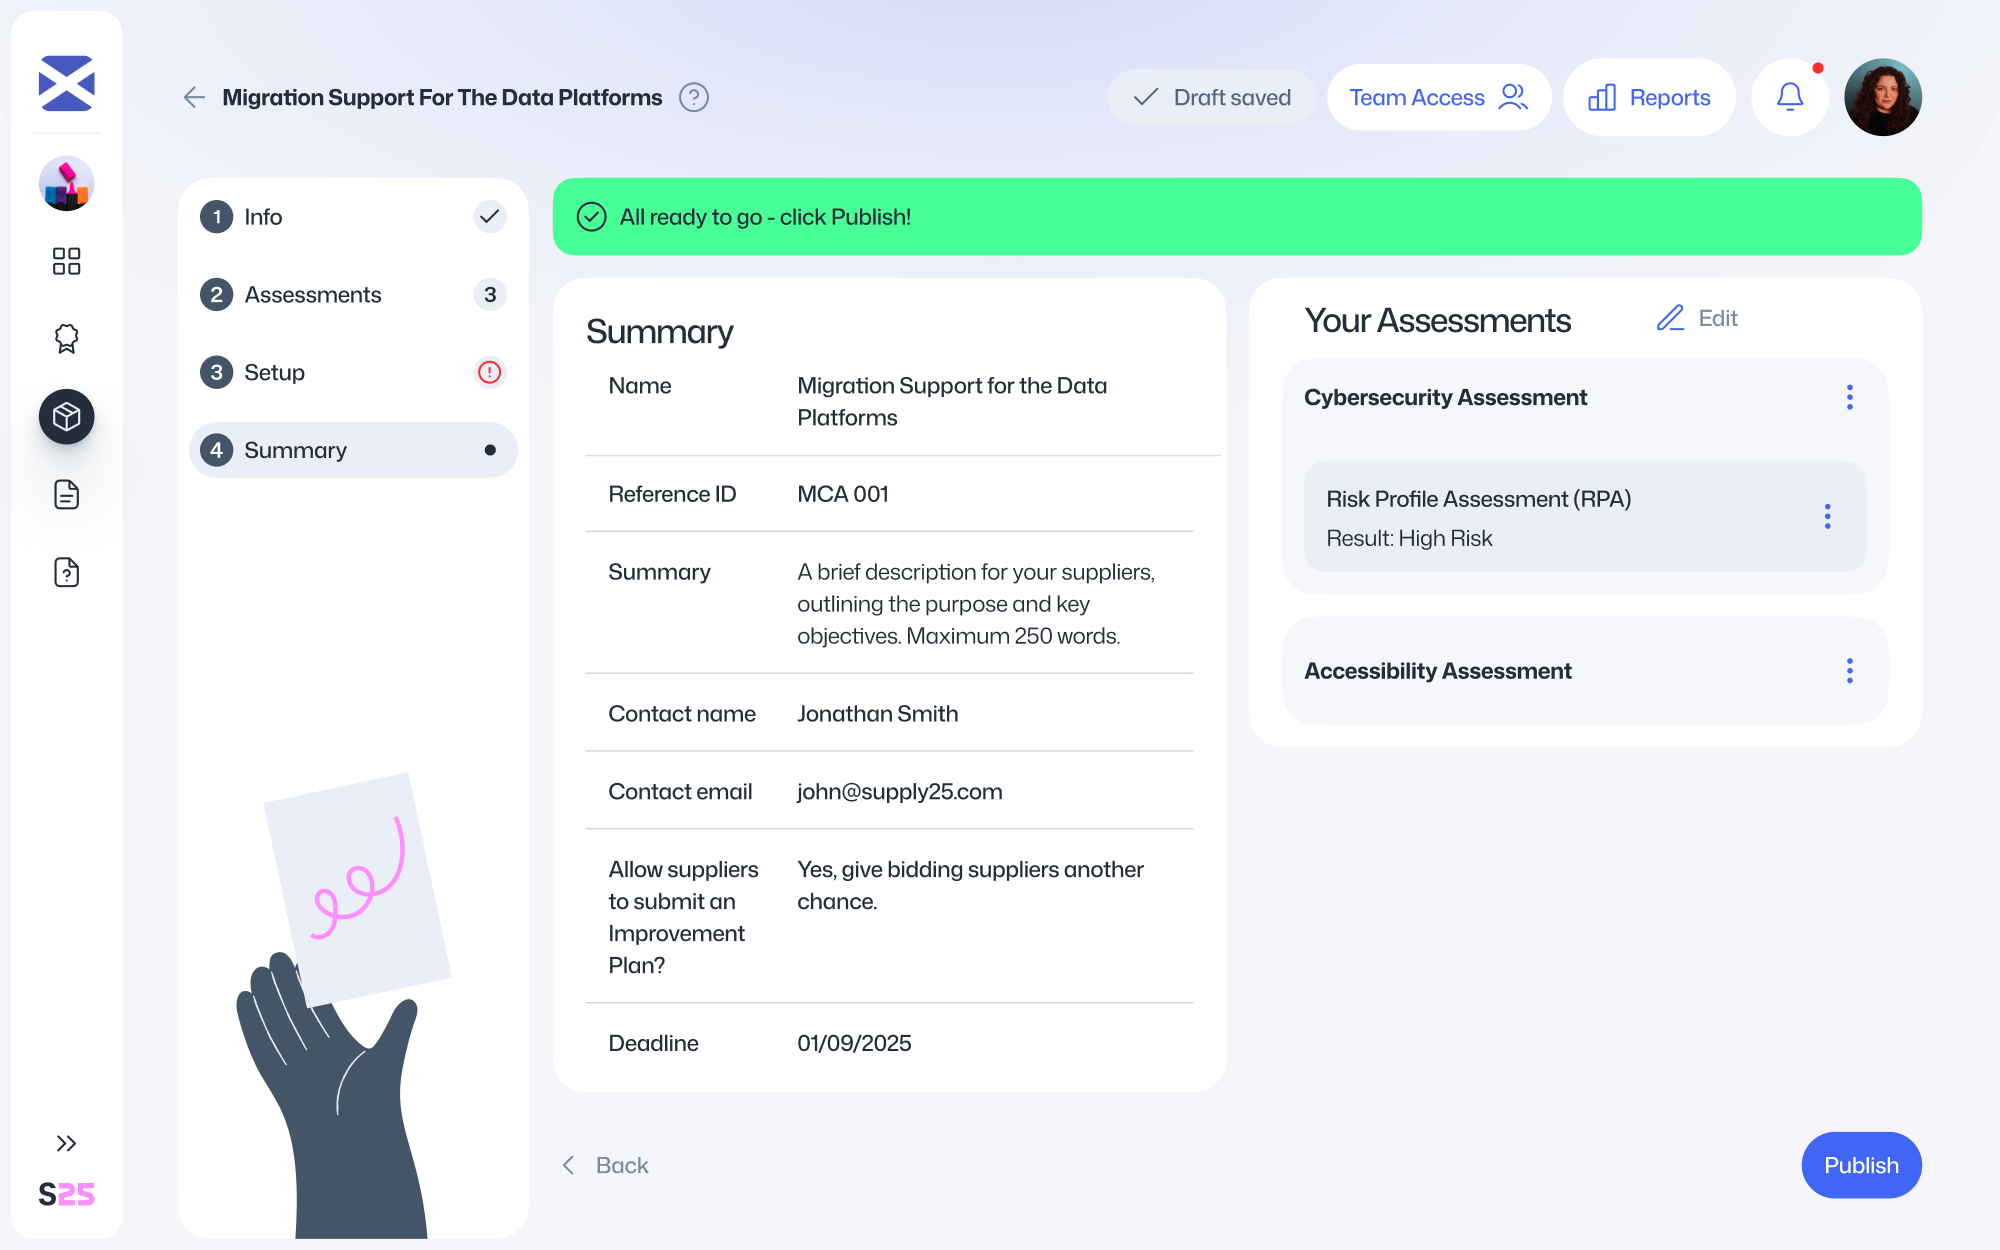
Go to the Summary page to review all the details of your Assessment Package. Once everything is correct, click Publish.
This action is irreversible. After publishing, you will not be able to change key details – including the selected assessments.
Once published, Supply25 generates a unique link to the supplier assessments.
You can include this link in your Invitation to Tender (ITT) or share it with suppliers directly, depending on your procurement process.
Managing your Assessment Package

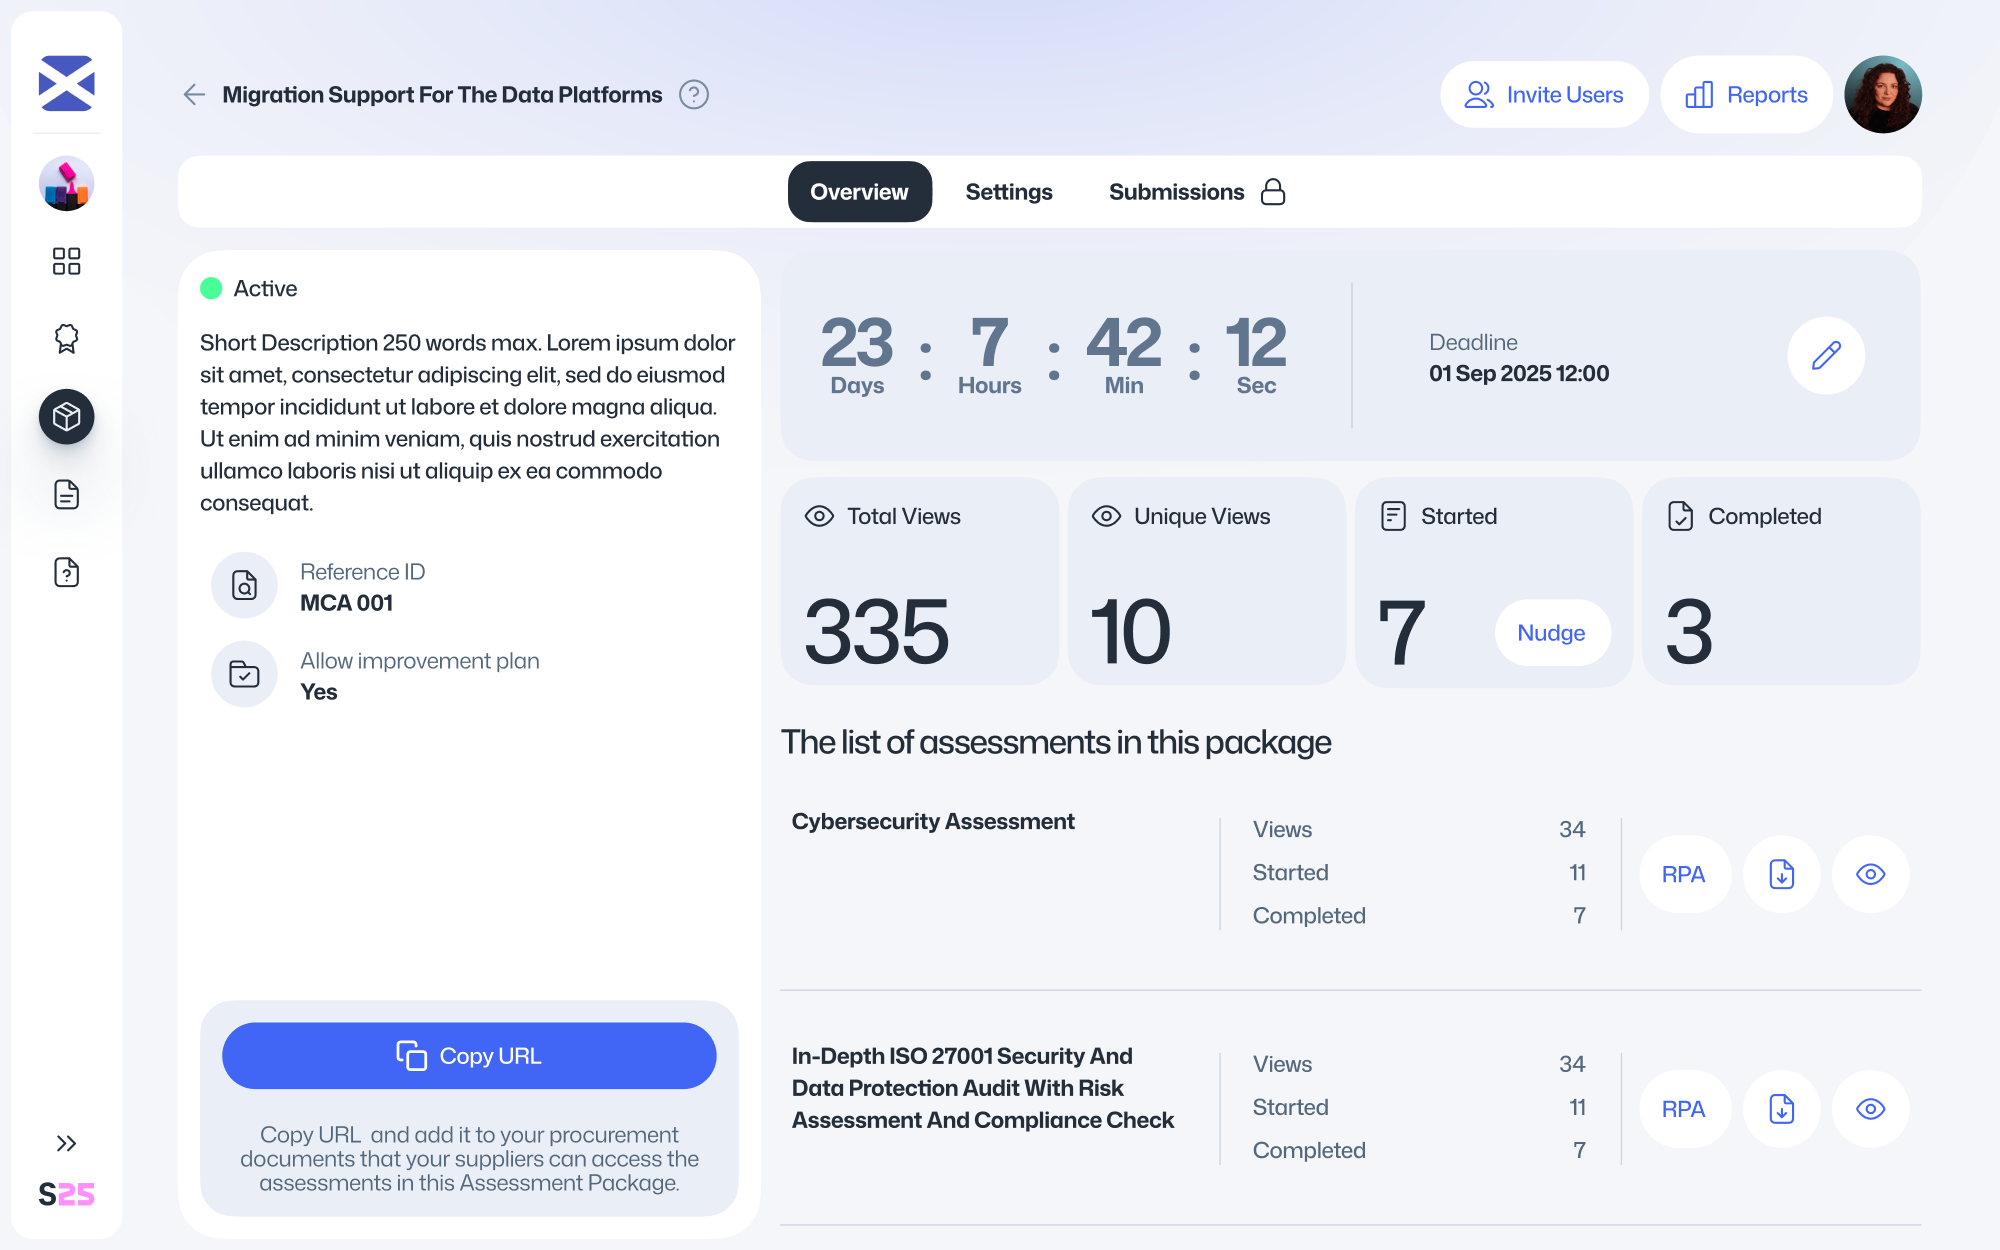
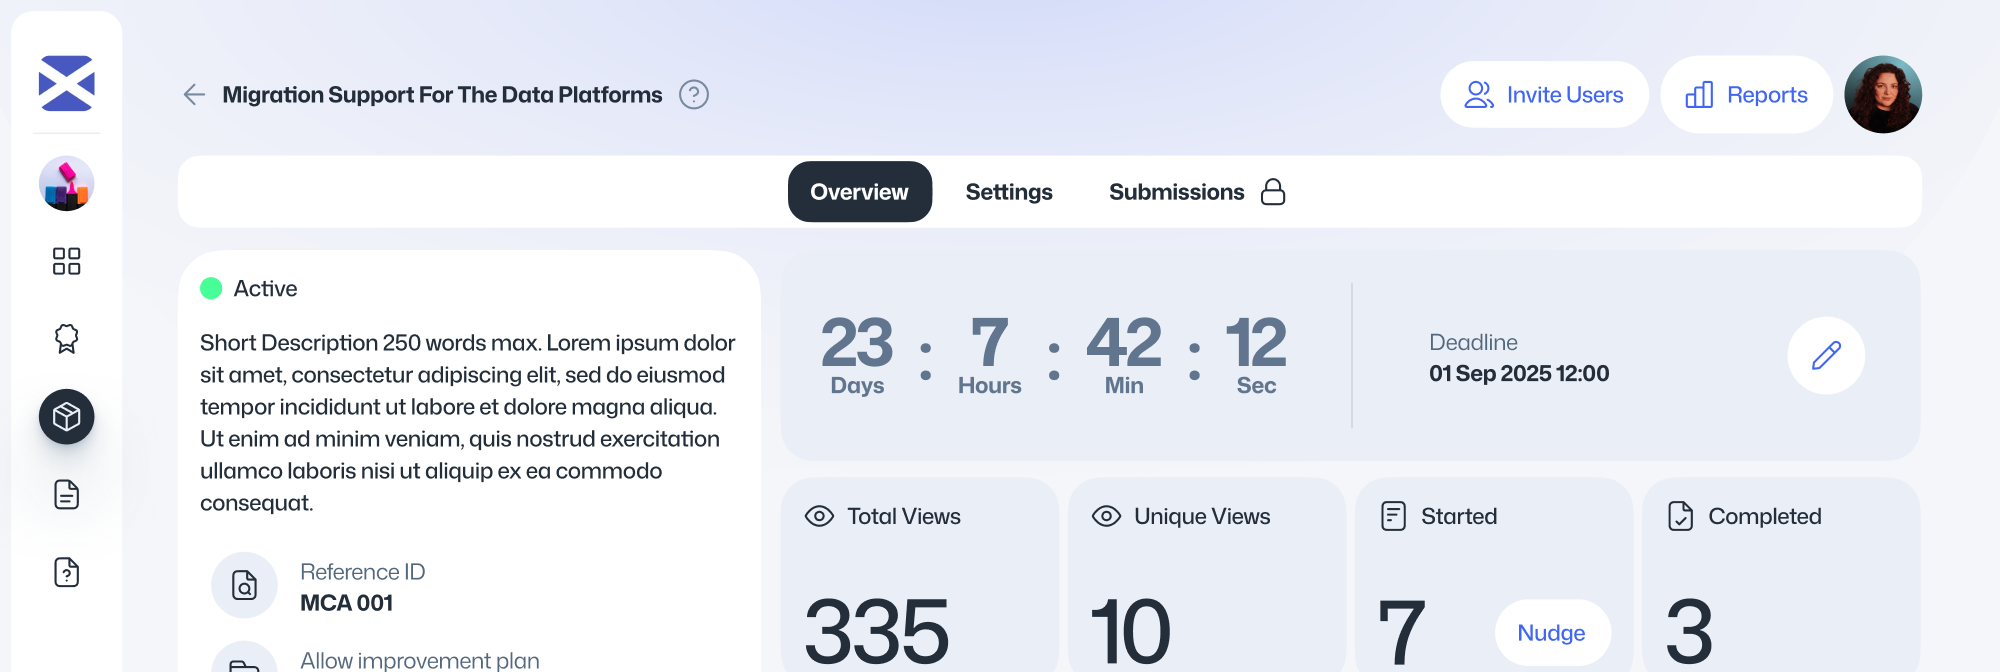
Once an Assessment Package is published, it will stay open for supplier submissions until the deadline.
Before the deadline, you won’t be able to view individual submissions, but you can monitor real-time activity – including how many suppliers have viewed, started or completed their assessments. You can also view key details and preview the assessments included.
How do I change the deadline after publishing?
Select the relevant Assessment Package.
Click the Edit icon next to the deadline.
Set the new date and time.
You can update the deadline at any time, as long as the current deadline hasn’t passed.
How do I send bidding suppliers the assessments?

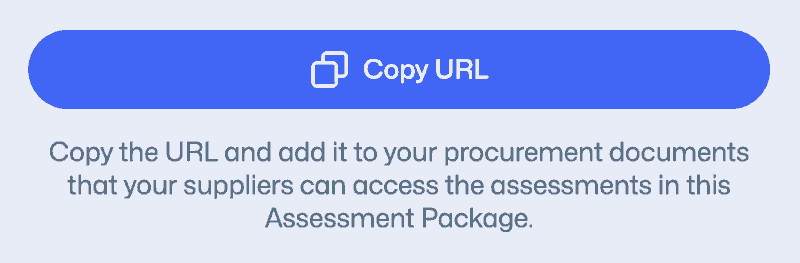
On the individual Assessment Package page, click the Copy URL button. This generates a single link that you can share with all bidding suppliers.
Each supplier will use the same link to access the assessments, create their own account, and submit responses on behalf of their organisation.
You can include this link in your Invitation to Tender or share it directly with suppliers, depending on your procurement process.
Inviting guests to an Assessment Package
You may want to invite someone outside your organisation to help with reviewing or managing an Assessment Package. Guest users will only have access to the specific package they are invited to.
To invite a guest:
Open the individual Assessment Package.
Click the Team Access button.
Enter the guest’s email address.
Choose their permission level. By default, guests have read-only access.
Click Send invitation.
The guest will receive an email with instructions on how to join the platform.
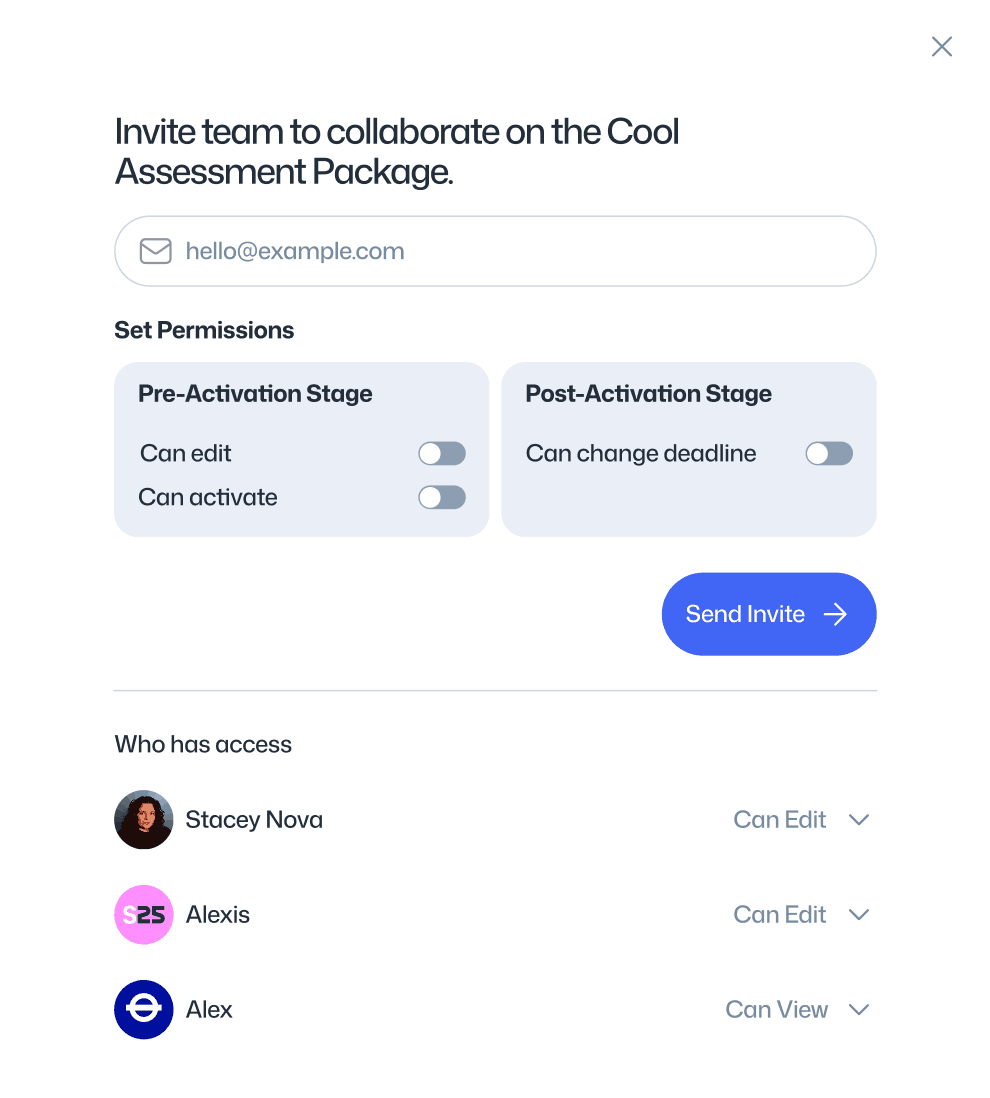
Managing guest access
Once a guest has accepted the invitation and joined the platform, they will appear under the Who has access section within Team Access.
From here, you can update their permissions or revoke access at any time.
Reviewing Submissions
Once the submission deadline for an Assessment Package has passed, you’ll be able to review all supplier submissions on the Supply25 platform.
Suppliers will have completed their assessments on the platform and, depending on the instructions you’ve provided, may also have submitted supporting documents (such as a PDF output of their responses) through your usual procurement channels (e.g. Public Contracts Scotland). While you can review submissions offline as before, reviewing directly on the platform provides the added benefit of a clear audit trail for all actions and decisions.
How to review submissions
When an Assessment Package is ready for review, it will show the Review label on your Assessment Packages dashboard.
Click into the Assessment Package you want to review.
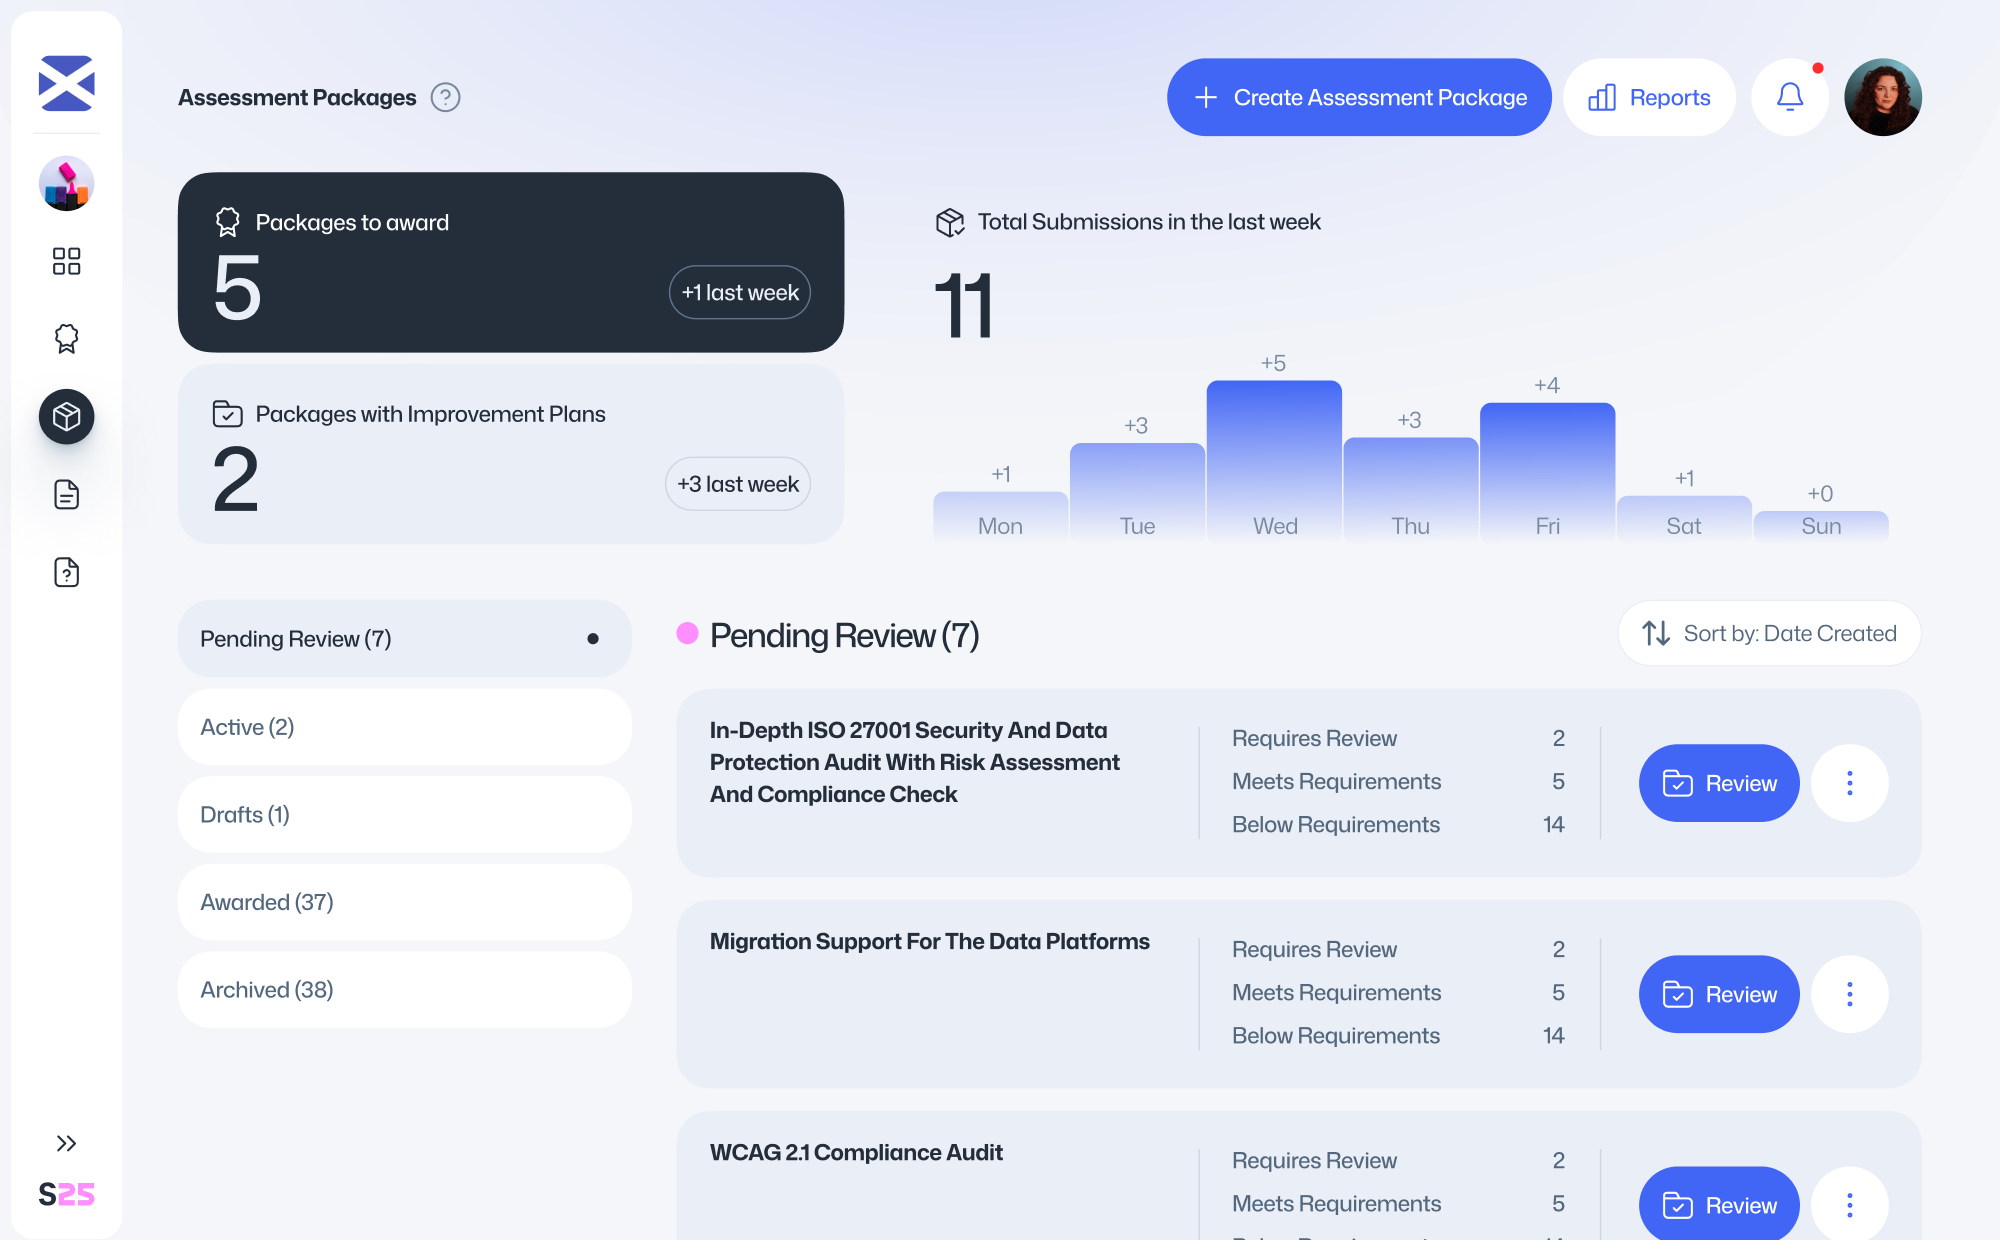
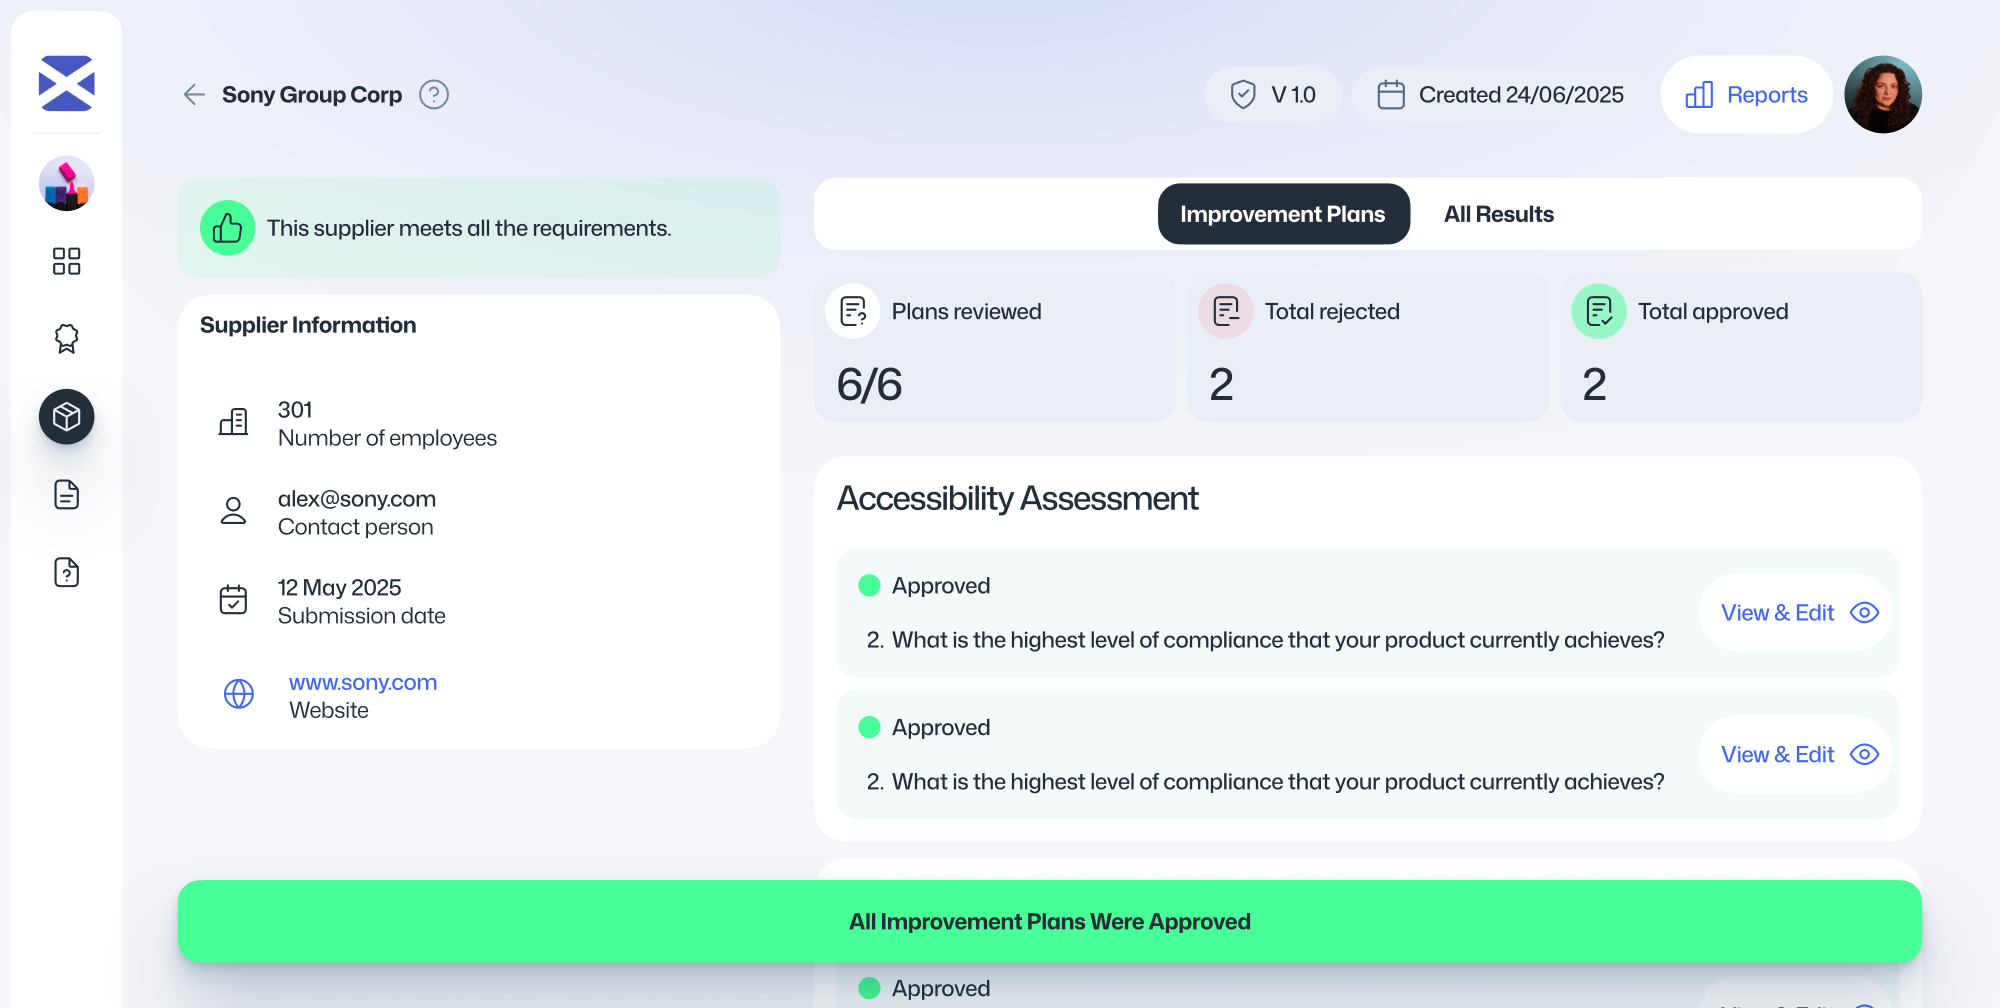
Submissions are displayed in a visual board layout, grouped into four columns:
- Review Required– suppliers who have submitted an Improvement Plan that you need to review and either accept or reject.
- Meets Requirements – suppliers who met all minimum requirements.
- Below Requirements – suppliers who did not meet the minimum requirements and did not submit an Improvement Plan.
- Late Submissions – suppliers who submitted assessments after the deadline.
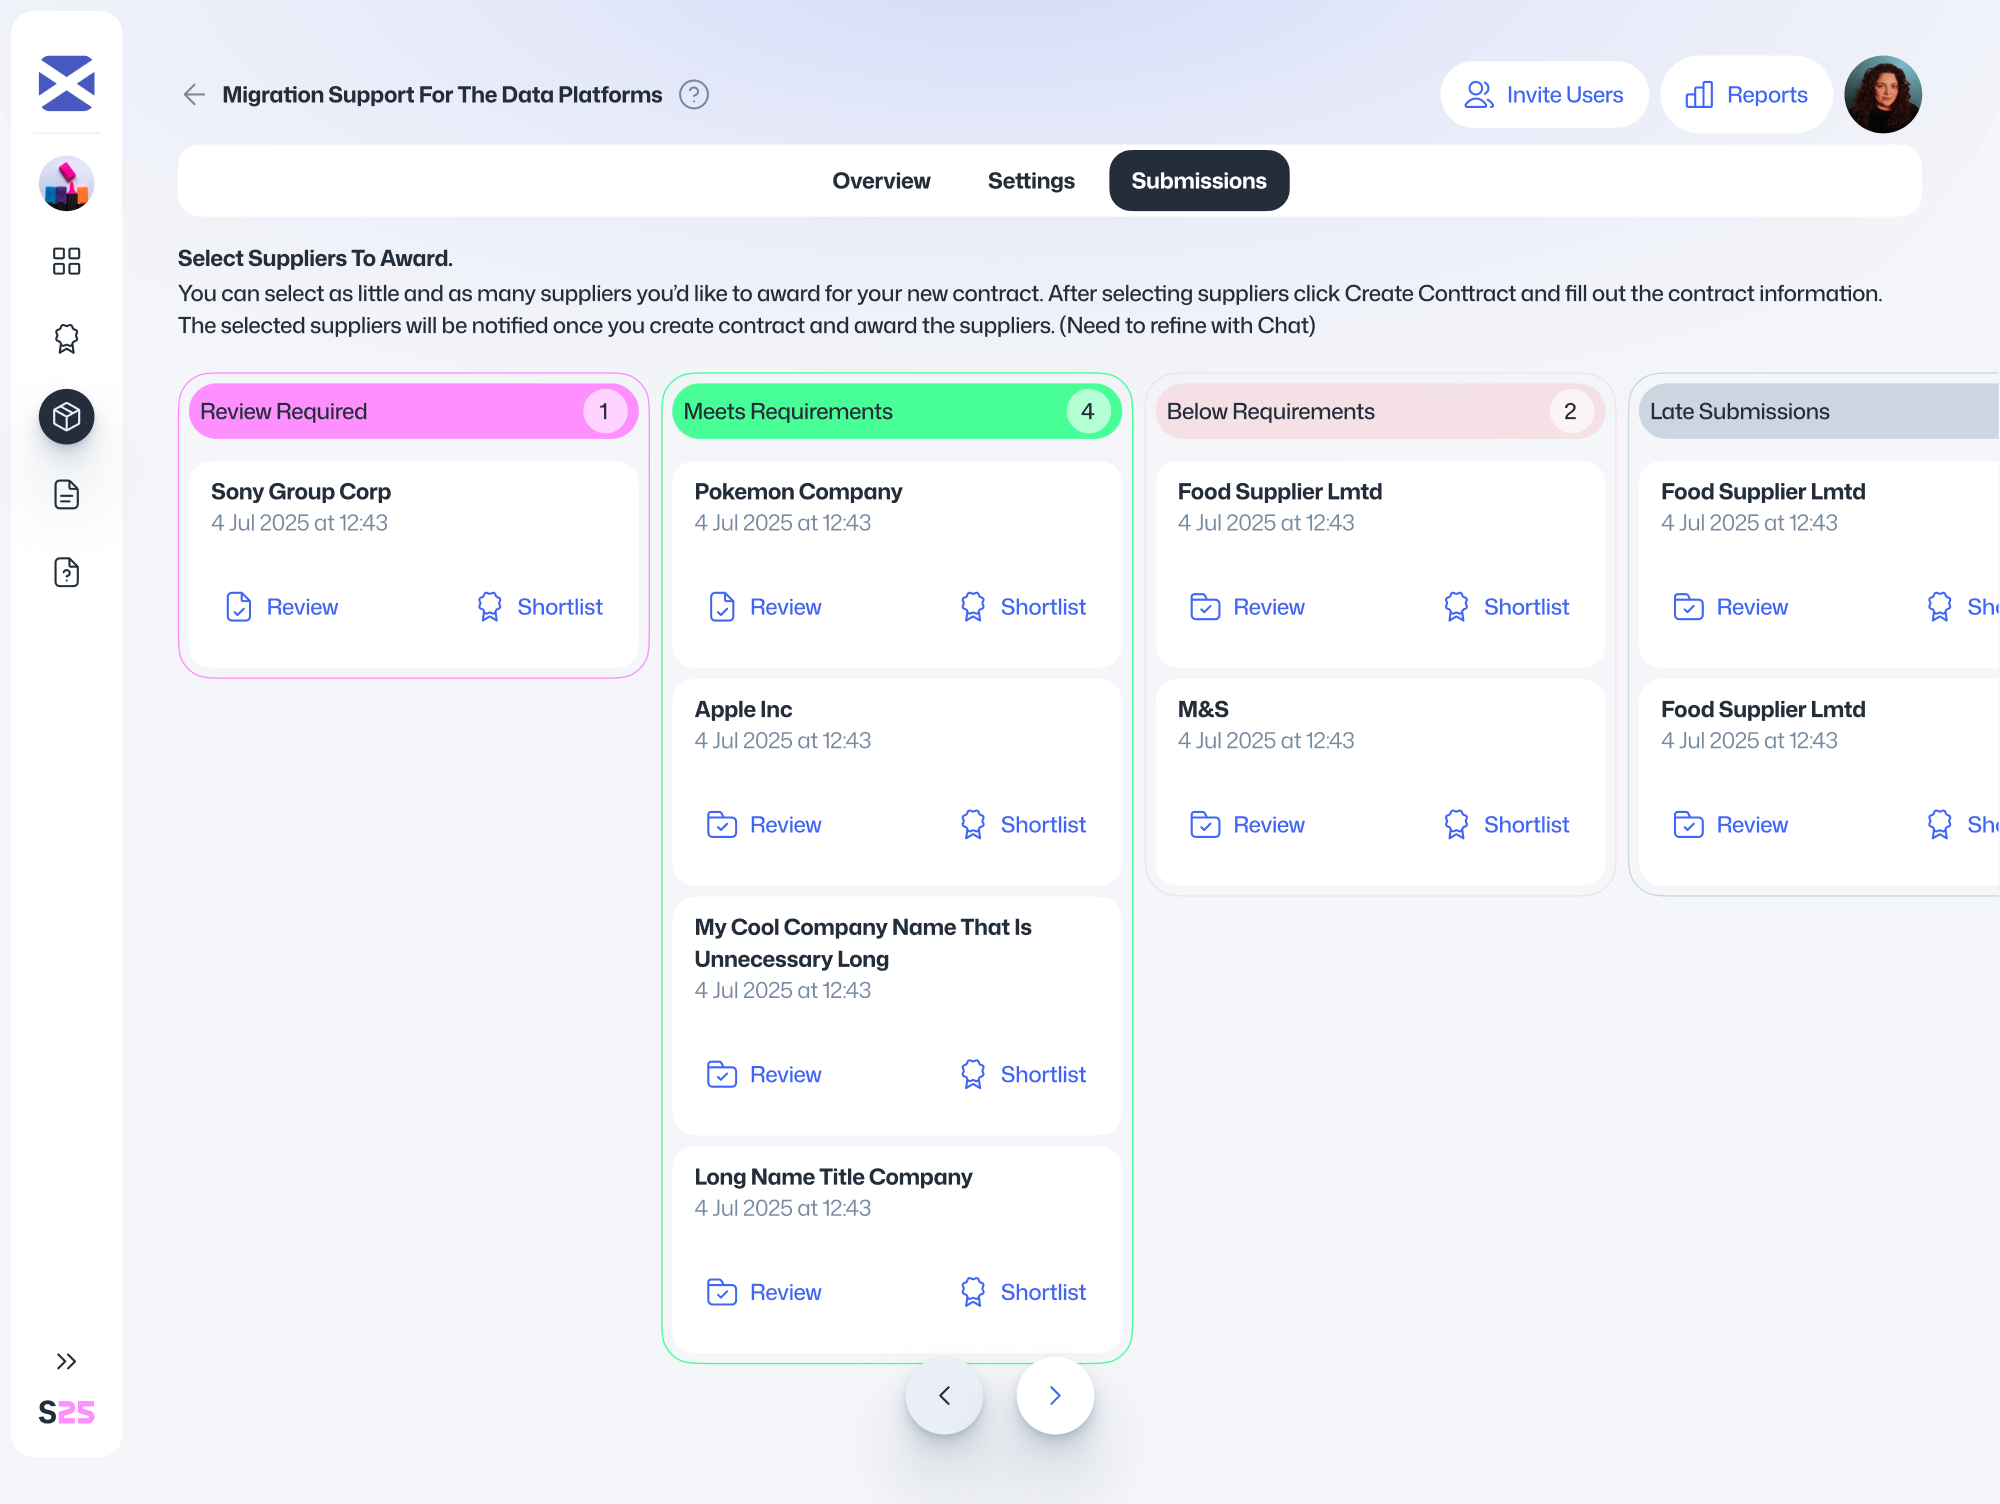
Click on a supplier in the Requires Review column to begin.
Within their submission, you’ll see which assessments and questions need review. Click Review Plan on the individual questions to begin reviewing the Improvement Plans.
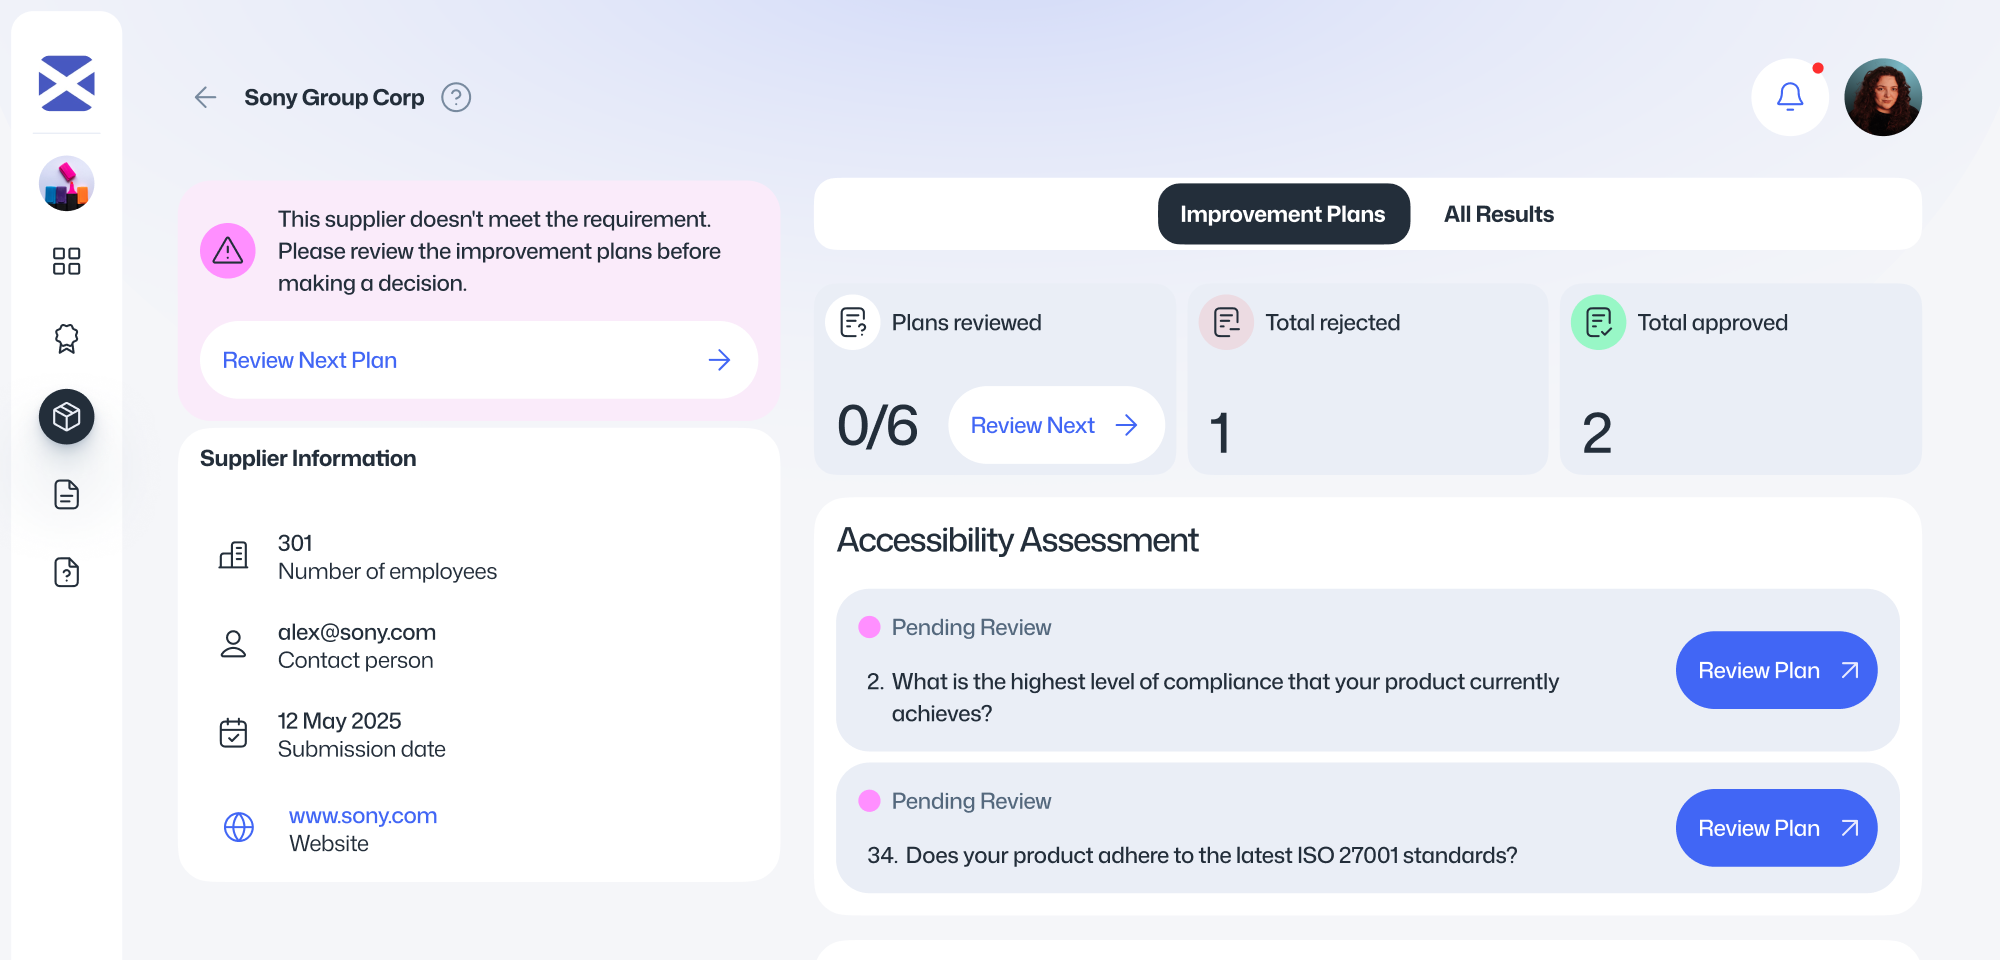
Under All Results tab you’ll see:
- The original supplier response.
- The stated minimum requirement.
- The supplier’s Improvement Plan response.
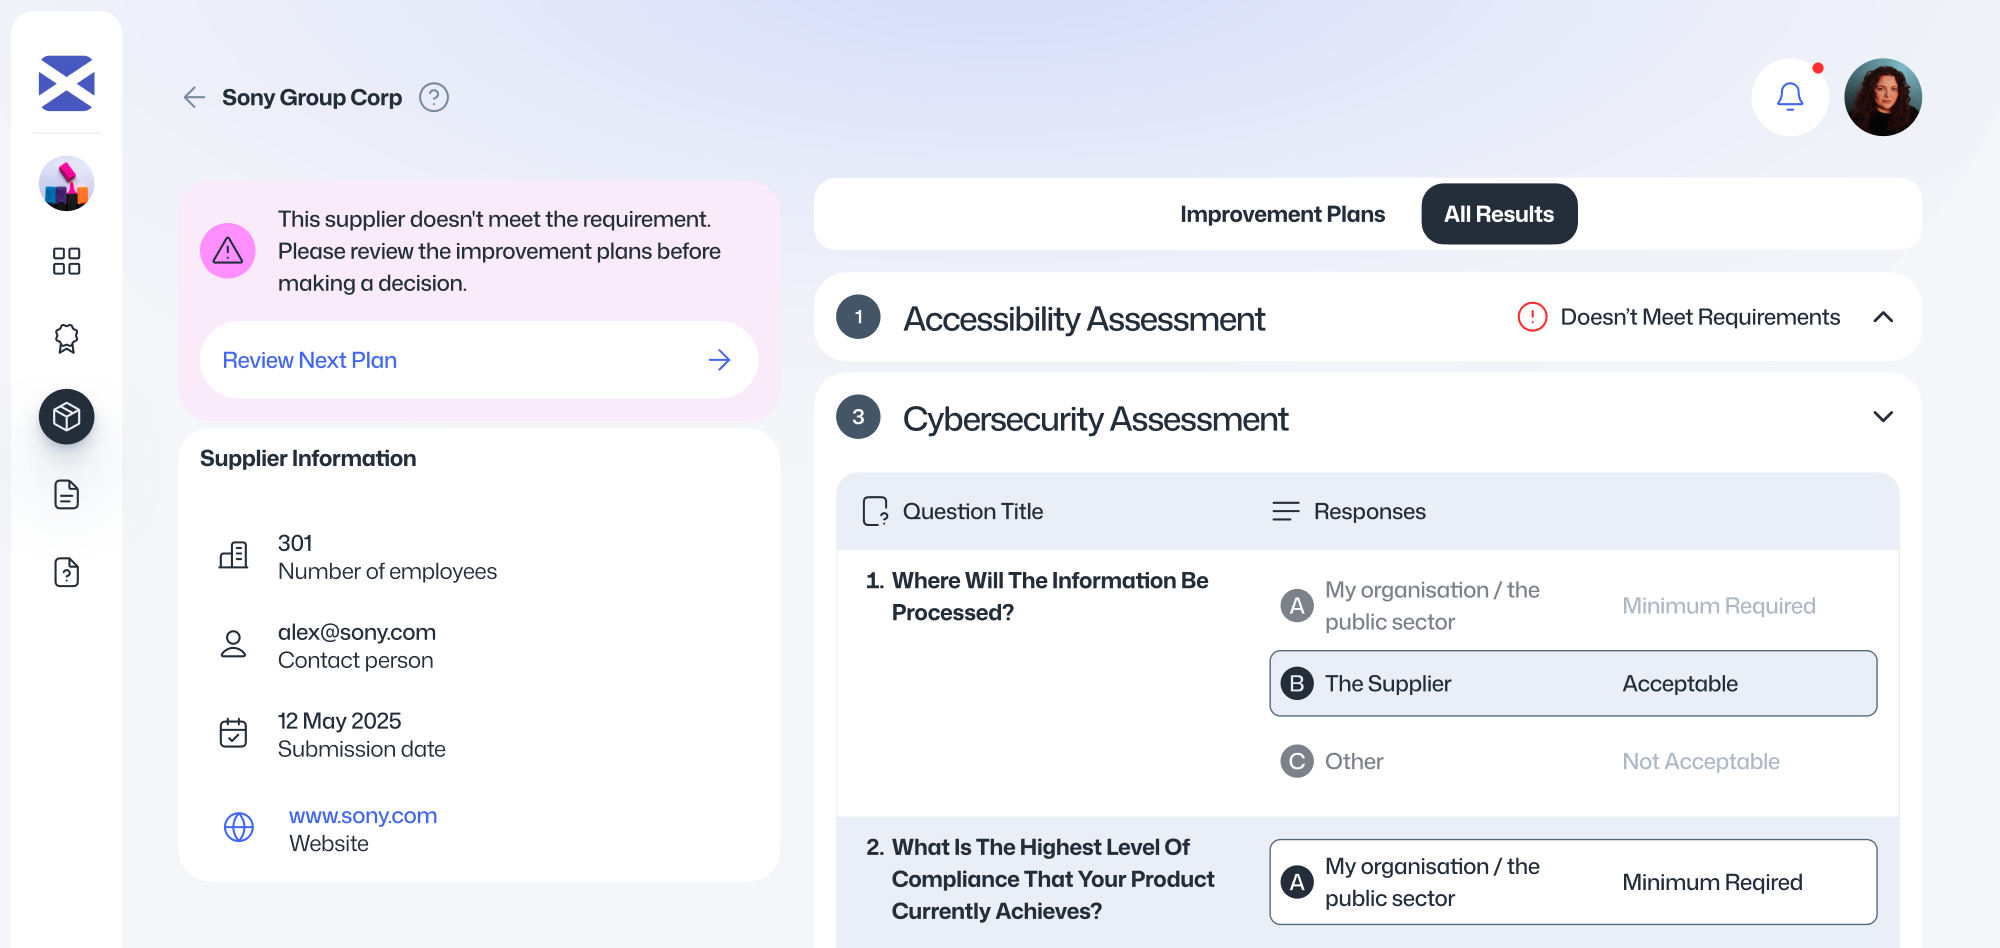
Click the Review Plan button to start reviewing each Improvement Plan.
For each question, decide whether the supplier’s plan satisfactorily addresses the requirement. You must either accept or reject the plan and provide a brief reason to support your decision.
These reasons are not visible to the supplier and are for your organisation’s internal records only.
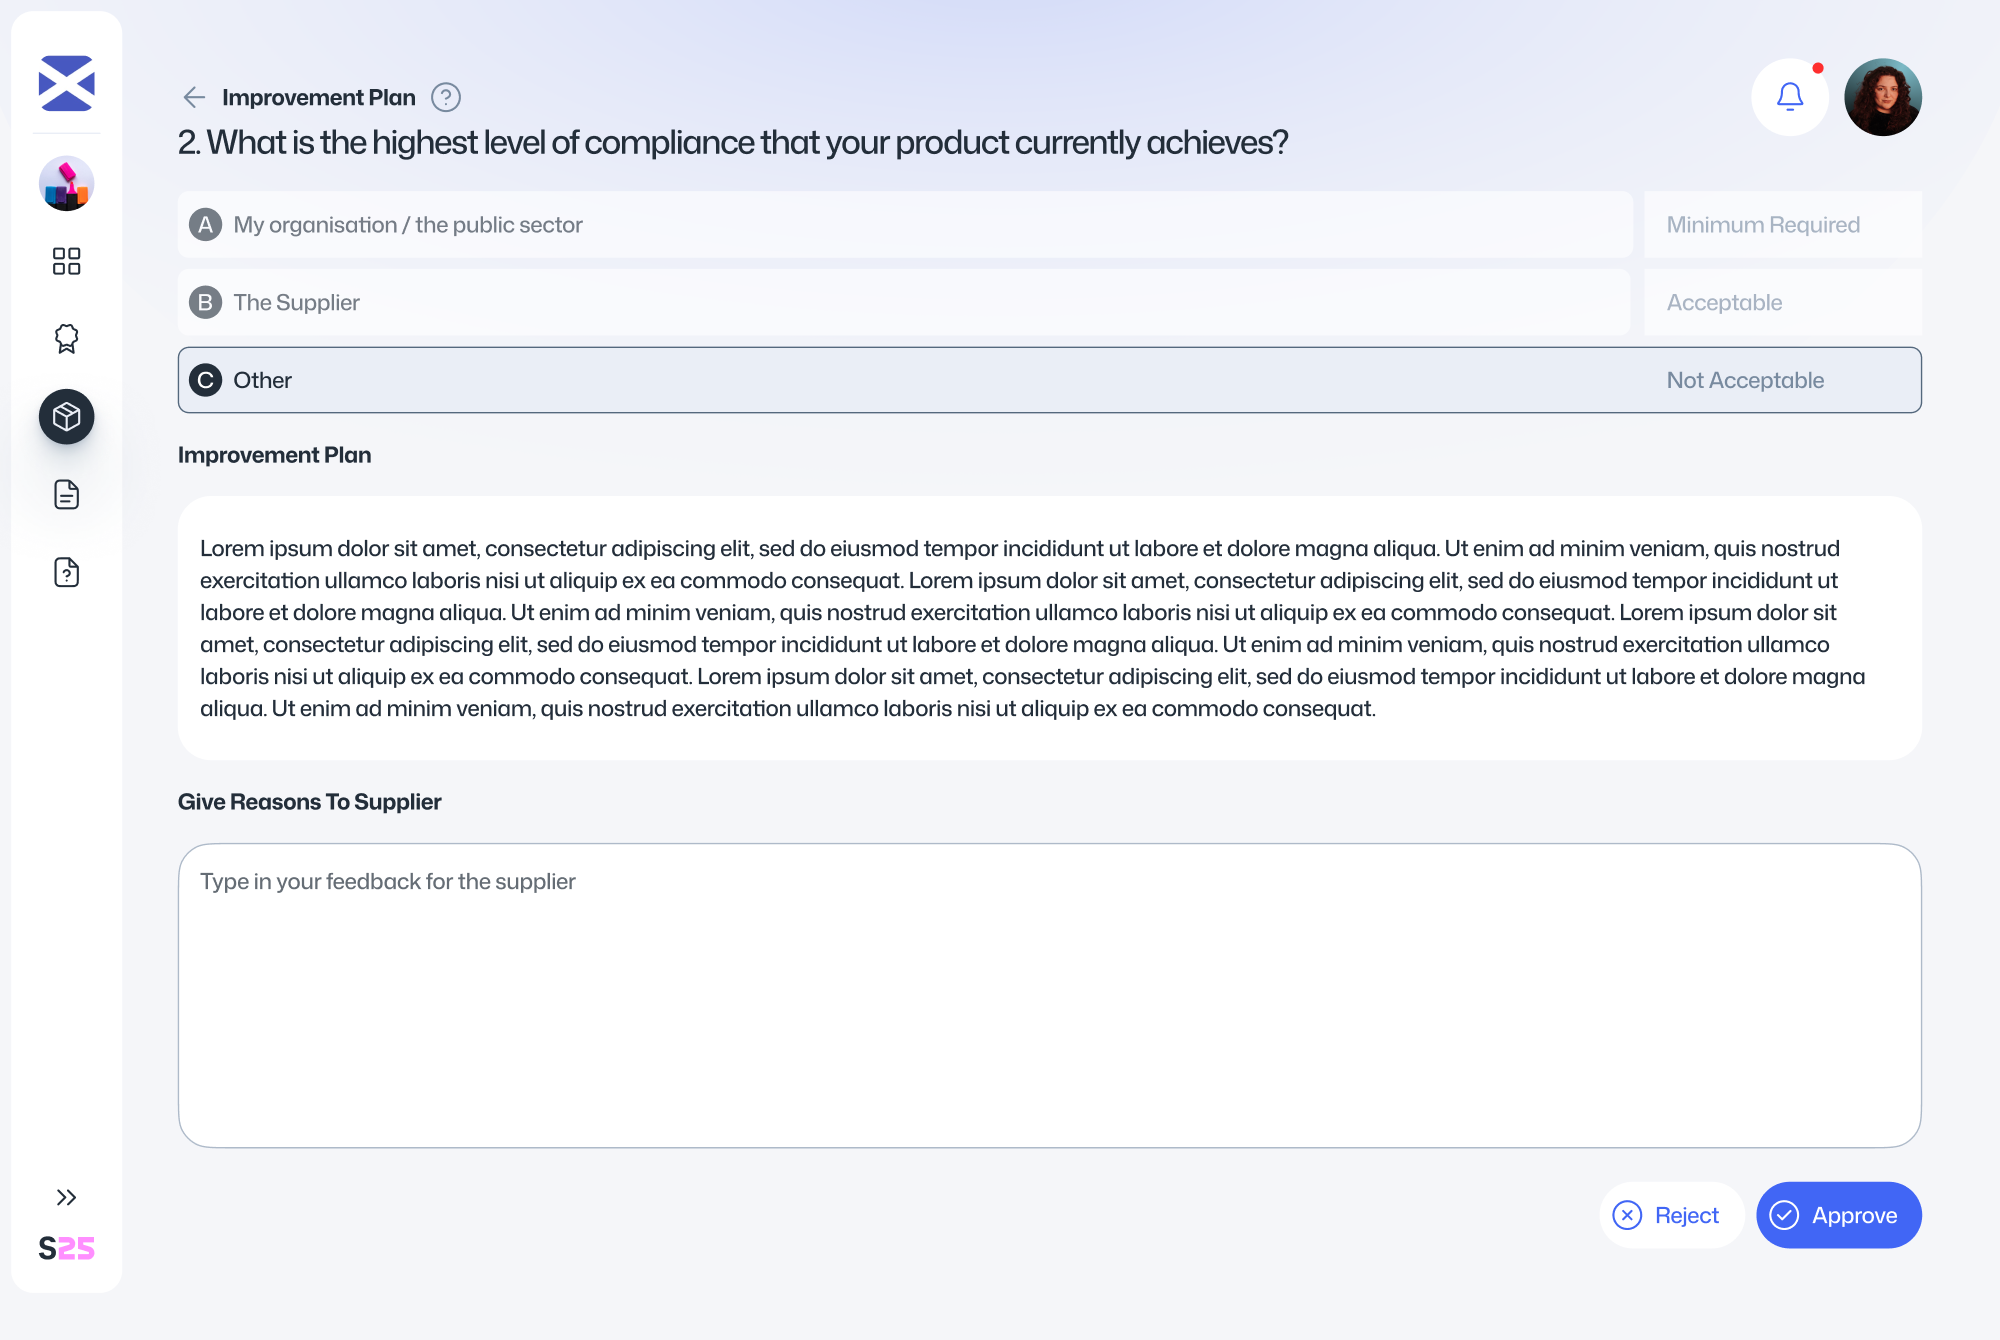
Once you’ve completed your review, the button will change to View & Edit, allowing you to revisit and update your decisions at any time before the procurement process is finalised.
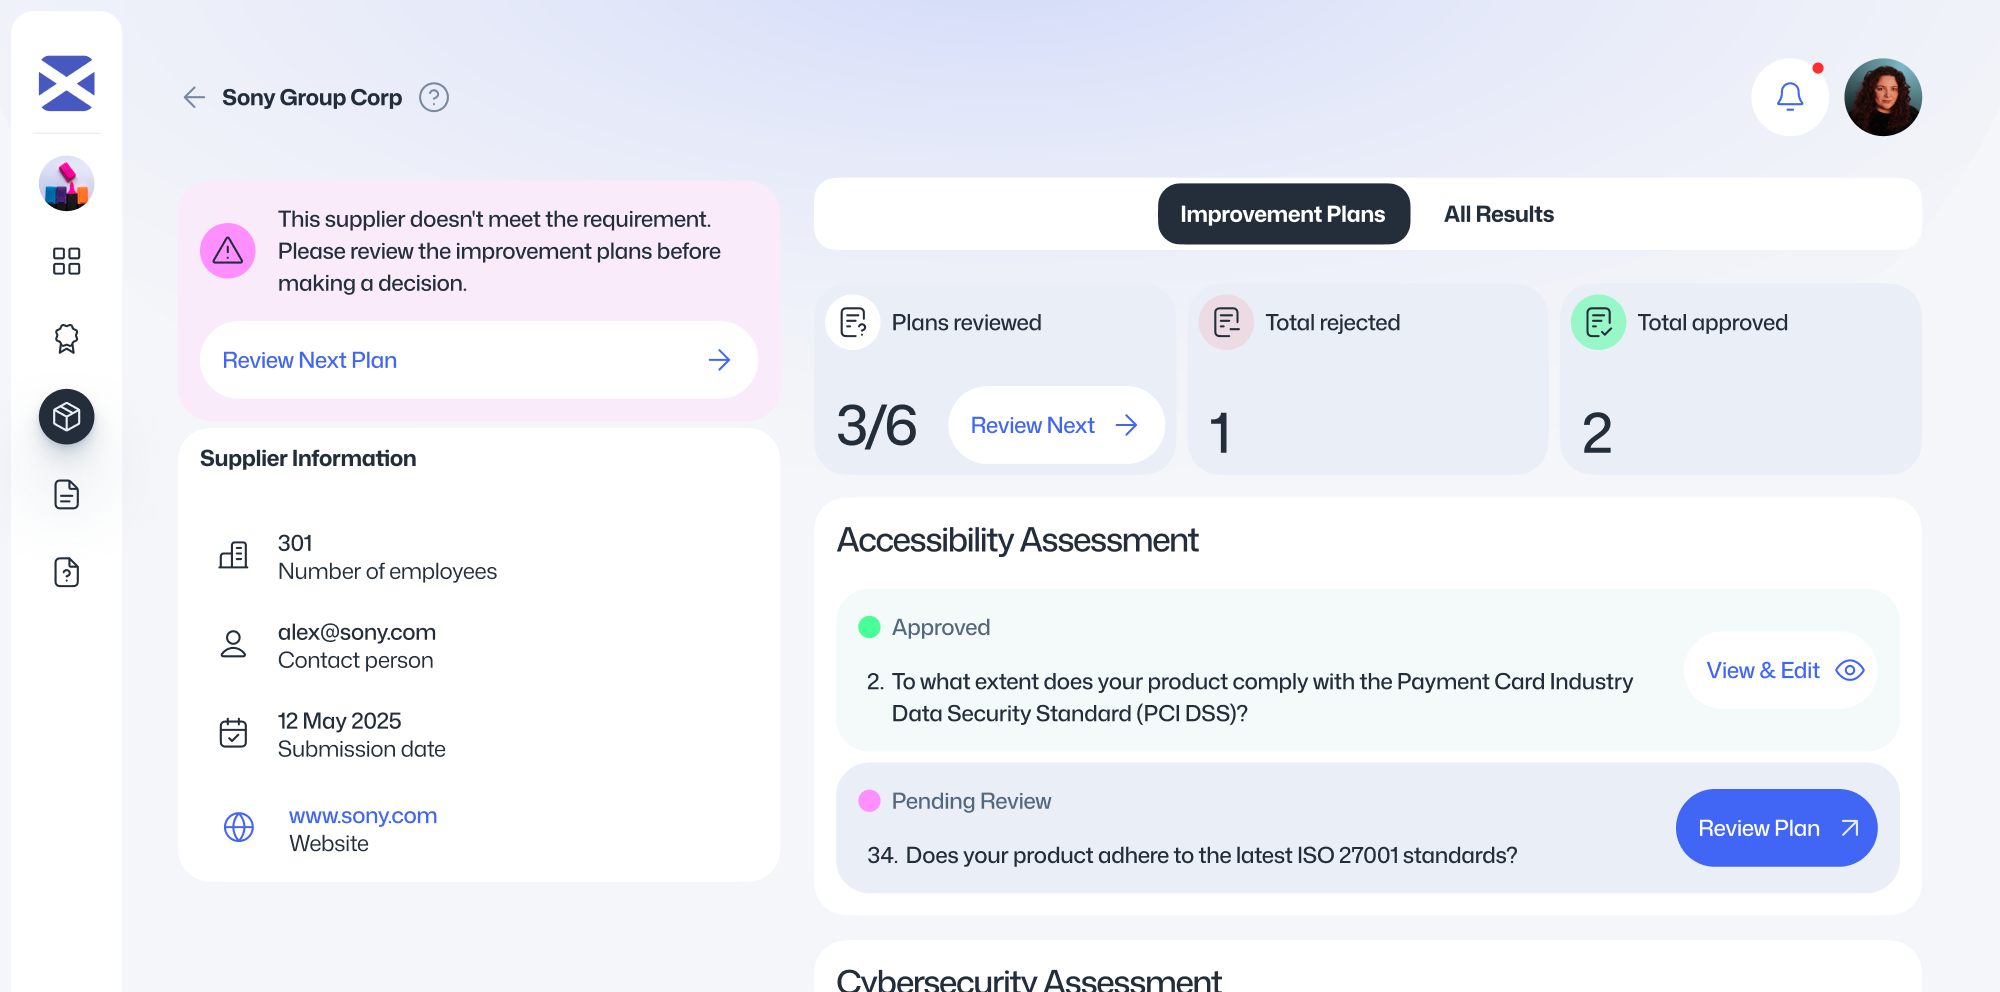
When all assessments that require review have been reviewed, their status will change and no further action is needed.
Once all Improvement Plans have been reviewed, you will see that no more Improvement Plans have the Requires Review status and the Requires Review column will be empty. At that point, you’ll have a clear view of which suppliers have met the requirements and are ready to move forward to the next stage of your evaluation process.
FAQs
Getting Started
How do I join the platform?
You will receive an invitation email from your organisation. Click the link in the email to create your account and set up your login credentials.
Alternatively, you can sign up directly using your work email. If your organisation has enabled open access, Supply25 will recognise your email domain and automatically connect you to the correct organisation and workspaces.
What are the system requirements to use Supply25?
Supply25 works on all modern web browsers, including Chrome, Firefox, Edge, and Safari. For the best experience, we recommend using the latest version of your browser.
Why can’t I join more than one organisation?
You can. Supply25 now supports users being part of multiple organisations. You can switch between them as needed from your account menu.
Can I collaborate with colleagues on Supply25?
Yes. Admins can invite team members to join their organisation directly from the platform.
You can also invite guests to collaborate on individual Assessment Packages. See the section titled Inviting guests to an Assessment Package in this guide for more details.
Logging In
What if I forget my password?
Click the Forgot your password? link on the login page. Follow the instructions sent to your email to reset your password securely.
What is an MFA app, and why do I need it?
A Multi-Factor Authentication (MFA) app, like Google Authenticator or Microsoft Authenticator, adds an extra layer of security when logging in. After entering your email and password, you’ll be asked to enter a one-time passcode from the app.
These apps only generate random codes and do not monitor your phone or access your personal data.
How do I set up an MFA app?
During your first login or account setup, you’ll be prompted to scan a QR code using your chosen MFA app. Once scanned, the app will begin generating timebased passcodes for your Supply25 account.
For detailed steps, refer to the Creating an account section in this guide.
Which MFA apps do you recommend?
We recommend using Google Authenticator or Microsoft Authenticator. Both are free, widely supported, and work well with Supply25.
What should I do if my MFA passcode isn’t working?
Check that your device’s clock is accurate – MFA codes are time-sensitive. If you’re still having trouble, contact our support team at support@supply25.com.
What happens if I lose access to my MFA app?
If you lose access to your MFA app or device, contact support@supply25.com as soon as possible. We’ll help you securely regain access to your account.
Can I use the platform on multiple devices?
Supply25 is currently optimised for desktop use only.
Using Supply25
What is an Assessment Package?
An Assessment Package is created and activated on Supply25 by a buying organisation. It brings together all the assessments that suppliers must complete as part of their bid for a specific tender.
All bidding suppliers must complete every assessment in the package and submit their responses before the deadline. Once published, suppliers access the assessments via a unique link.
Assessment Packages help buyers apply clear, standardised criteria when evaluating suppliers during the procurement process.
How does an Assessment Package work?
Assessment Packages are used to manage supplier assessments and support the evaluation stage of a procurement.
Creating & Activating an Assessment Package
You can create a new Assessment Package from your dashboard. Start by entering basic information about the contract, including the name, reference ID, description, and submission deadline.
Next, choose the assessments you want suppliers to complete. Some assessments, such as the Cyber Security Assessment, require additional configuration before the package can be activated.
Once activated, Supply25 generates a unique URL that suppliers use to access and submit their assessments. You can share this link with suppliers in your tender documentation.
What is an Improvement Plan?
If a supplier does not meet the minimum requirements of an assessment, you can choose to allow them to submit an Improvement Plan. This gives them the opportunity to outline how they will meet the unmet requirements within agreed timescales.
Improvement Plans are optional and entirely at the buyer’s discretion.
Reviewing Assessment Packages
After the submission deadline, you can view all supplier responses and evaluate them individually.
If an Improvement Plan has been submitted, you can accept or reject each one based on whether it provides a credible and acceptable path to meeting the contract requirements. You’ll be asked to provide a brief reason for each decision to support your own internal review and audit.
Suppliers will not see these reasons — they are only visible within your organisation.
Can I change the deadline date?
Yes. You can update the submission deadline at any time before it passes.
See the section How do I change the deadline? for full instructions.
Why do assessments open in a new tab?
To keep things simple. All assessments run on a separate site, so opening them in a new tab ensures you don’t lose your progress in the main app. Close the tab anytime to go right back to what you were doing.
Once you’re finished, you can close the tab or return to the Supply25 platform using the link provided at the top of the assessment page.
Can I save my work and come back to it later?
Yes. Supply25 automatically saves your work as you go, so you can safely close your browser and return at any time without losing progress.
What is a Risk Profile Assessment, and why do I need to complete it?
The Risk Profile Assessment (RPA) helps determine the level of cyber risk for your contract – Low, Moderate, or High.
If you include a Cyber Security Assessment in your Assessment Package, you’ll need to complete the RPA first so the platform can generate the correct version of the Supplier Assurance Questionnaire.
See the Cyber Security Assessment section for a step-by-step guide.
What is a Supplier Assurance Questionnaire?
The Supplier Assurance Questionnaire (SAQ) is the Cyber Security Assessment that suppliers complete as part of their bid.
It is automatically generated based on the answers provided in the Risk Profile Assessment completed by the buying organisation.
For more details, see the How does the Cyber Security Assessment work? section of this guide.
What does it mean to "activate" an Assessment Package?
Activating an Assessment Package generates a unique URL link containing all the assessments suppliers need to complete.
Once activated, the package is open for supplier submissions. You can share the URL link in your Invitation to Tender or by another method, depending on your procurement process.
How do I send the assessments to suppliers?
After you publish an Assessment Package, a URL link is generated. You can:
- Copy the link from the final screen after publishing, or
- Access it at any time from the individual Assessment Package page.
Refer to the Managing your Assessment Package section in this guide for full instructions.
What happens when the deadline date passes?
After the submission deadline, you can review all supplier assessments directly on the Supply25 platform.
Depending on your instructions, suppliers may also submit supporting documents (such as PDF versions of their assessments) through your normal procurement channels, like Public Contracts Scotland.
You can choose to review submissions offline or use the platform for a more streamlined review process with a built-in audit trail.
How do I review submissions?
See the Reviewing Submissions section in this guide for step-by-step instructions on how to assess supplier responses and Improvement Plans.
What happens when I finish reviewing all submissions?
Once all submissions have been reviewed, the Assessment Package summary page will clearly show which suppliers meet the requirements and are ready to progress to the next stage of your evaluation process.
Feedback
Your feedback plays a key role in helping us improve Supply25. Whether you’ve come across a bug, have a suggestion for improvement, or simply want to share your thoughts, we’d love to hear from you.
How to Provide Feedback
Use our feedback form to tell us about your experience. You can include:
- What’s working well – Features or functionality you’ve found helpful.
- What could be improved – Suggestions, ideas, or areas that need refinement.
- Any issues – Bugs, errors, or anything unexpected.
- Attach screenshots or files if it helps explain your feedback.
What Happens Next?
- All feedback is reviewed by our team.
- Bug reports and critical issues are prioritised for resolution.
- Suggestions are logged and assessed for possible inclusion in future updates.
- Thank you for helping us make Supply25 better. Every piece of feedback helps shape the platform and improve the experience for everyone.
Glossary
This section provides quick definitions of key terms and features used in Supply25.
Assessment Package
A group of assessments created by a buying organisation for suppliers to complete as part of their bid for a specific tender.
Improvement Plan
A response submitted by a supplier who does not initially meet minimum requirements. It outlines how they plan to meet those requirements within an agreed timescale.
Multi-Factor Authentication (MFA)
A security feature that requires users to verify their identity using two methods — typically a password and a one-time passcode from an authentication app (like Google or Microsoft Authenticator).
Risk Profile Assessment (RPA)
A short assessment completed by the buying organisation to determine the cyber risk level of a contract. It must be completed before a Supplier Assurance Questionnaire can be generated.
Supplier Assurance Questionnaire (SAQ)
The Cyber Security Assessment that suppliers complete as part of their bid. It is automatically generated based on the outcome of the Risk Profile Assessment and tailored to the contract’s risk level.
Organisation Admin
A user with administrative rights within an organisation’s account. Admins can manage users, configure Assessment Packages, and invite team members.